---
title: Add or remove data tiers in Elastic Cloud Hosted or Elastic Cloud Enterprise
description: Add or remove warm, cold, or frozen data tiers in Elastic Cloud Hosted or Elastic Cloud Enterprise, including safe removal with shard migration.
url: https://docs-v3-preview.elastic.dev/elastic/docs-content/pull/6243/manage-data/lifecycle/data-tiers/manage-data-tiers-ech-ece
products:
- Elastic Cloud Enterprise
- Elastic Cloud Hosted
- Elasticsearch
applies_to:
- Elastic Cloud Hosted: Generally available
- Elastic Cloud Enterprise: Generally available
---
# Add or remove data tiers in Elastic Cloud Hosted or Elastic Cloud Enterprise
In Elastic Cloud Hosted and Elastic Cloud Enterprise, you add **warm**, **cold**, or **frozen** capacity from the deployment editor, and you remove a tier only after data can migrate away safely. The default configuration includes a shared tier for hot and content data; that tier is required and cannot be removed.
## Add a data tier
Review [Elasticsearch data tiers](https://docs-v3-preview.elastic.dev/elastic/docs-content/pull/6243/manage-data/lifecycle/data-tiers) so you choose the right tier for your workload.
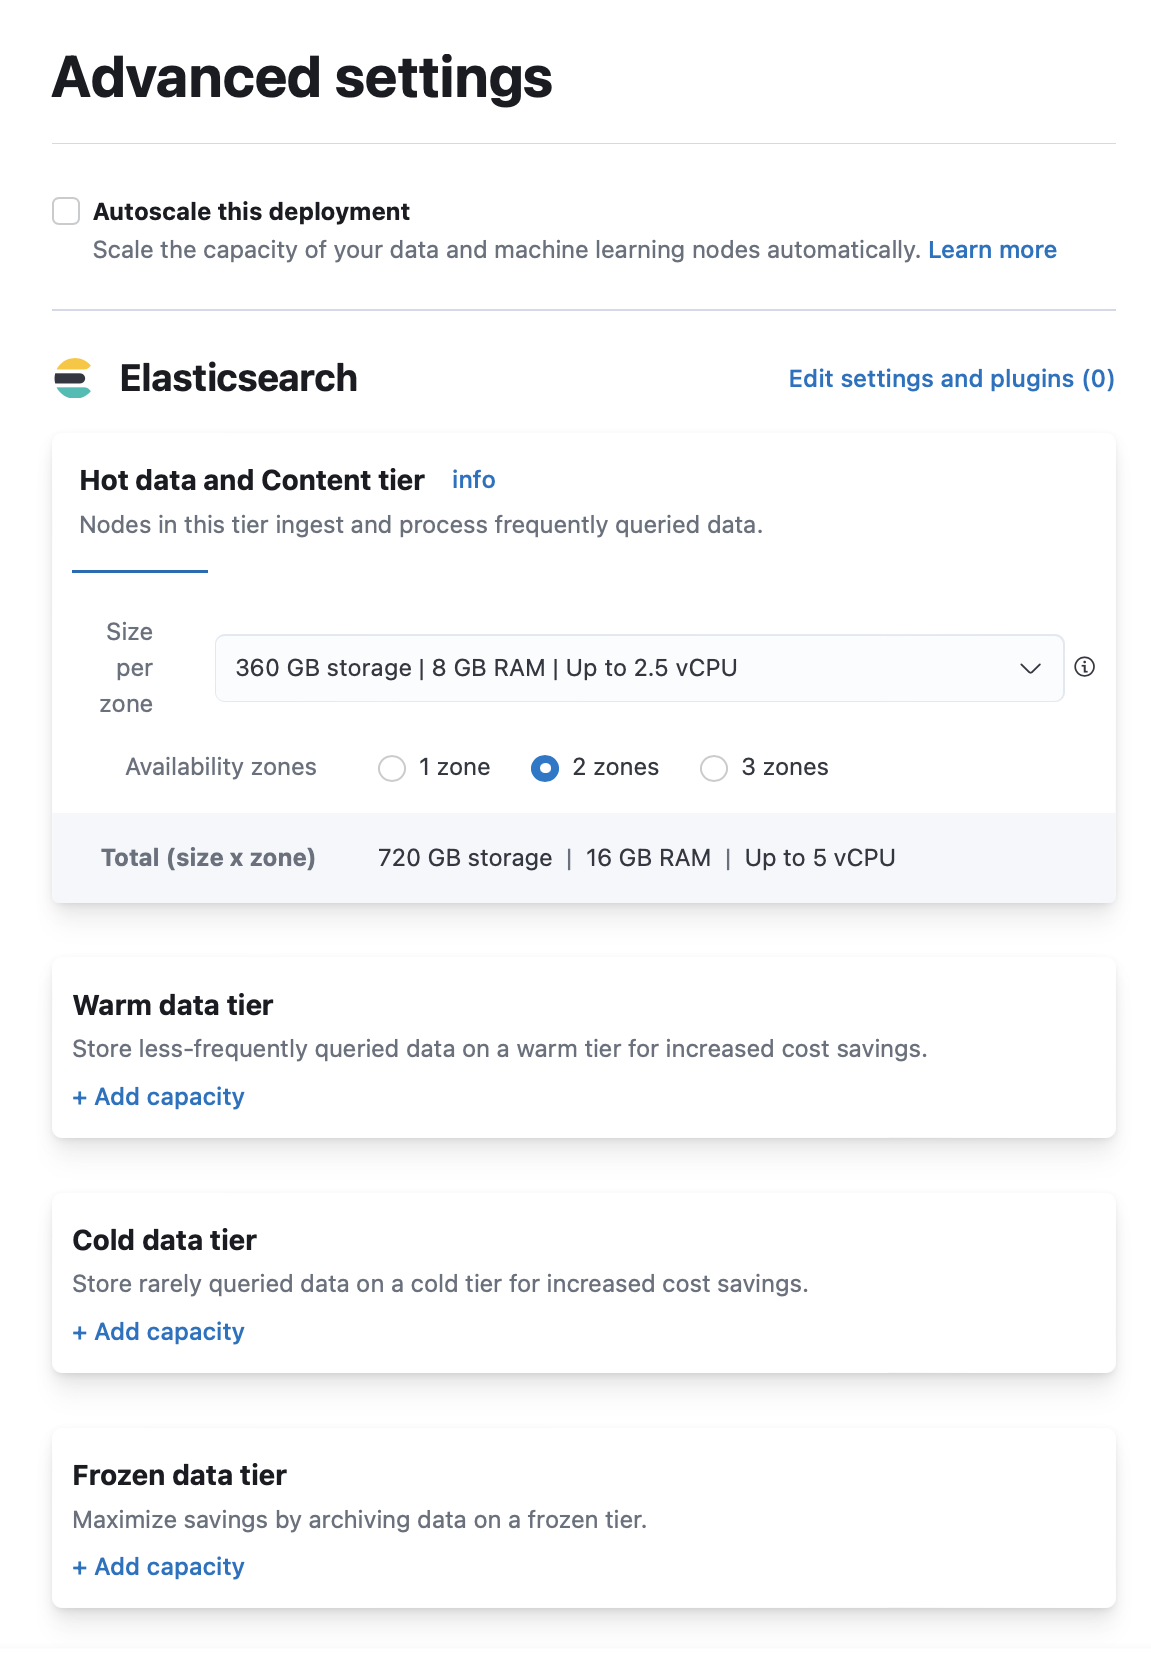
### Add capacity when you create a deployment
1. On the **Create deployment** page, click **Advanced Settings**.
2. Click **+ Add capacity** for any data tiers to add.
3. Click **Create deployment** at the bottom of the page to save your changes.
### Add capacity to an existing deployment
1. Log in to the [Elastic Cloud Console](https://cloud.elastic.co?page=docs&placement=docs-body) or ECE [Cloud UI](https://docs-v3-preview.elastic.dev/elastic/docs-content/pull/6243/deploy-manage/deploy/cloud-enterprise/log-into-cloud-ui).
2. On the home page, find your deployment.
If you have many deployments, you can instead go to the **Hosted deployments** (Elastic Cloud Hosted) or **Deployments** (Elastic Cloud Enterprise) page. On that page, you can narrow your deployments by name, ID, or choose from several other filters.
3. Select **Manage**.
1. From the navigation menu, select **Edit**.
2. Click **+ Add capacity** for any data tiers to add.
3. Click **Save** at the bottom of the page to save your changes.
## Remove a data tier
Follow this section when you need to remove a data tier from an Elastic Cloud Hosted or Elastic Cloud Enterprise deployment. The steps differ depending on whether the tier holds [regular indices](#non-searchable-snapshot-data-tier) or [searchable snapshot](#searchable-snapshot-data-tier) indices (typical for cold or frozen when using index lifecycle management (ILM)).
### Before you remove a data tier
Disabling a data tier, attempting to scale nodes down in size, reducing availability zones, or reverting an [autoscaling](https://docs-v3-preview.elastic.dev/elastic/docs-content/pull/6243/deploy-manage/autoscaling) change can all result in cluster instability, cluster inaccessibility, and even data corruption or loss in extreme cases.To avoid this, especially for [production environments](https://docs-v3-preview.elastic.dev/elastic/docs-content/pull/6243/deploy-manage/production-guidance), and in addition to making configuration changes to your indices and ILM as described in this guide:
- Review the disk size, CPU, JVM memory pressure, and other [performance metrics](https://docs-v3-preview.elastic.dev/elastic/docs-content/pull/6243/deploy-manage/monitor/access-performance-metrics-on-elastic-cloud) of your deployment **before** attempting to perform the scaling down action.
- Make sure that you have enough resources and [availability zones](https://docs-v3-preview.elastic.dev/elastic/docs-content/pull/6243/deploy-manage/production-guidance/availability-and-resilience) to handle your workloads after scaling down.
- Check that your [deployment hardware profile](https://docs-v3-preview.elastic.dev/elastic/docs-content/pull/6243/deploy-manage/deploy/elastic-cloud/ec-change-hardware-profile) (for Elastic Cloud Hosted) or [deployment template](https://docs-v3-preview.elastic.dev/elastic/docs-content/pull/6243/deploy-manage/deploy/cloud-enterprise/configure-deployment-templates) (for Elastic Cloud Enterprise) is correct for your business use case. For example, if you need to scale due to CPU pressure increases and are using a *Storage Optimized* hardware profile, consider switching to a *CPU Optimized* configuration instead.
Read [[https://www.elastic.co/cloud/shared-responsibility](https://www.elastic.co/cloud/shared-responsibility)](https://www.elastic.co/cloud/shared-responsibility) for additional details.
If in doubt, reach out to Support.
- Know whether you are disabling a tier that stores regular indices or searchable snapshots. The frozen tier only holds [partially mounted](/elastic/docs-content/pull/6243/deploy-manage/tools/snapshot-and-restore/searchable-snapshots#partially-mounted) searchable snapshots. The cold tier can hold regular indices or [fully mounted](/elastic/docs-content/pull/6243/deploy-manage/tools/snapshot-and-restore/searchable-snapshots#fully-mounted) searchable snapshots. The hot tier usually holds regular indices, but an ILM policy can mount a fully mounted searchable snapshot on the hot tier (for example, when the [searchable_snapshot](https://docs-v3-preview.elastic.dev/elastic/elasticsearch/tree/main/reference/elasticsearch/index-lifecycle-actions/ilm-searchable-snapshot) action runs in the `hot` phase). Use these requests to check for searchable snapshot indices on the tier you are removing:
```sh
# cold data tier: {{search-snap}} indices
GET /_cat/indices/restored-*
# frozen data tier: {{search-snap}} indices
GET /_cat/indices/partial-*
```
- To learn more about ILM or shard allocation filtering, see [Create your index lifecycle policy](https://docs-v3-preview.elastic.dev/elastic/docs-content/pull/6243/manage-data/lifecycle/index-lifecycle-management/configure-lifecycle-policy), [Managing the index lifecycle](https://docs-v3-preview.elastic.dev/elastic/docs-content/pull/6243/manage-data/lifecycle/index-lifecycle-management), and [Shard allocation filters](https://docs-v3-preview.elastic.dev/elastic/docs-content/pull/6243/deploy-manage/distributed-architecture/shard-allocation-relocation-recovery/index-level-shard-allocation).
### Remove a tier with regular indices
The frozen tier only stores [partially mounted](/elastic/docs-content/pull/6243/deploy-manage/tools/snapshot-and-restore/searchable-snapshots#partially-mounted) searchable snapshots. [Fully mounted](/elastic/docs-content/pull/6243/deploy-manage/tools/snapshot-and-restore/searchable-snapshots#fully-mounted) searchable snapshots can be allocated to the hot or cold tier depending on the ILM phase, while the cold tier can also hold regular indices. Use the checks in [Before you remove a data tier](#before-you-remove-a-data-tier) if you are unsure what is on the tier.
When you update the deployment, Elastic Cloud Hosted and Elastic Cloud Enterprise try to move all data from the nodes that are removed. To disable a tier that holds only regular indices, make sure that all data on that tier can be re-allocated by reconfiguring the relevant shard allocation filters. You’ll also need to temporarily stop your ILM policies to prevent new indices from being moved to the data tier you want to disable.
To make sure that all data can be migrated from the data tier you want to disable, follow these steps:
1. Determine which nodes will be removed from the cluster.
1. Log in to the [Elastic Cloud Console](https://cloud.elastic.co?page=docs&placement=docs-body).
2. From the **Hosted deployments** page, select your deployment.
On the **Hosted deployments** page you can narrow your deployments by name, ID, or choose from several other filters. To customize your view, use a combination of filters, or change the format from a grid to a list.
3. Filter the list of instances by the Data tier you want to disable.

Note the listed instance IDs. In this example, it would be Instance 2 and Instance 3.
1. [Log into the Cloud UI](https://docs-v3-preview.elastic.dev/elastic/docs-content/pull/6243/deploy-manage/deploy/cloud-enterprise/log-into-cloud-ui).
2. From the **Deployments** page, select your deployment.
Narrow the list by name, ID, or choose from several other filters. To further define the list, use a combination of filters.
3. Filter the list of instances by the Data tier you want to disable.
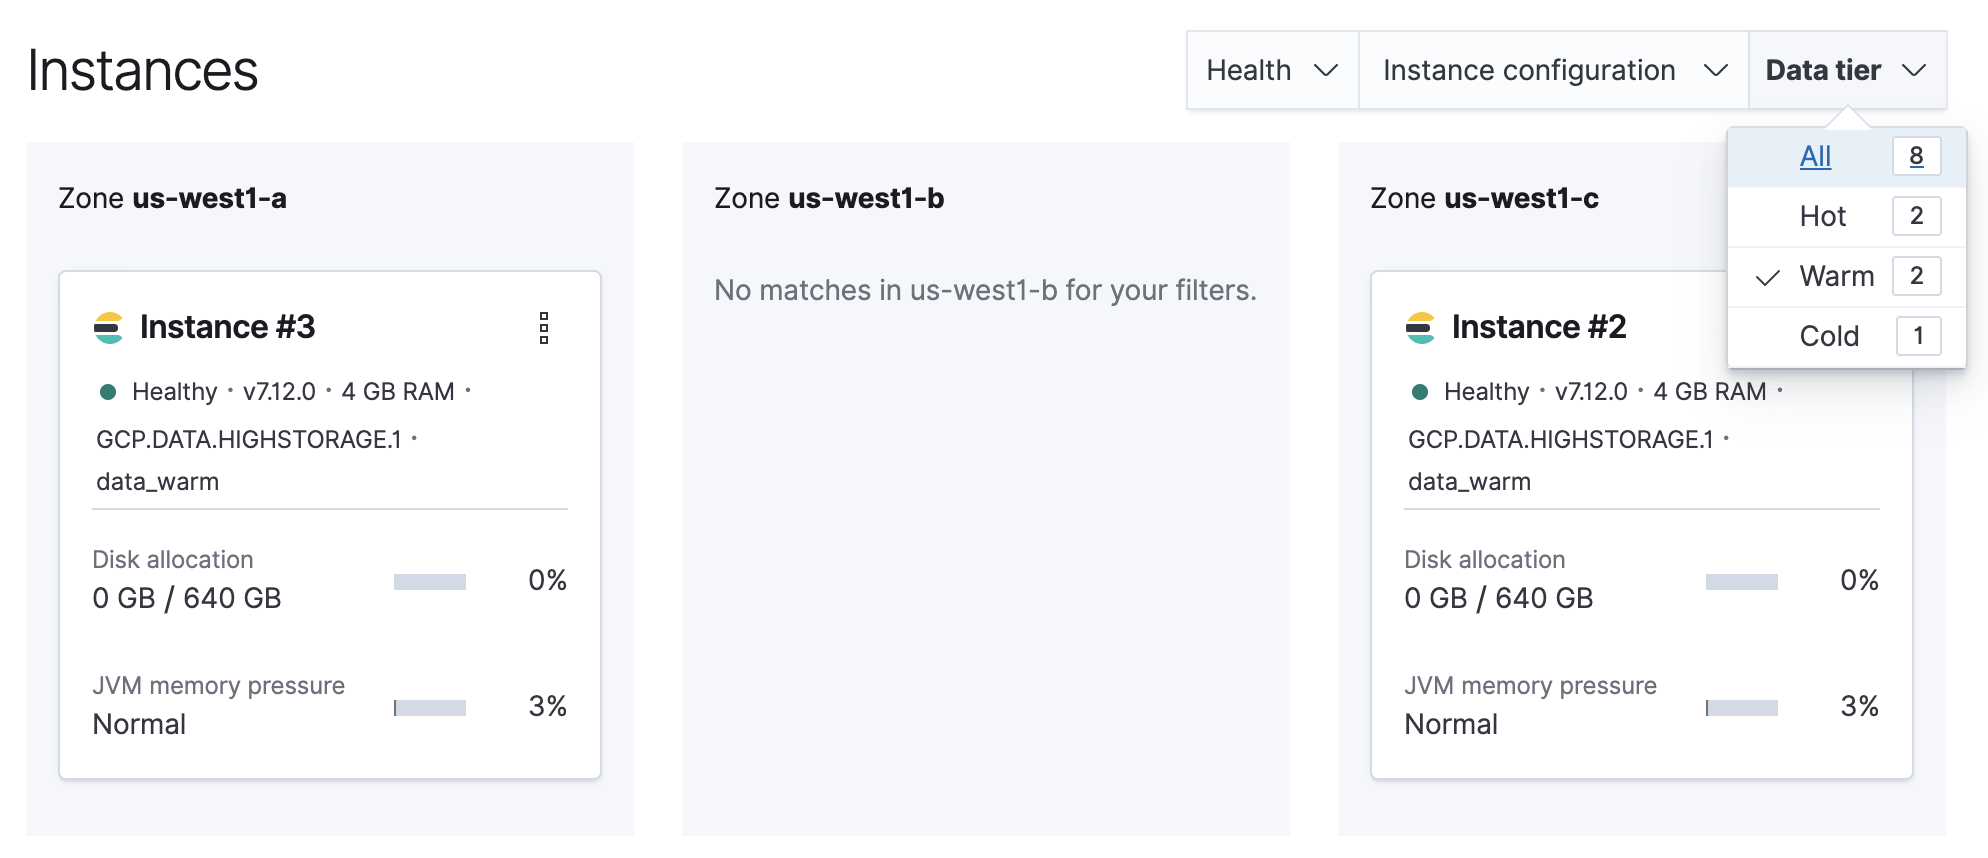
Note the listed instance IDs. In this example, it would be Instance 2 and Instance 3.
2. Stop ILM.
```sh
POST /_ilm/stop
```
3. Determine which shards need to be moved.
```sh
GET /_cat/shards
```
Parse the output, looking for shards allocated to the nodes to be removed from the cluster. `Instance #2` is shown as `instance-0000000002` in the output.

4. Move shards off the nodes to be removed from the cluster.
You must remove any [index-level shard allocation filters](https://docs-v3-preview.elastic.dev/elastic/docs-content/pull/6243/deploy-manage/distributed-architecture/shard-allocation-relocation-recovery/index-level-shard-allocation) from the indices on the nodes to be removed. ILM uses different rules depending on the policy and version of Elasticsearch. Check the index settings to determine which rule to use:
```sh
GET /my-index/_settings
```
1. Updating data tier based allocation inclusion rules.
Data tier based ILM policies use `index.routing.allocation.include` to allocate shards to the appropriate tier. The indices that use this method have index routing settings similar to the following example:
```sh
{
...
"routing": {
"allocation": {
"include": {
"_tier_preference": "data_warm,data_hot"
}
}
}
...
}
```
You must remove the relevant tier from the inclusion rules. For example, to disable the warm tier, remove the `data_warm` parameter and set `_tier_preference` to a tier you are keeping. Prefer promoting data through the lifecycle, for example from warm to cold, not back to hot, unless the cluster has no colder tier to accept the data:
```sh
PUT /my-index/_settings
{
"routing": {
"allocation": {
"include": {
"_tier_preference": "data_cold,data_warm,data_hot"
}
}
}
}
```
Updating allocation inclusion rules will trigger a shard re-allocation, moving the shards from the nodes to be removed.
2. Updating node attribute allocation requirement rules.
Node attribute based ILM policies use `index.routing.allocation.require` to allocate shards to the appropriate nodes. The indices that use this method have index routing settings that are similar to the following example:
```sh
{
...
"routing": {
"allocation": {
"require": {
"data": "warm"
}
}
}
...
}
```
You must either remove or redefine the routing requirements. To remove the attribute requirements, use the following code:
```sh
PUT /my-index/_settings
{
"routing": {
"allocation": {
"require": {
"data": null
}
}
}
}
```
Removing required attributes does not trigger a shard reallocation. These shards are moved when applying the plan to disable the data tier. Alternatively, you can use the [cluster re-route API](https://www.elastic.co/docs/api/doc/elasticsearch/operation/operation-cluster-reroute) to manually re-allocate the shards before removing the nodes, or set `require` to migrate shards to a desired tier. For example, to force an index to nodes with `data` attribute of `cold`, use the following request:
```sh
PUT /my-index/_settings
{
"routing": {
"allocation": {
"require": {
"data": "cold"
}
}
}
}
```
Adjust the `data` value to match the [custom node attributes](https://docs-v3-preview.elastic.dev/elastic/elasticsearch/tree/main/reference/elasticsearch/configuration-reference/node-settings#custom-node-attributes) and [index-level shard allocation filters](https://docs-v3-preview.elastic.dev/elastic/elasticsearch/tree/main/reference/elasticsearch/index-settings/shard-allocation) your indices already use. You cannot send regular indices to the frozen tier.
3. Removing custom allocation rules.
If indices on nodes to be removed have shard allocation rules of other forms, they must be removed as shown in the following example:
```sh
PUT /my-index/_settings
{
"routing": {
"allocation": {
"require": null,
"include": null,
"exclude": null
}
}
}
```
Confirm that no shards are left on the nodes to be removed after the allocation completes: `GET /_cat/shards` (filter by `node` as needed) should show that the tier is empty. Updating settings starts the relocation process, but you must wait until [shard allocation and recovery](https://docs-v3-preview.elastic.dev/elastic/docs-content/pull/6243/deploy-manage/distributed-architecture/shard-allocation-relocation-recovery) finish. If shards stay on the original tier, use the [cluster allocation explain](https://www.elastic.co/docs/api/doc/elasticsearch/operation/operation-cluster-allocation-explain) API to determine the cause. Common reasons can be [disk watermarks](https://docs-v3-preview.elastic.dev/elastic/docs-content/pull/6243/troubleshoot/elasticsearch/fix-watermark-errors) or [`index.routing.allocation.total_shards_per_node`](https://docs-v3-preview.elastic.dev/elastic/elasticsearch/tree/main/reference/elasticsearch/index-settings/total-shards-per-node#total-shards-per-node) on the destination nodes.
5. Edit the deployment, disabling the data tier.
If autoscaling is enabled, set the maximum size to 0 for the data tier to ensure autoscaling does not re-enable the data tier.
Any remaining shards on the tier being disabled are re-allocated across the remaining cluster nodes while applying the plan to disable the data tier. Monitor shard allocation during the data migration phase to ensure all allocation rules have been correctly updated. If the plan fails to migrate data away from the data tier, then re-examine the allocation rules for the indices remaining on that data tier.
6. Once the plan change completes, confirm that there are no remaining nodes associated with the disabled tier and that `GET _cluster/health` reports `green`. If this is the case, re-enable ILM.
```sh
POST _ilm/start
```
### Remove a tier with searchable snapshots
Fully mounted [searchable snapshots](/elastic/docs-content/pull/6243/deploy-manage/tools/snapshot-and-restore/searchable-snapshots#fully-mounted) on the hot or cold tier can often be moved to another remaining tier by updating the [`index.routing.allocation.include._tier_preference`](#update-data-tier-allocation-rules) setting and related [allocation rules](https://docs-v3-preview.elastic.dev/elastic/docs-content/pull/6243/deploy-manage/distributed-architecture/shard-allocation-relocation-recovery/index-level-shard-allocation) alone, without a `POST _snapshot/.../_restore` call. When Elasticsearch creates them with the [`searchable_snapshot` ILM action](https://docs-v3-preview.elastic.dev/elastic/elasticsearch/tree/main/reference/elasticsearch/index-lifecycle-actions/ilm-searchable-snapshot), the index name is typically prefixed with `restored-*`. If you [mount a snapshot yourself](https://docs-v3-preview.elastic.dev/elastic/docs-content/pull/6243/deploy-manage/tools/snapshot-and-restore/searchable-snapshots), the index name is not limited to that pattern. Use a full restore to a new regular index when you are [rehydrating](https://docs-v3-preview.elastic.dev/elastic/docs-content/pull/6243/deploy-manage/tools/snapshot-and-restore/searchable-snapshots) or when you have [partially mounted](/elastic/docs-content/pull/6243/deploy-manage/tools/snapshot-and-restore/searchable-snapshots#partially-mounted) indices on frozen and need a regular index on another tier. In a `frozen` tier, the ILM action typically uses a `partial-*` name prefix; self-managed partial mounts do not have to follow it.
When an [ILM policy’s `searchable_snapshot` action](https://docs-v3-preview.elastic.dev/elastic/elasticsearch/tree/main/reference/elasticsearch/index-lifecycle-actions/ilm-searchable-snapshot) runs in a `hot`, `cold`, or `frozen` phase, it can convert a managed index into a [searchable snapshot](https://docs-v3-preview.elastic.dev/elastic/docs-content/pull/6243/deploy-manage/tools/snapshot-and-restore/searchable-snapshots) (`restored-*` in non-frozen phases, or `partial-*` in the `frozen` phase). If the data is no longer required, the `delete` phase of the same policy can remove it. If you must retain the data while removing the tier, follow these steps:
1. Stop ILM and check ILM status is `STOPPED` to prevent data from migrating to the phase you intend to disable while you are working through the next steps.
```sh
# stop {{ilm-init}}
POST _ilm/stop
# check status
GET _ilm/status
```
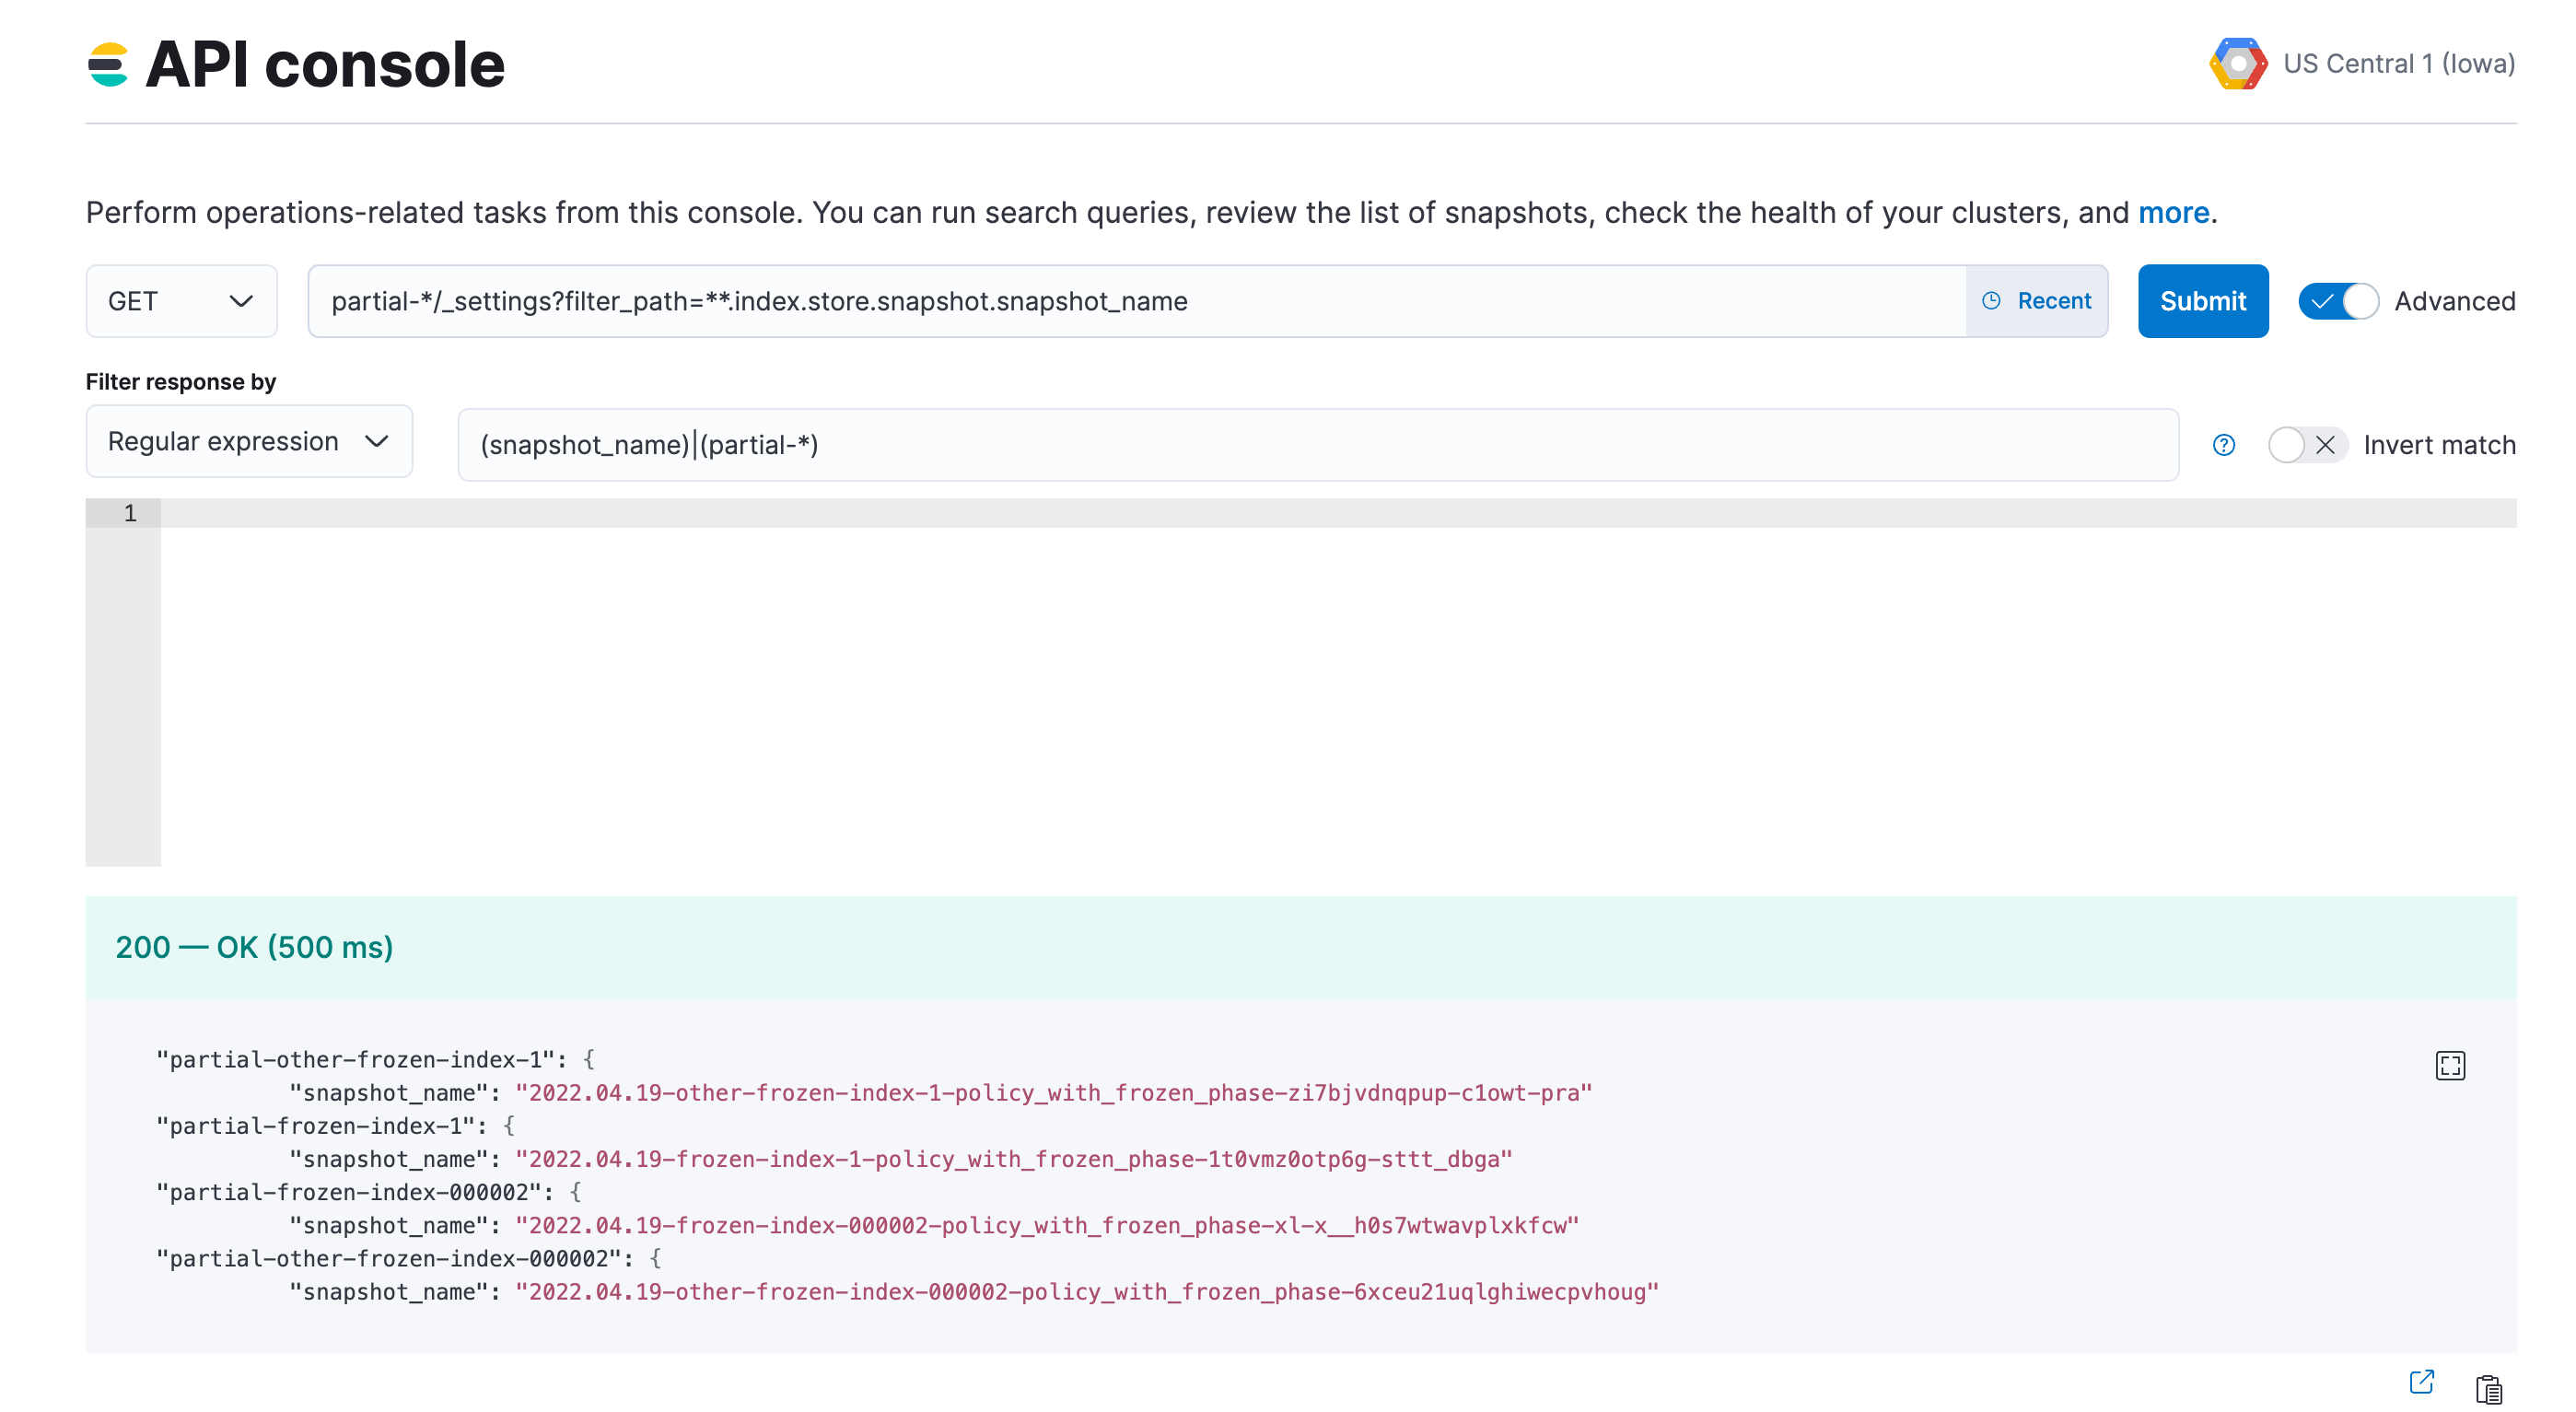
2. Capture a comprehensive list of index and searchable snapshot names, and which snapshot repository each snapshot lives in.
1. The index name of the searchable snapshots may differ based on the data tier. If you intend to disable the cold tier, use the `restored-*` prefix. If the frozen tier is the one to be disabled, use the `partial-*` prefix. If you are removing a tier that had a [searchable_snapshot](https://docs-v3-preview.elastic.dev/elastic/elasticsearch/tree/main/reference/elasticsearch/index-lifecycle-actions/ilm-searchable-snapshot) action in an earlier phase, for example during the `hot` phase, also run the same query for `restored-*` on that tier.
```sh
GET /_settings?filter_path=**.index.store.snapshot.snapshot_name&expand_wildcards=all
```
In the example we have a list of 4 indices, which need to be moved away from the frozen tier.
3. (Optional) Save the list of index and snapshot names in a text file, so you can access it throughout the rest of the process.
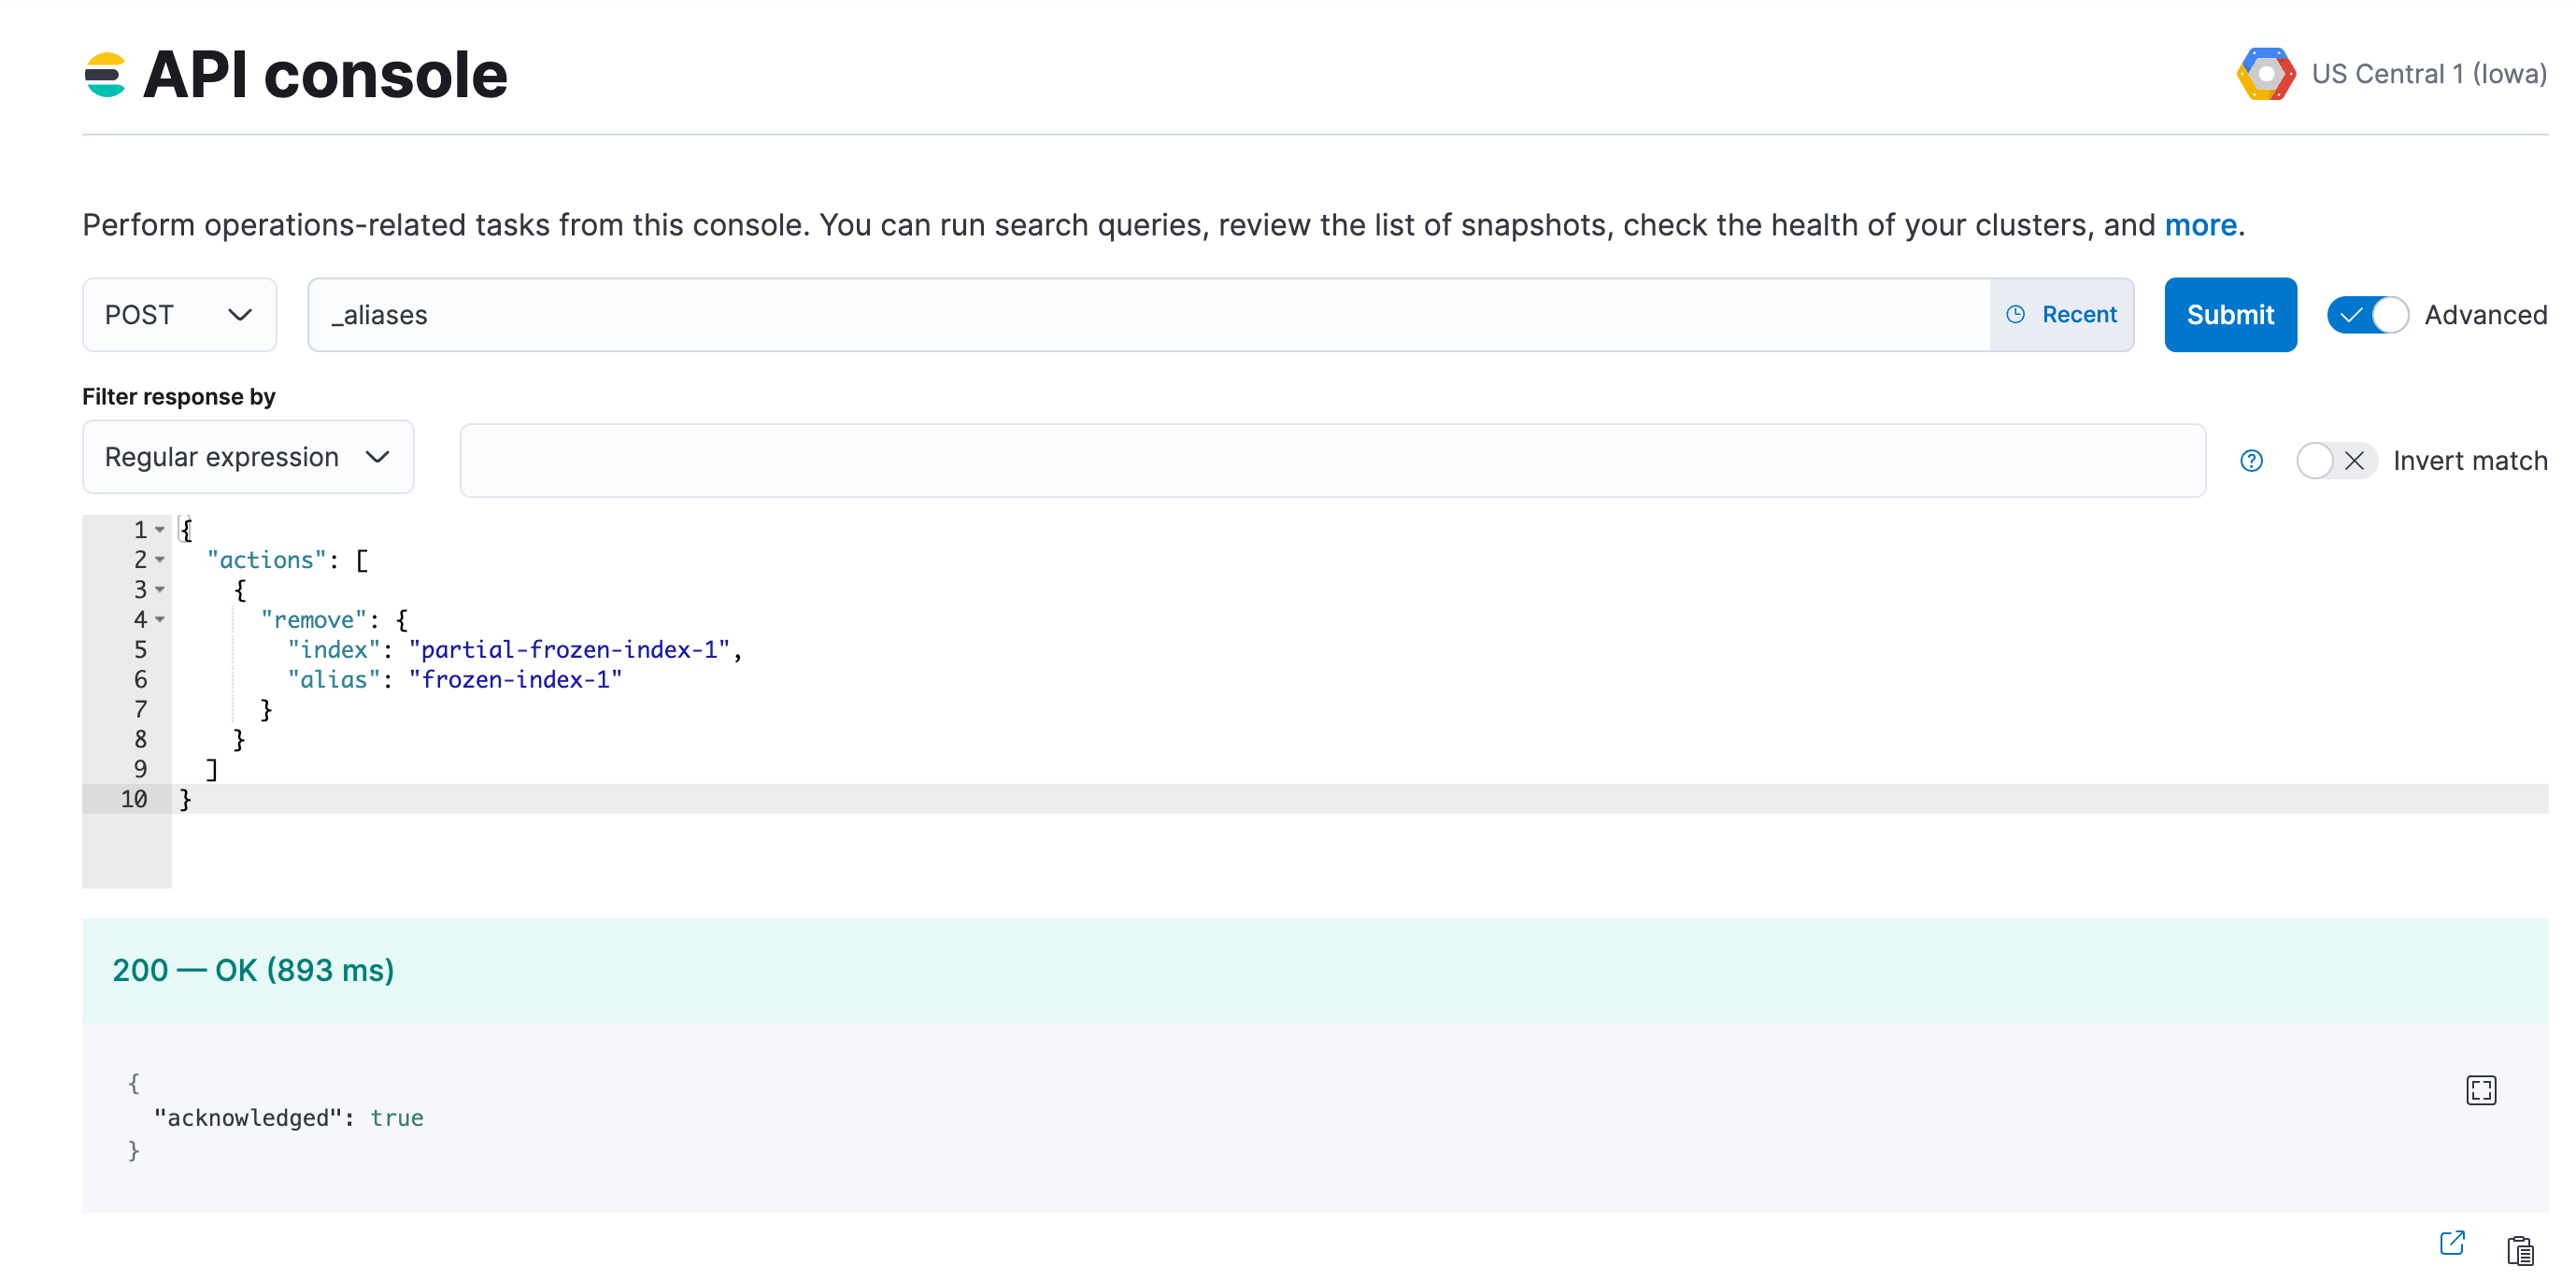
4. Remove the aliases that were applied to searchable snapshots indices. Use the index prefix from step 2.
```sh
POST _aliases
{
"actions": [
{
"remove": {
"index": "-",
"alias": ""
}
}
]
}
```
If you use data stream, you can skip this step.
In the example we are removing the alias for the `frozen-index-1` index.
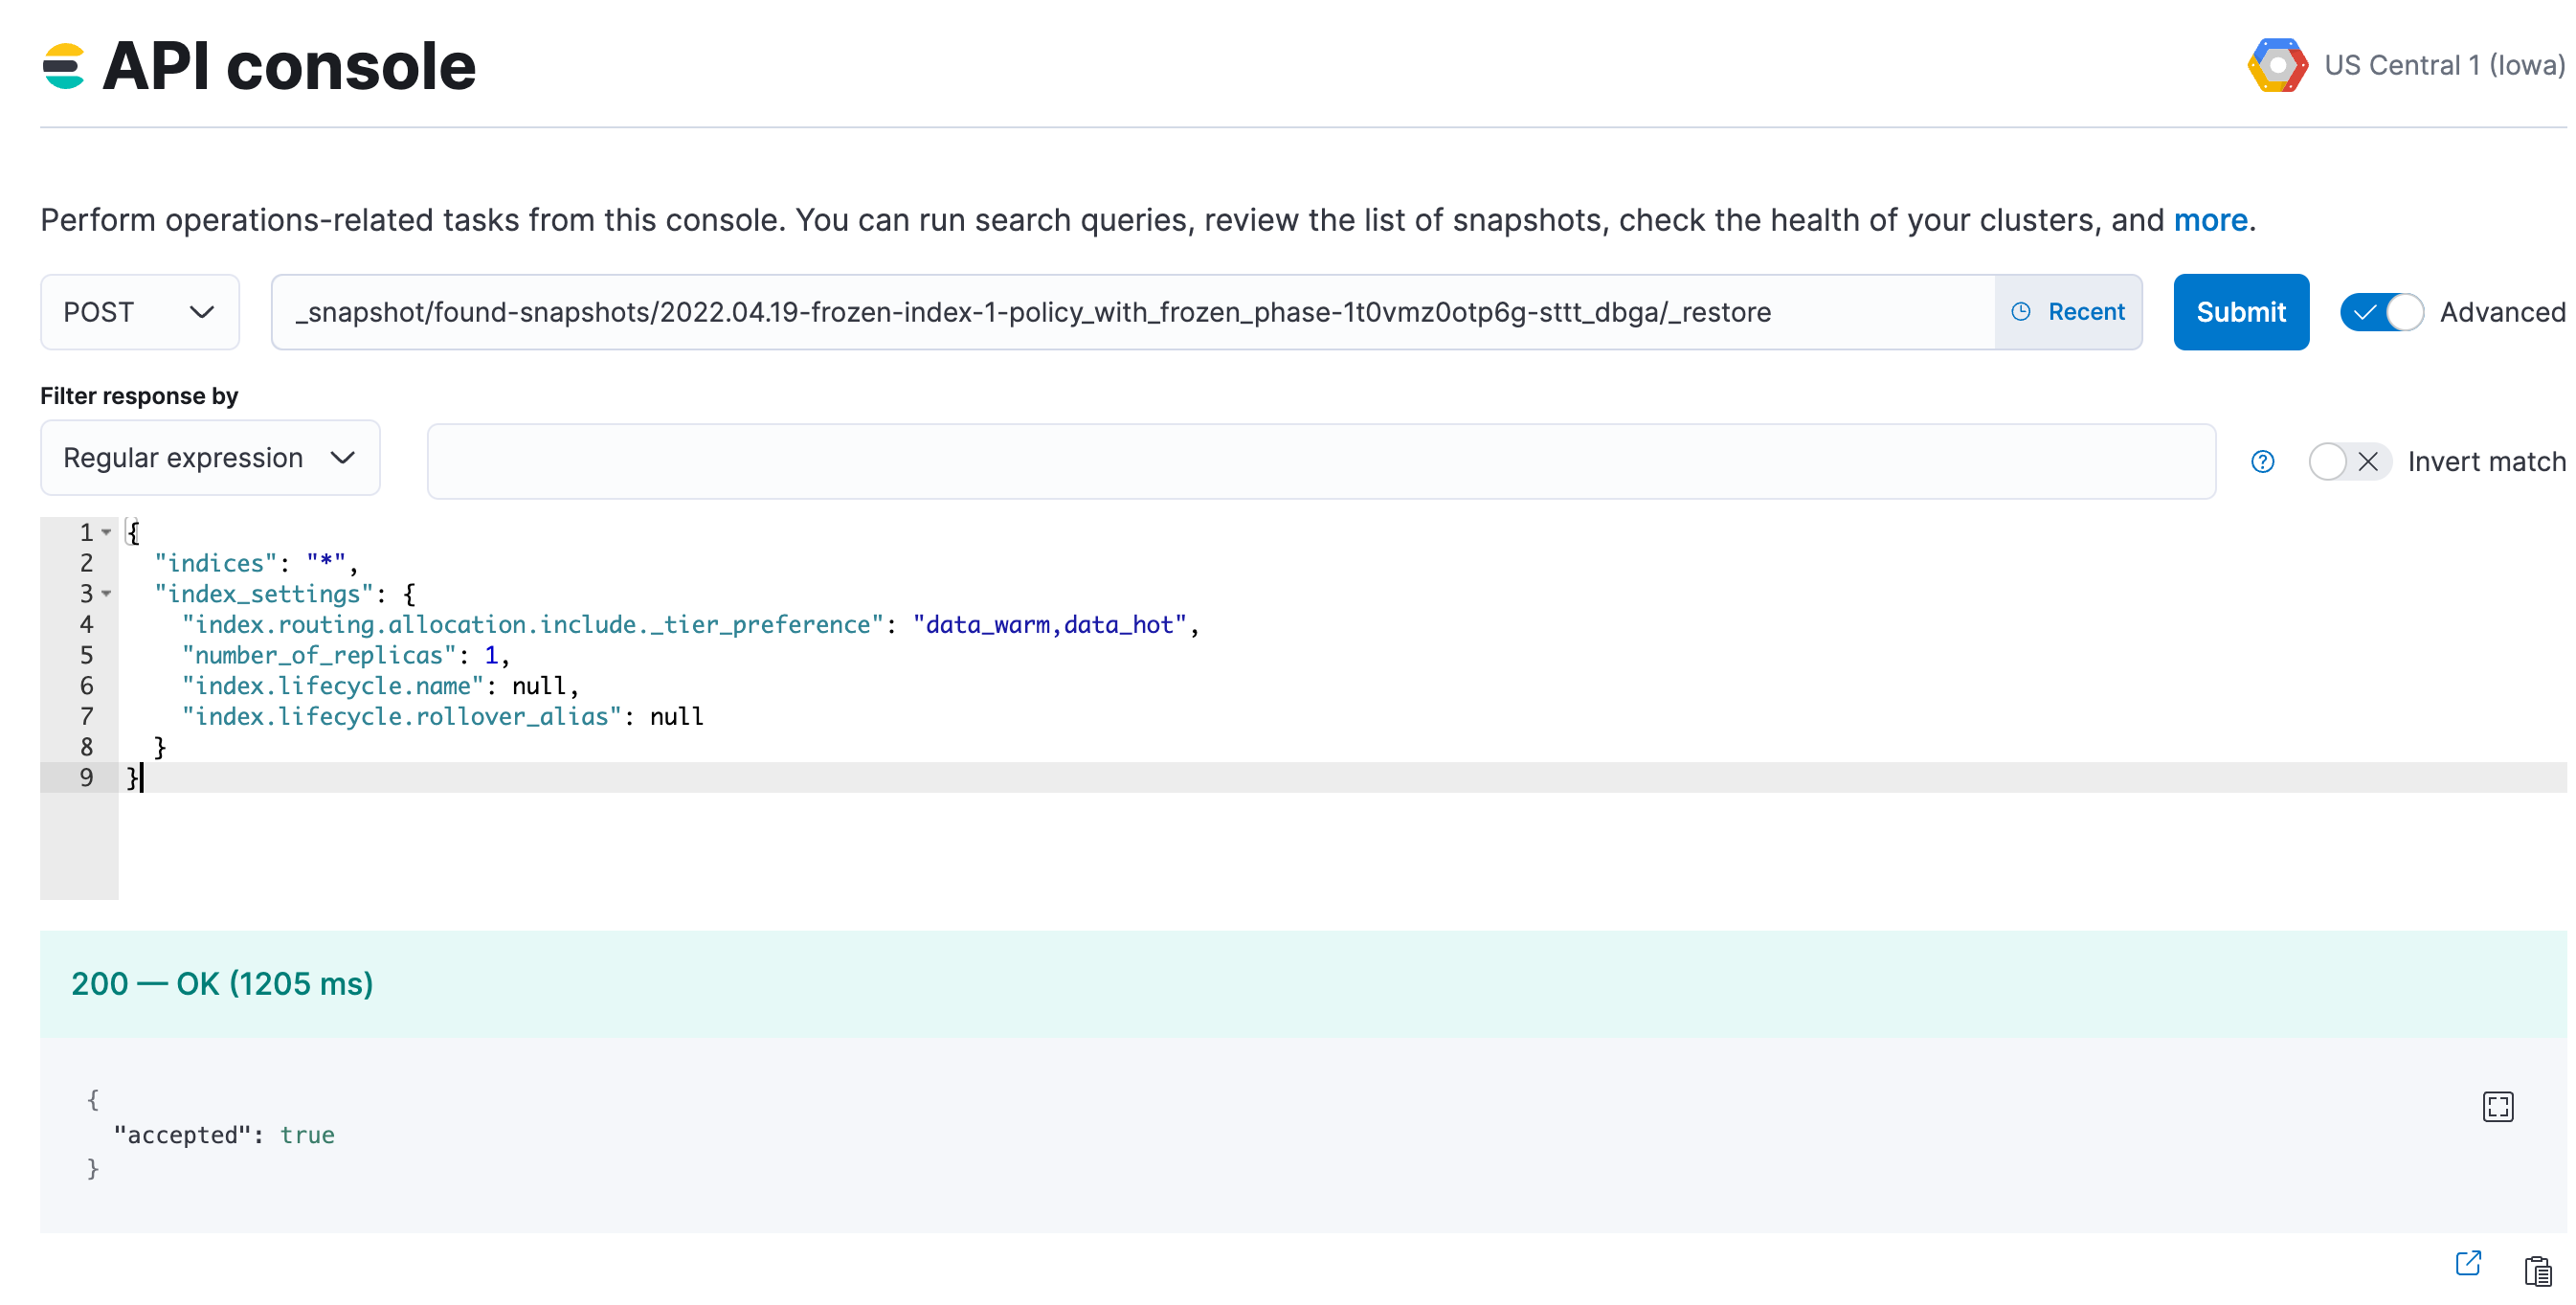
5. Restore indices from the searchable snapshots.
1. Follow the steps to [specify the data tier based allocation inclusion rules](#update-data-tier-allocation-rules) for the tier you are keeping.
2. Remove the associated ILM policy (set it to `null`). If you want to apply a different ILM policy, follow the steps to [Switch lifecycle policies](/elastic/docs-content/pull/6243/manage-data/lifecycle/index-lifecycle-management/policy-updates#switch-lifecycle-policies).
3. If needed, specify the alias for rollover, otherwise set it to `null`.
4. Optionally, specify the desired number of replica shards.
```sh
POST _snapshot///_restore
{
"indices": "*",
"index_settings": {
"index.routing.allocation.include._tier_preference": "",
"index.number_of_replicas": 0,
"index.lifecycle.name": "",
"index.lifecycle.rollover_alias": ""
}
}
```
For `` use the names that you obtained in step 2. Adjust `index.number_of_replicas` to match your resiliency needs.
The example request restores `frozen-index-1` and places it in the warm tier; the snapshot can be found in `found-snapshots`, which is the default snapshot repository.
6. Repeat steps 4 and 5 until all snapshots are restored to regular indices.
7. Once all snapshots are restored, use `GET _cat/indices/?v=true` to check that the restored indices are `green` and are correctly reflecting the expected `doc` and `store.size` counts.
If you are using data stream, you may need to use `GET _data_stream/` to get the list of the backing indices, and then specify them by using `GET _cat/indices/?v=true` to check. When you restore the backing indices of a data stream, some [considerations](/elastic/docs-content/pull/6243/deploy-manage/tools/snapshot-and-restore/restore-snapshot#considerations) apply, and you might need to manually add the restored indices into your data stream or recreate your data stream.
8. Once your data has completed restoration from searchable snapshots to the target data tier, `DELETE` searchable snapshot indices using the prefix from step 2.
```sh
DELETE -
```
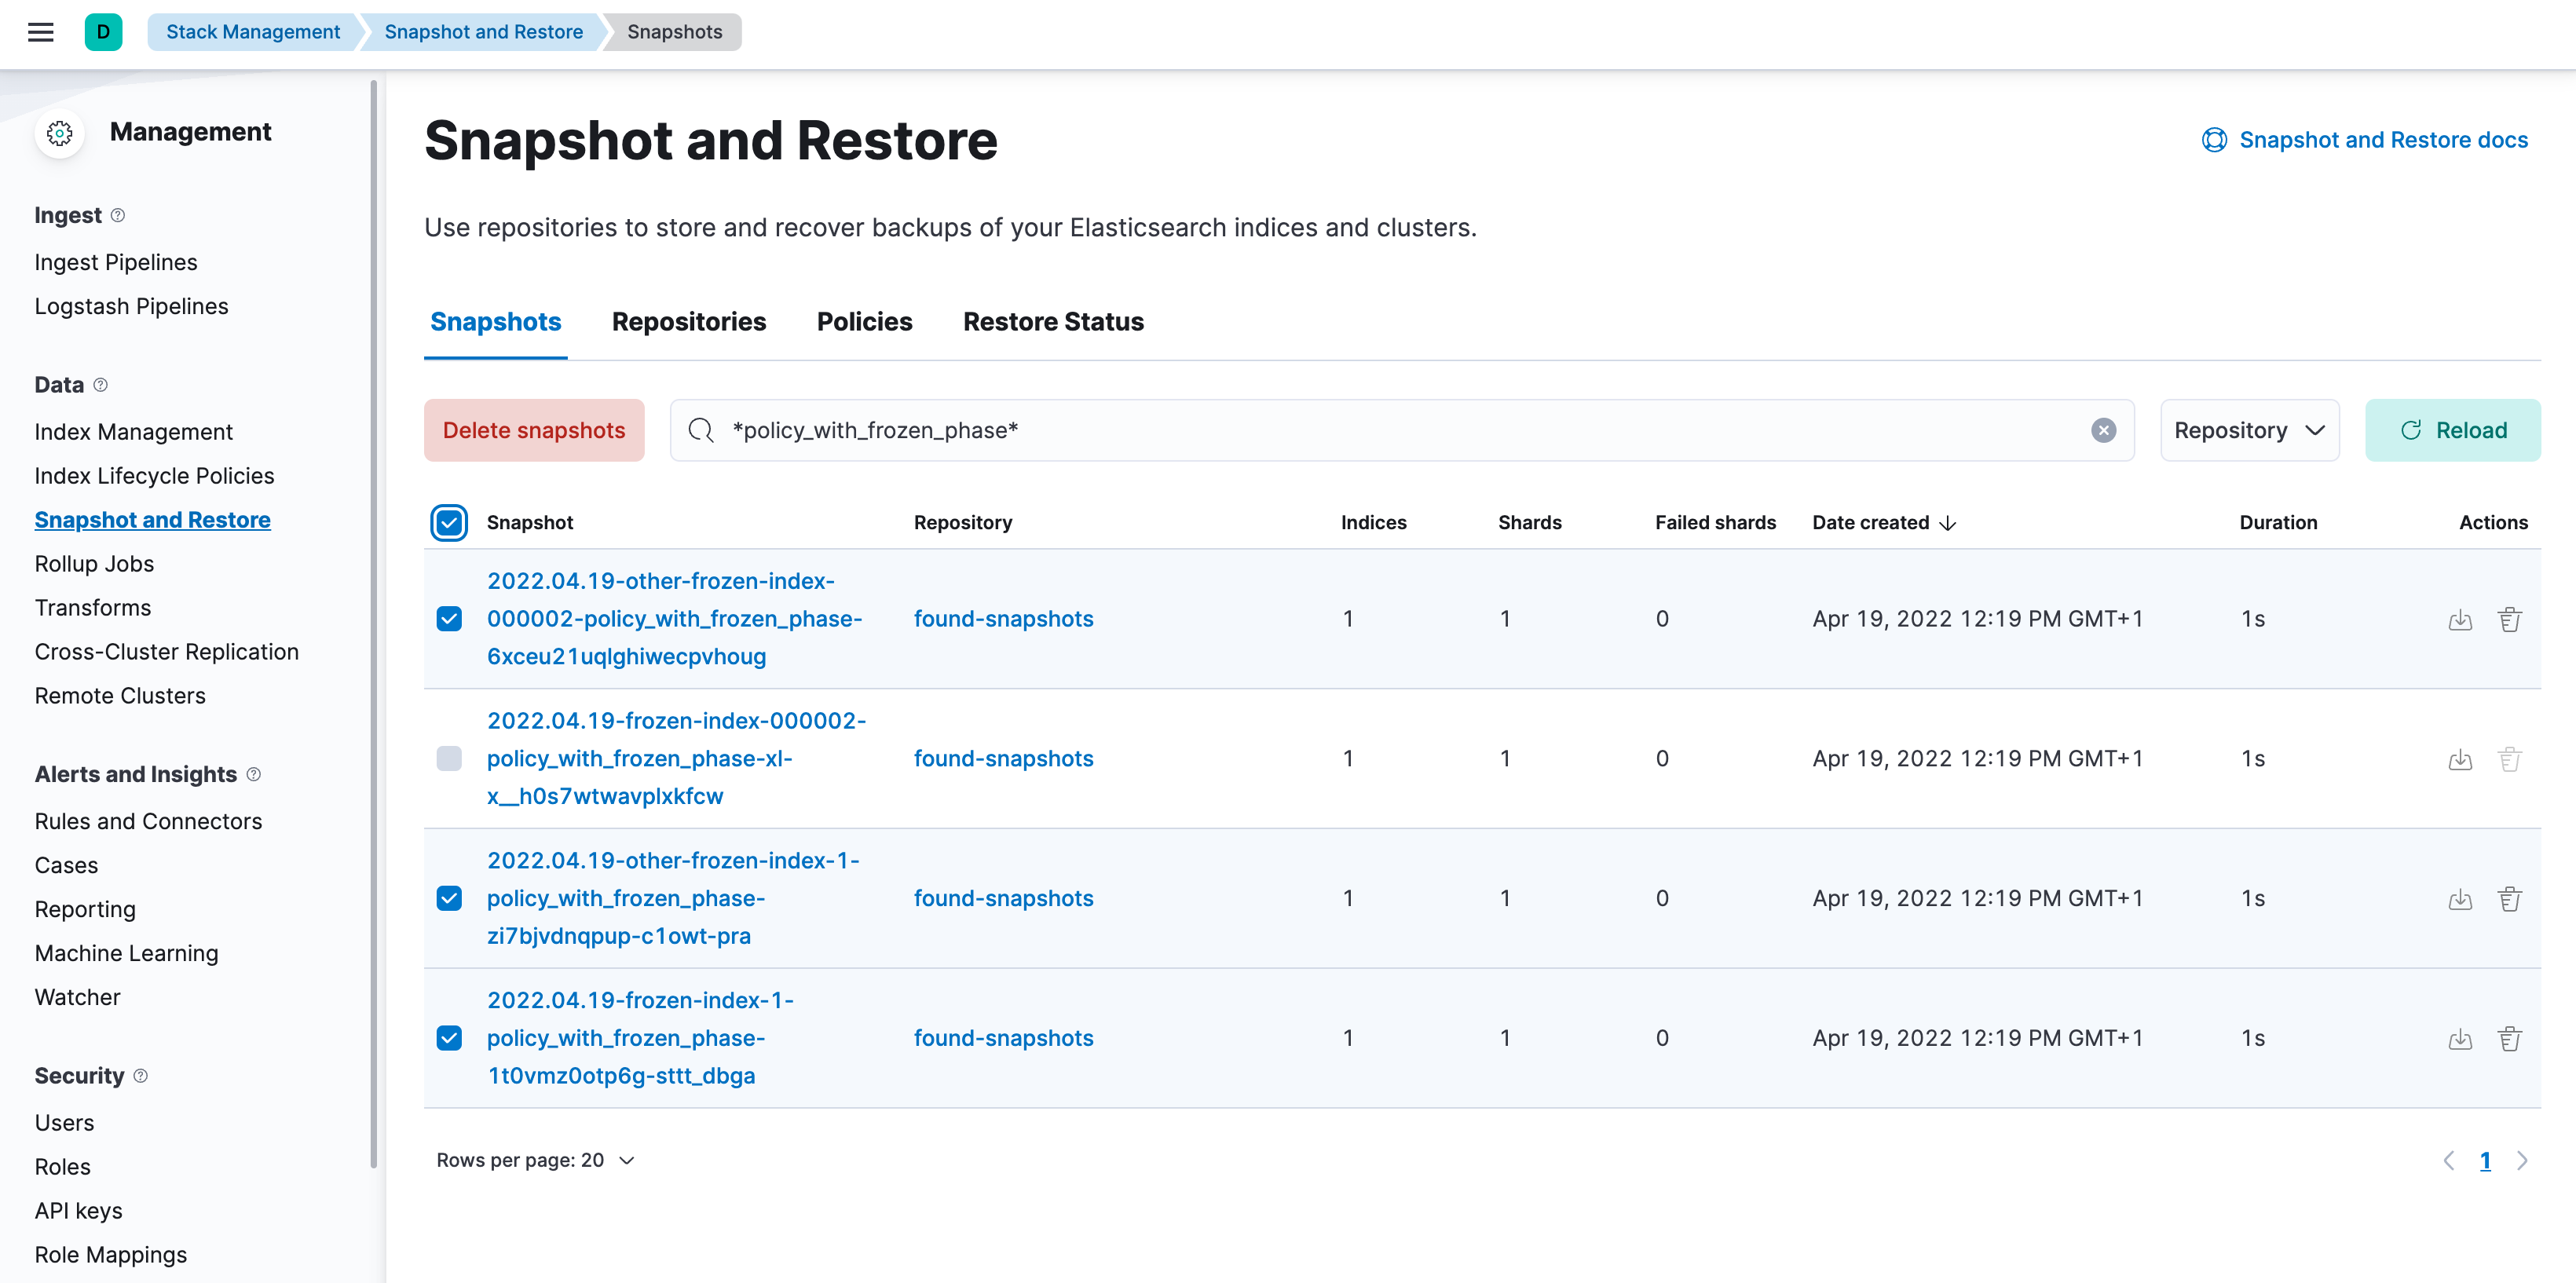
9. Delete the searchable snapshots by following these steps:
1. Open Kibana, go to the **Snapshot and Restore** management page using the navigation menu or the [global search field](https://docs-v3-preview.elastic.dev/elastic/docs-content/pull/6243/explore-analyze/find-and-organize/find-apps-and-objects), and go to the **Snapshots** tab. (Alternatively, go to `/app/management/data/snapshot_restore/snapshots`.)
2. Search for `**`
3. Bulk select the snapshots and delete them
In the example we are deleting the snapshots associated with the `policy_with_frozen_phase`.
10. Confirm that no shards remain on the data nodes you wish to remove using `GET _cat/allocation?v=true&s=node`.
11. Edit your cluster from the console to disable the data tier.
12. Once the plan change completes, confirm that there are no remaining nodes associated with the disabled tier and that `GET _cluster/health` reports `green`. If this is the case, re-enable ILM.
```sh
POST _ilm/start
```
## Related pages
- [Configure data tiers](/elastic/docs-content/pull/6243/manage-data/lifecycle/data-tiers#configure-data-tiers)
- [Data tier index allocation](/elastic/docs-content/pull/6243/manage-data/lifecycle/data-tiers#data-tier-allocation)
- [Index lifecycle management](https://docs-v3-preview.elastic.dev/elastic/docs-content/pull/6243/manage-data/lifecycle/index-lifecycle-management)