---
title: Scenario 3: Apply an ILM policy with integrations using multiple namespaces
description: In this scenario, you have Elastic Agents collecting system metrics with the System integration in two environments—one with the namespace development,...
url: https://docs-v3-preview.elastic.dev/elastic/docs-content/pull/7705/reference/fleet/data-streams-scenario3
products:
- Elastic Agent
- Fleet
applies_to:
- Elastic Cloud Serverless: Unavailable
- Elastic Stack: Generally available
---
# Scenario 3: Apply an ILM policy with integrations using multiple namespaces
In this scenario, you have Elastic Agents collecting system metrics with the System integration in two environments—one with the namespace `development`, and one with `production`.
**Goal:** Customize the ILM policy for the `system.network` data stream in the `production` namespace. Specifically, apply the built-in `90-days-default` ILM policy so that data is deleted after 90 days.
- This scenario involves cloning an index template. We strongly recommend repeating this procedure on every minor Elastic Stack upgrade in order to avoid missing any possible changes to the structure of the managed index template(s) that are shipped with integrations.
- If you cloned an index template to customize the data retention policy on an Elasticsearch version prior to 8.13, you must update the index template in the clone to use the `ecs@mappings` component template on Elasticsearch version 8.13 or later. See [Update index template cloned before Elasticsearch 8.13](#data-streams-pipeline-update-cloned-template-before-8.13) for the step-by-step instructions.
## Step 1: View data streams
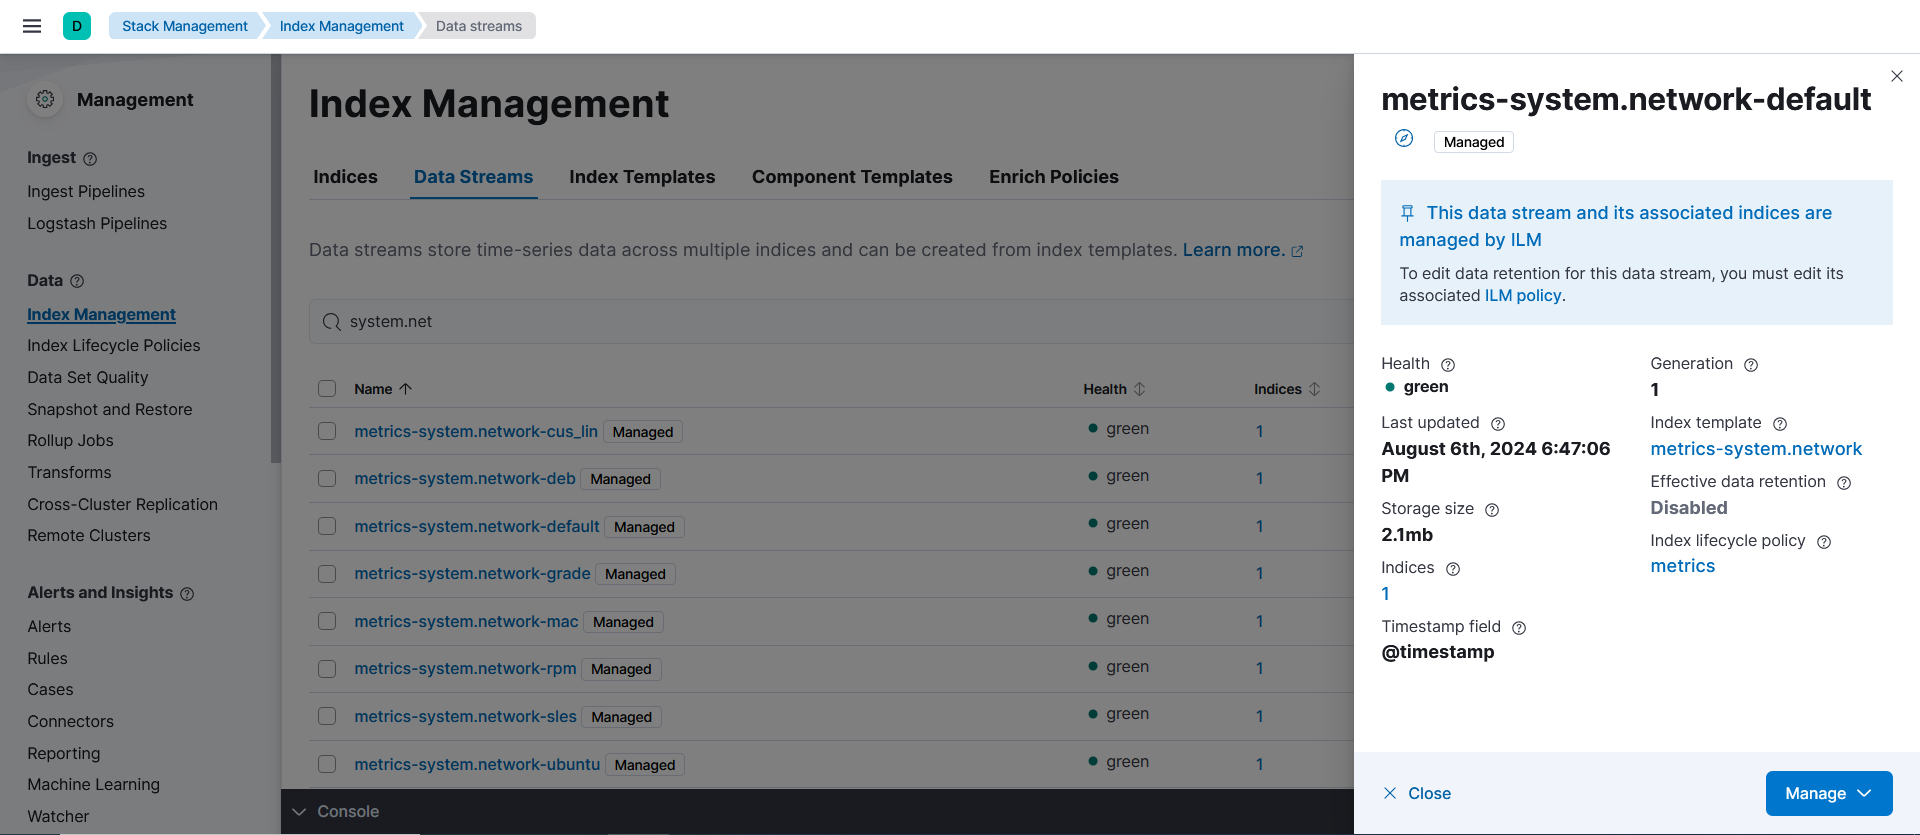
The **Data Streams** view in Kibana shows you the data streams, index templates, and ILM policies associated with a given integration.
1. Go to the **Index Management** page using the navigation menu or the [global search field](https://docs-v3-preview.elastic.dev/elastic/docs-content/pull/7705/explore-analyze/find-and-organize/find-apps-and-objects), and open the **Data Streams** tab.
2. Search for `system` to see all data streams associated with the System integration.
3. Select the `metrics-system.network-{{namespace}}` data stream to view its associated index template and ILM policy. As you can see, the data stream follows the [Data stream naming scheme](/elastic/docs-content/pull/7705/reference/fleet/data-streams#data-streams-naming-scheme) and starts with its type, `metrics-`.
## Step 2: Create a component template
For your changes to continue to be applied in future versions, you must put all custom index settings into a component template. The component template must follow the data stream naming scheme, and end with `@custom`:
```text
--@custom
```
For example, to create custom index settings for the `system.network` data stream with a namespace of `production`, the component template name would be:
```text
metrics-system.network-production@custom
```
1. Go to the **Index Management** page using the navigation menu or the [global search field](https://docs-v3-preview.elastic.dev/elastic/docs-content/pull/7705/explore-analyze/find-and-organize/find-apps-and-objects), and open the **Component Templates** tab.
2. Click **Create component template**.
3. Use the template above to set the name—in this case, `metrics-system.network-production@custom`. Click **Next**.
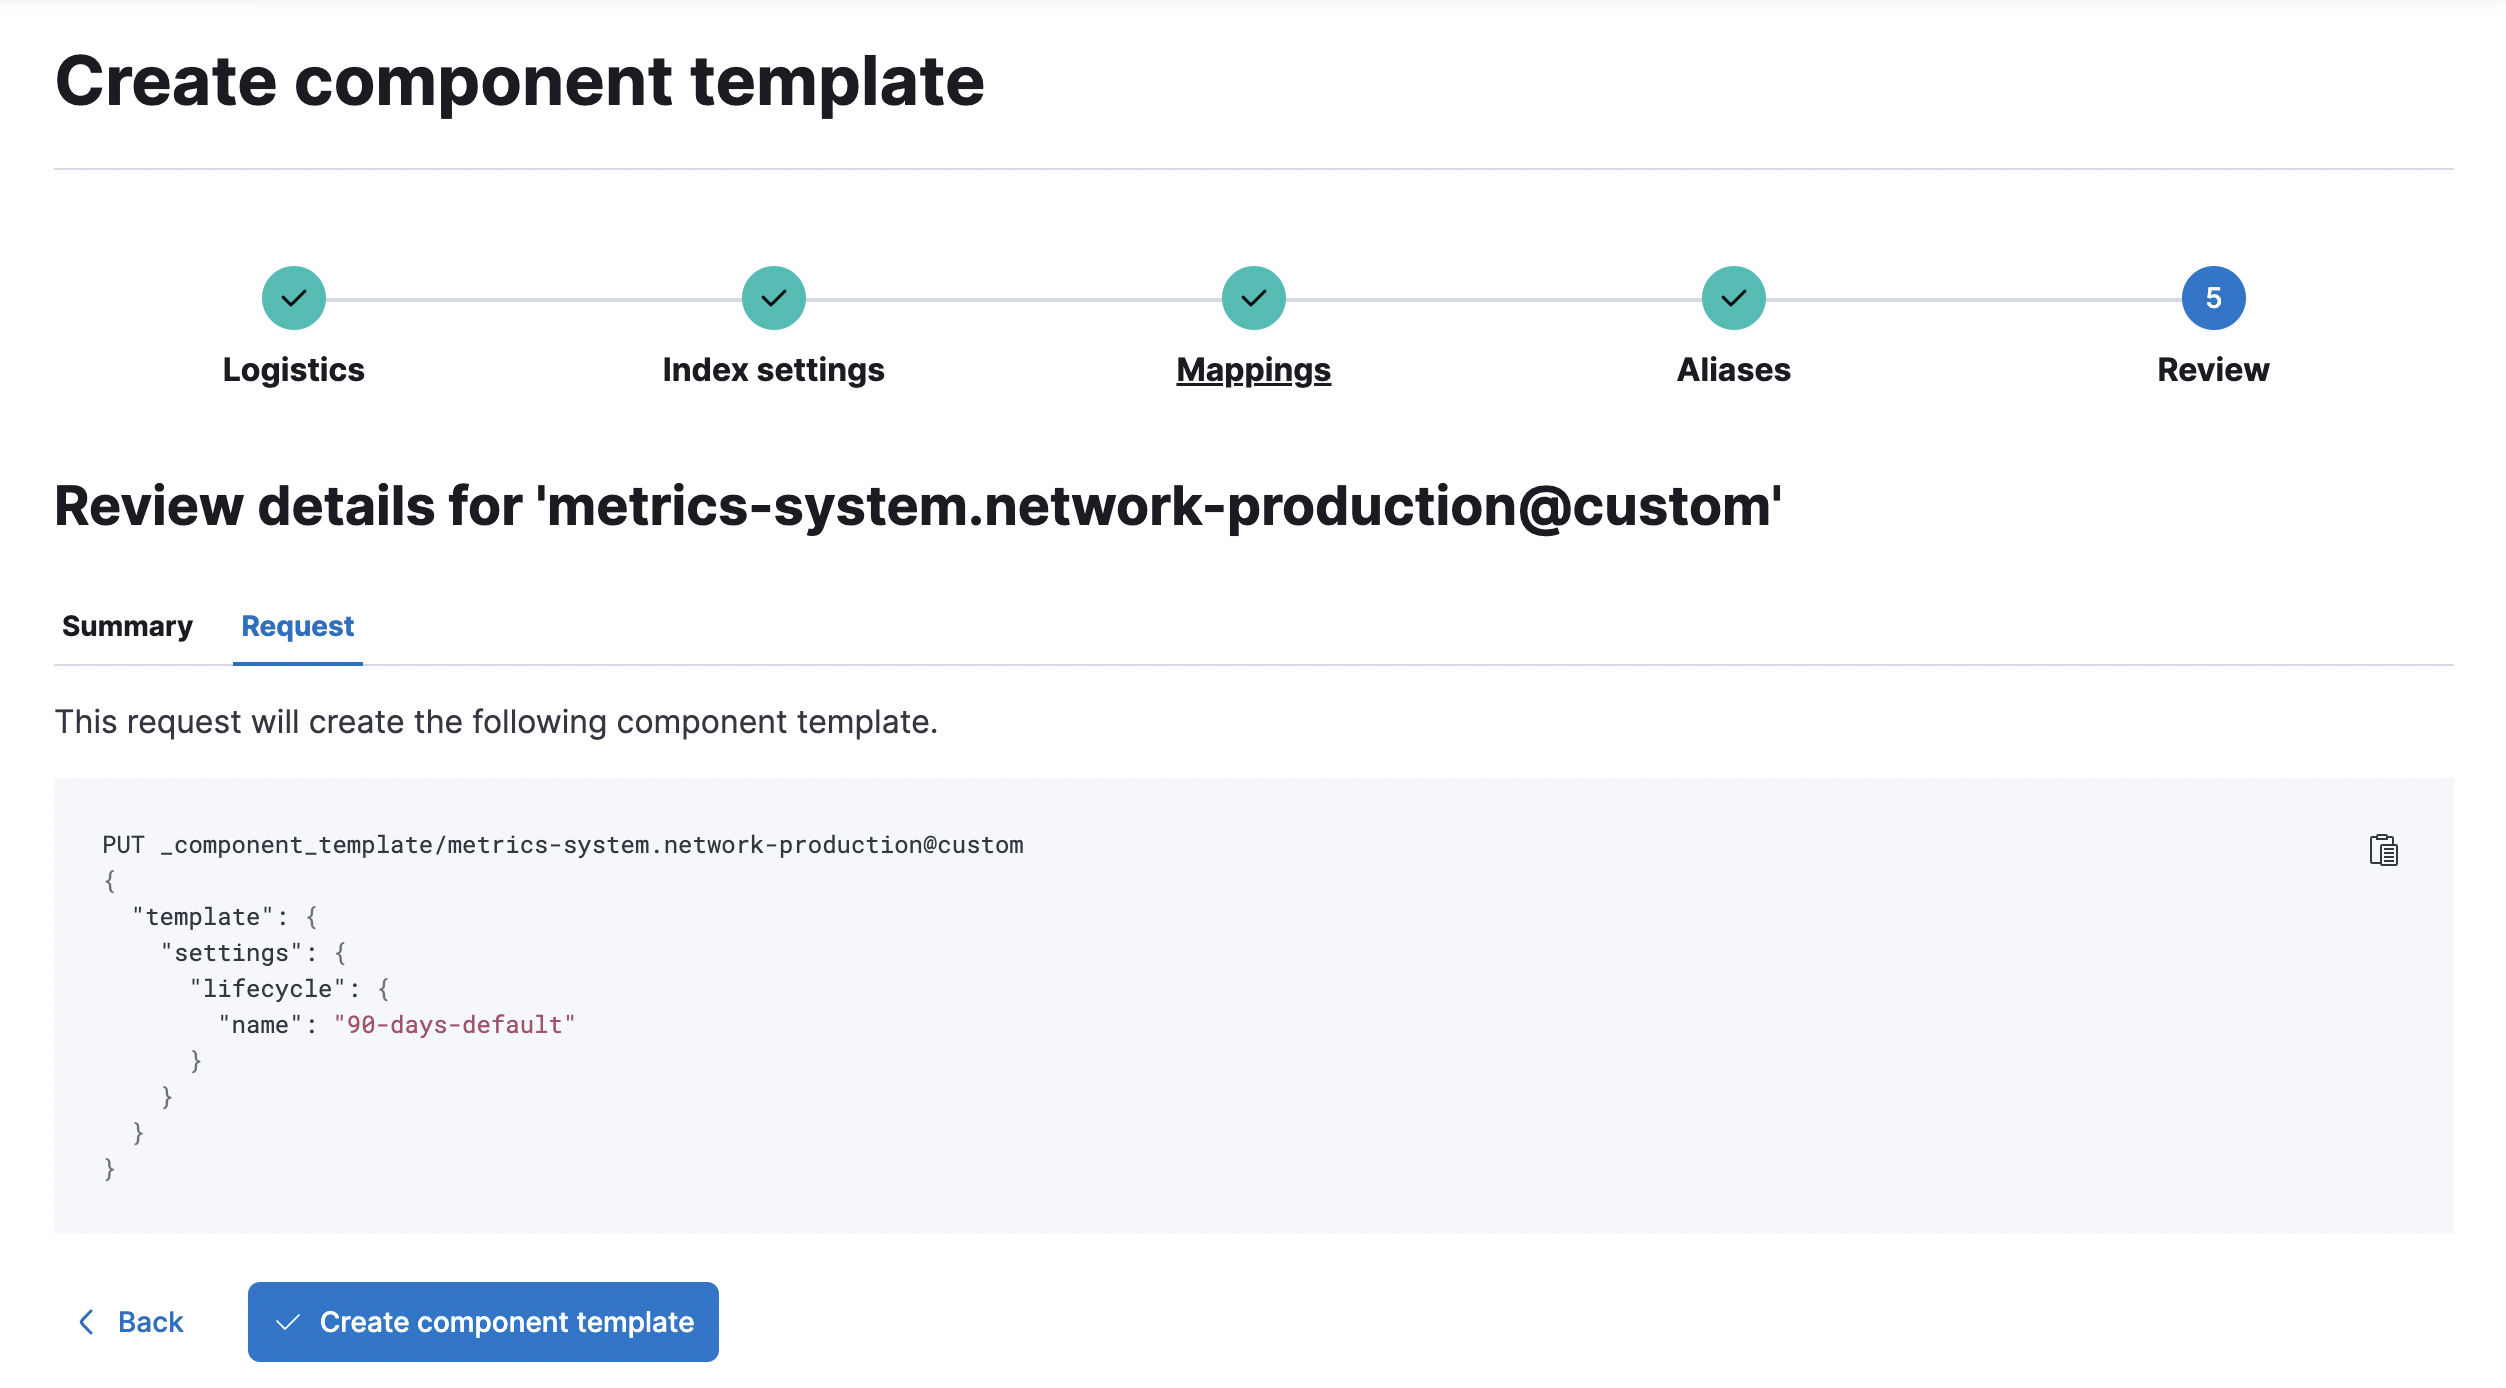
4. Under **Index settings**, set the ILM policy name under the `lifecycle.name` key:
```json
{
"lifecycle": {
"name": "90-days-default"
}
}
```
5. Continue to **Review** and ensure your request looks similar to the image below. If it does, click **Create component template**.
## Step 3: Clone and modify the existing index template
Now that you’ve created a component template, you need an index template scoped to the correct data stream and namespace. This scenario duplicates and modifies the integration’s existing index template.
Duplicating an integration index template is risky: don't change or remove managed properties, and remember that package upgrades don't update your copy. For details, refer to [Cloning the index template of an integration package](/elastic/docs-content/pull/7705/reference/fleet/integrations-assets-best-practices#assets-restrictions-cloning-index-template).
If your changes don't need to be namespace-specific, use a `@custom` component template instead, as described in [Scenario 1](https://docs-v3-preview.elastic.dev/elastic/docs-content/pull/7705/reference/fleet/data-streams-scenario1) and [Scenario 2](https://docs-v3-preview.elastic.dev/elastic/docs-content/pull/7705/reference/fleet/data-streams-scenario2). For more about ILM with Fleet data streams, refer to [Index lifecycle management (ILM)](/elastic/docs-content/pull/7705/reference/fleet/data-streams#data-streams-ilm).
Elastic Stack: Planned If you want the same settings for every data stream in a namespace (not only one data stream), you can use [namespace index templates](https://docs-v3-preview.elastic.dev/elastic/docs-content/pull/7705/reference/fleet/data-streams-namespace-custom) instead of duplicating the integration index template.
1. Go to the **Index Management** page using the navigation menu or the [global search field](https://docs-v3-preview.elastic.dev/elastic/docs-content/pull/7705/explore-analyze/find-and-organize/find-apps-and-objects), and open the **Index Templates** tab.
2. Find the index template you want to clone. The index template will have the `` and `` in its name, but not the ``. In this case, it’s `metrics-system.network`.
3. Select **Actions** > **Clone**.
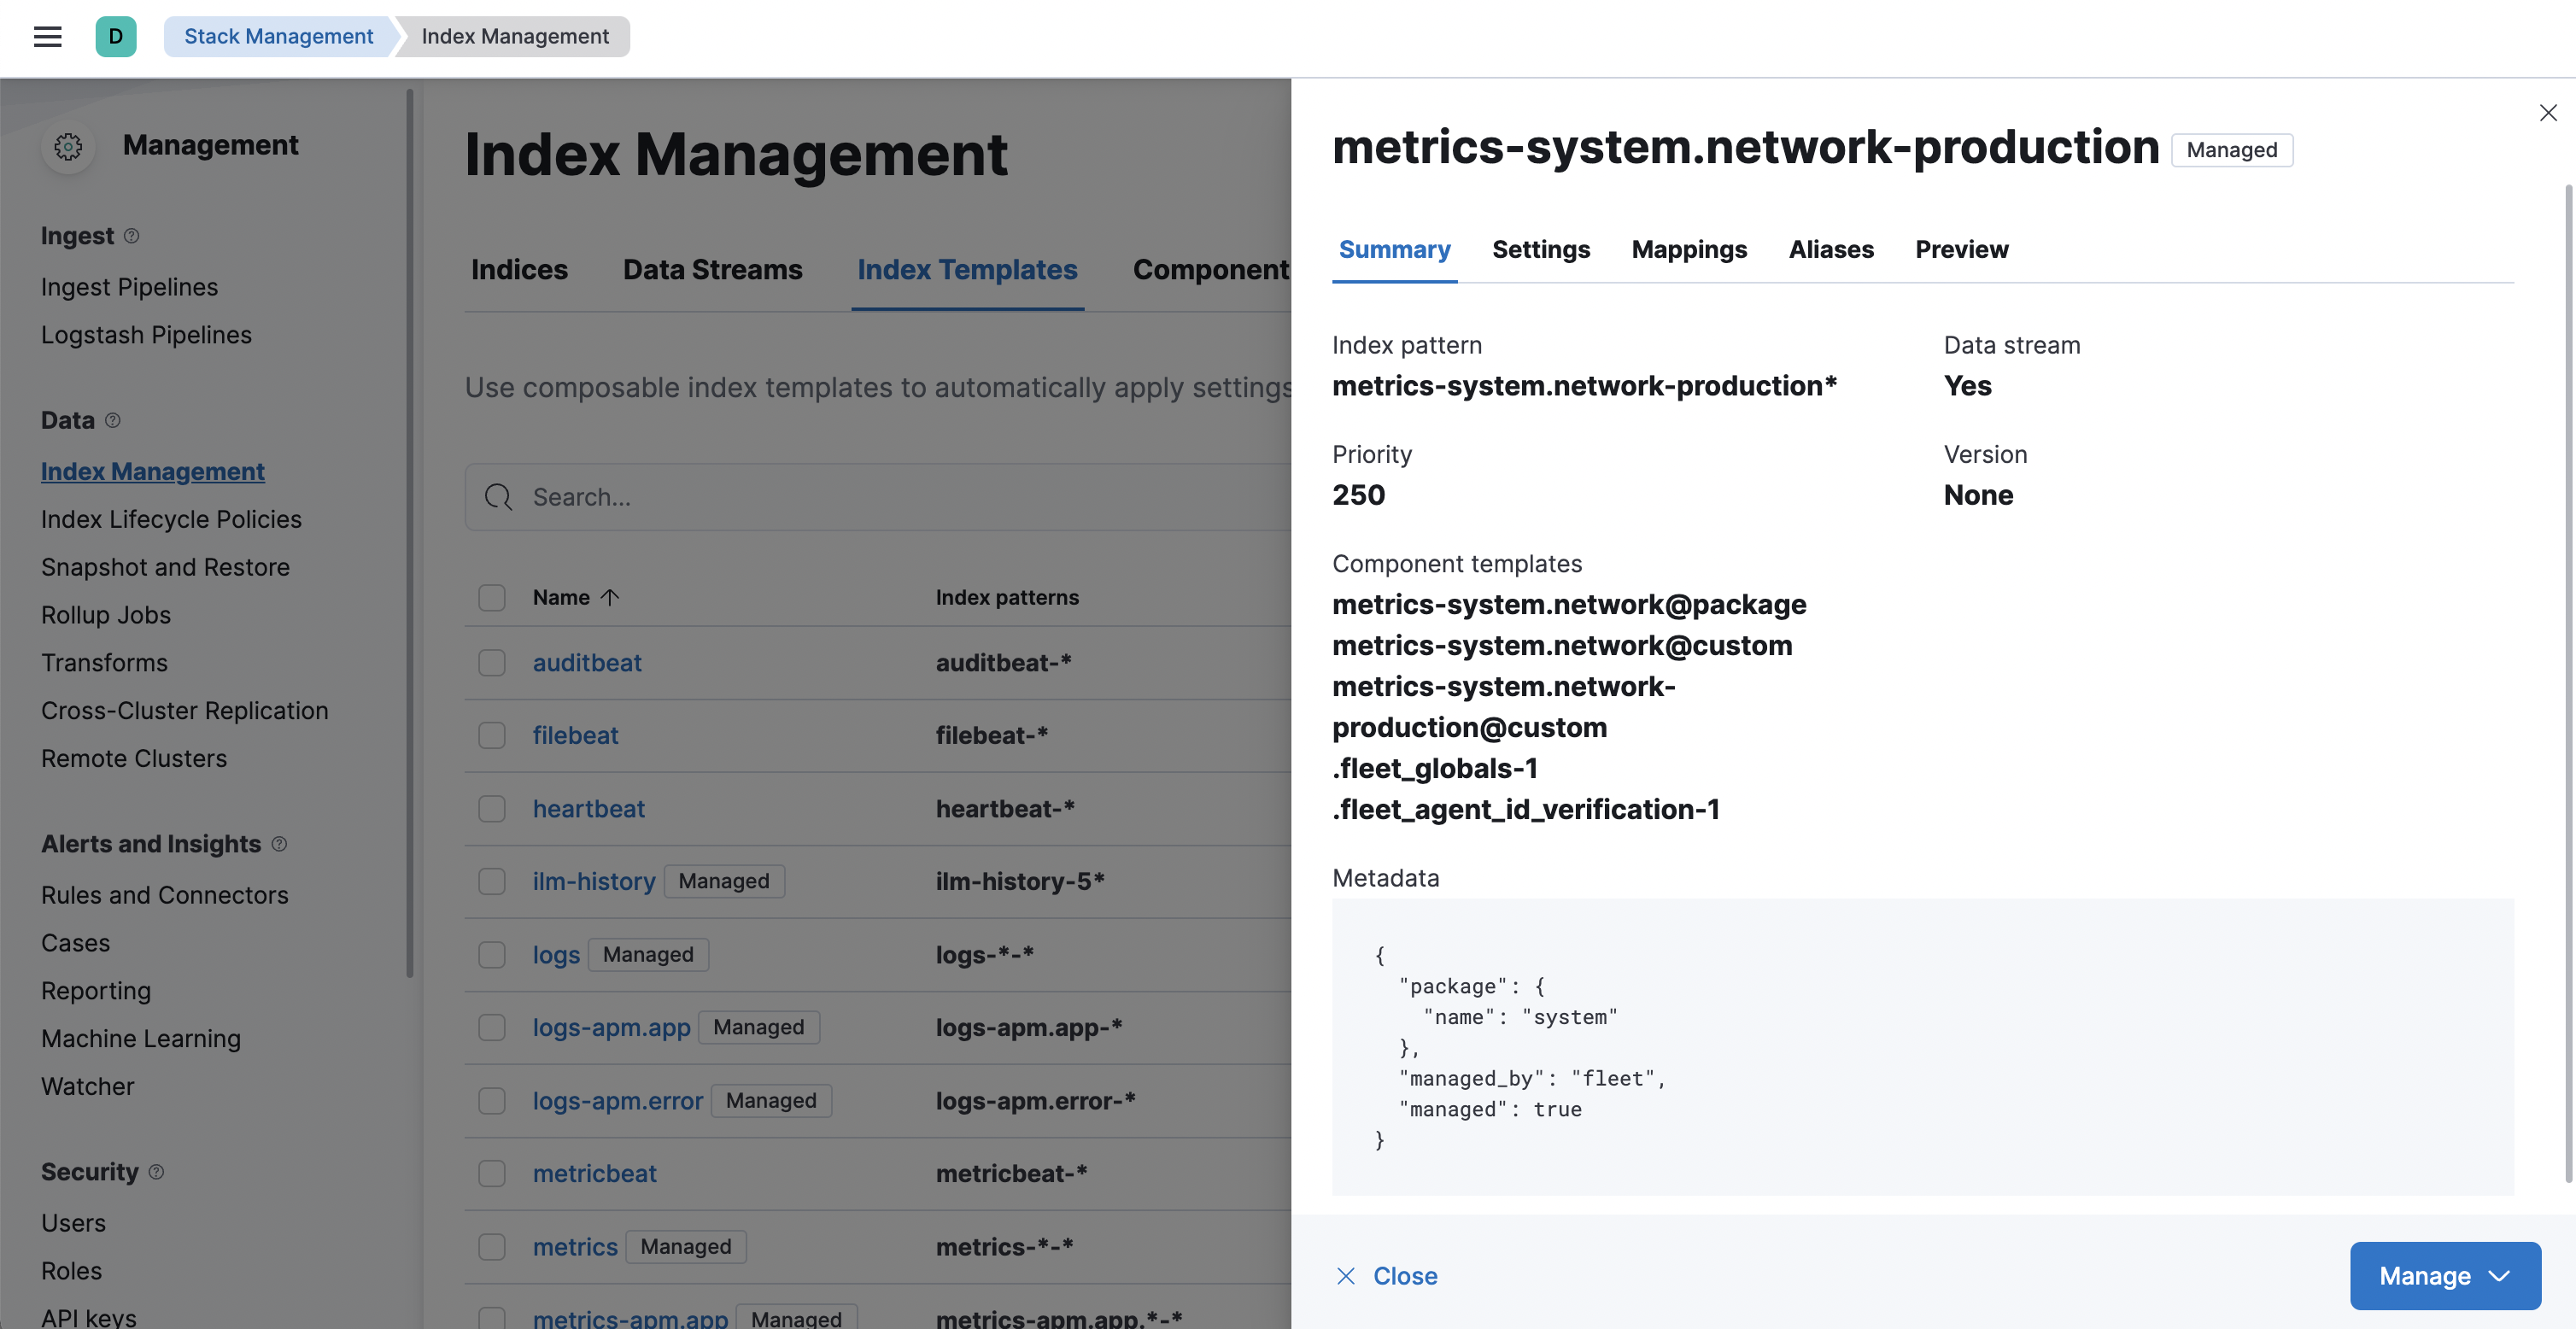
4. Set the name of the new index template to `metrics-system.network-production`.
5. Change the index pattern to include a namespace—in this case, `metrics-system.network-production*`. This ensures the previously created component template is only applied to the `production` namespace.
6. Set the priority to `250`. This ensures that the new index template takes precedence over other index templates that match the index pattern.
7. Under **Component templates**, search for and add the component template created in the previous step. To ensure your namespace-specific settings are applied over other custom settings, the new template should be added below the existing `@custom` template.
8. Create the index template.
## Step 4: Roll over the data stream (optional)
To confirm that the data stream is now using the new index template and ILM policy, you can either repeat Step 1, or navigate to **Dev Tools** and run the following:
```bash
GET /_data_stream/metrics-system.network-production
```
The result should include the following:
```json
{
"data_streams" : [
{
...
"template" : "metrics-system.network-production",
"ilm_policy" : "90-days-default",
...
}
]
}
```
New ILM policies only take effect when new indices are created, so you either must wait for a rollover to occur (usually after 30 days or when the index size reaches 50 GB), or force a rollover using the [Elasticsearch rollover API](https://www.elastic.co/docs/api/doc/elasticsearch/operation/operation-indices-rollover):
```bash
POST /metrics-system.network-production/_rollover/
```
## Update index template cloned before Elasticsearch 8.13
If you cloned an index template to customize the data retention policy on an Elasticsearch version prior to 8.13, you must update the index cloned index template to add the `ecs@mappings` component template on Elasticsearch version 8.13 or later.
To update the cloned index template:
1. Go to the **Index Management** page using the navigation menu or the [global search field](https://docs-v3-preview.elastic.dev/elastic/docs-content/pull/7705/explore-analyze/find-and-organize/find-apps-and-objects), and open the **Index Templates** tab.
2. Find the index template you cloned. The index template will have the `` and `` in its name.
3. Select **Manage** > **Edit**.
4. Select **(2) Component templates**
5. In the **Search component templates** field, search for `ecs@mappings`.
6. Click on the **+ (plus)** icon to add the `ecs@mappings` component template.
7. Move the `ecs@mappings` component template right below the `@package` component template.
8. Save the index template.
Roll over the data stream to apply the changes.