---
title: ServiceNow ITOM connector and action
description: The ServiceNow ITOM connector uses the event API to create ServiceNow events. You can use the connector for rule actions. You can create connectors in...
url: https://docs-v3-preview.elastic.dev/elastic/kibana/pull/280898/reference/connectors-kibana/servicenow-itom-action-type
products:
- Kibana
applies_to:
- Serverless Observability projects: Generally available
- Serverless Security projects: Generally available
- Elastic Stack: Generally available
---
# ServiceNow ITOM connector and action
The ServiceNow ITOM connector uses the [event API](https://docs.servicenow.com/bundle/rome-it-operations-management/page/product/event-management/task/send-events-via-web-service.md) to create ServiceNow events. You can use the connector for rule actions.
## Create connectors in Kibana
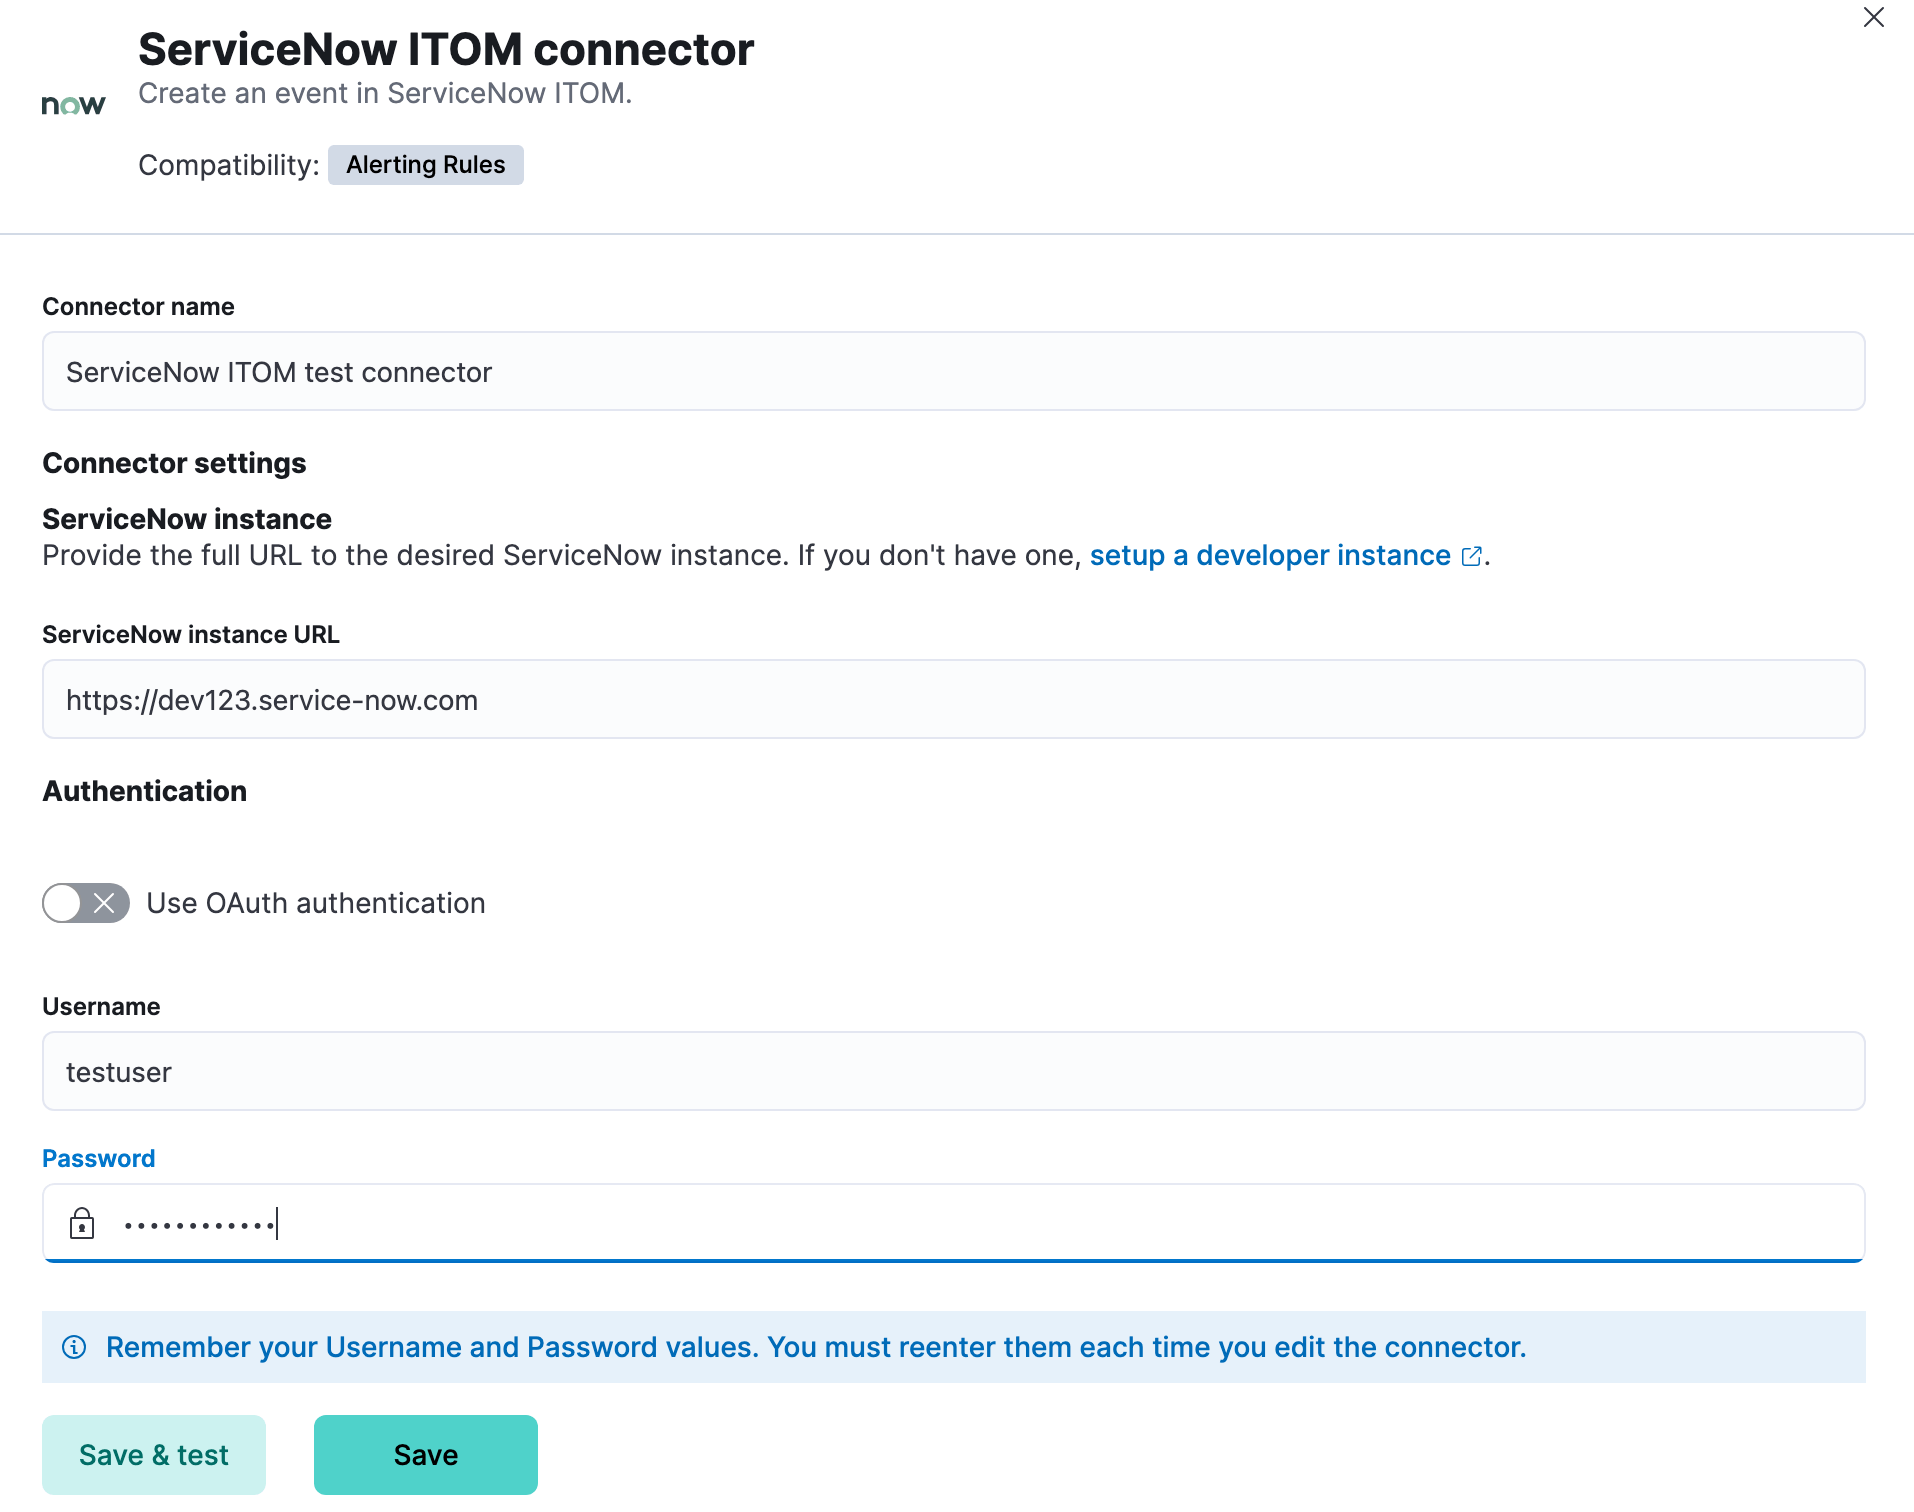
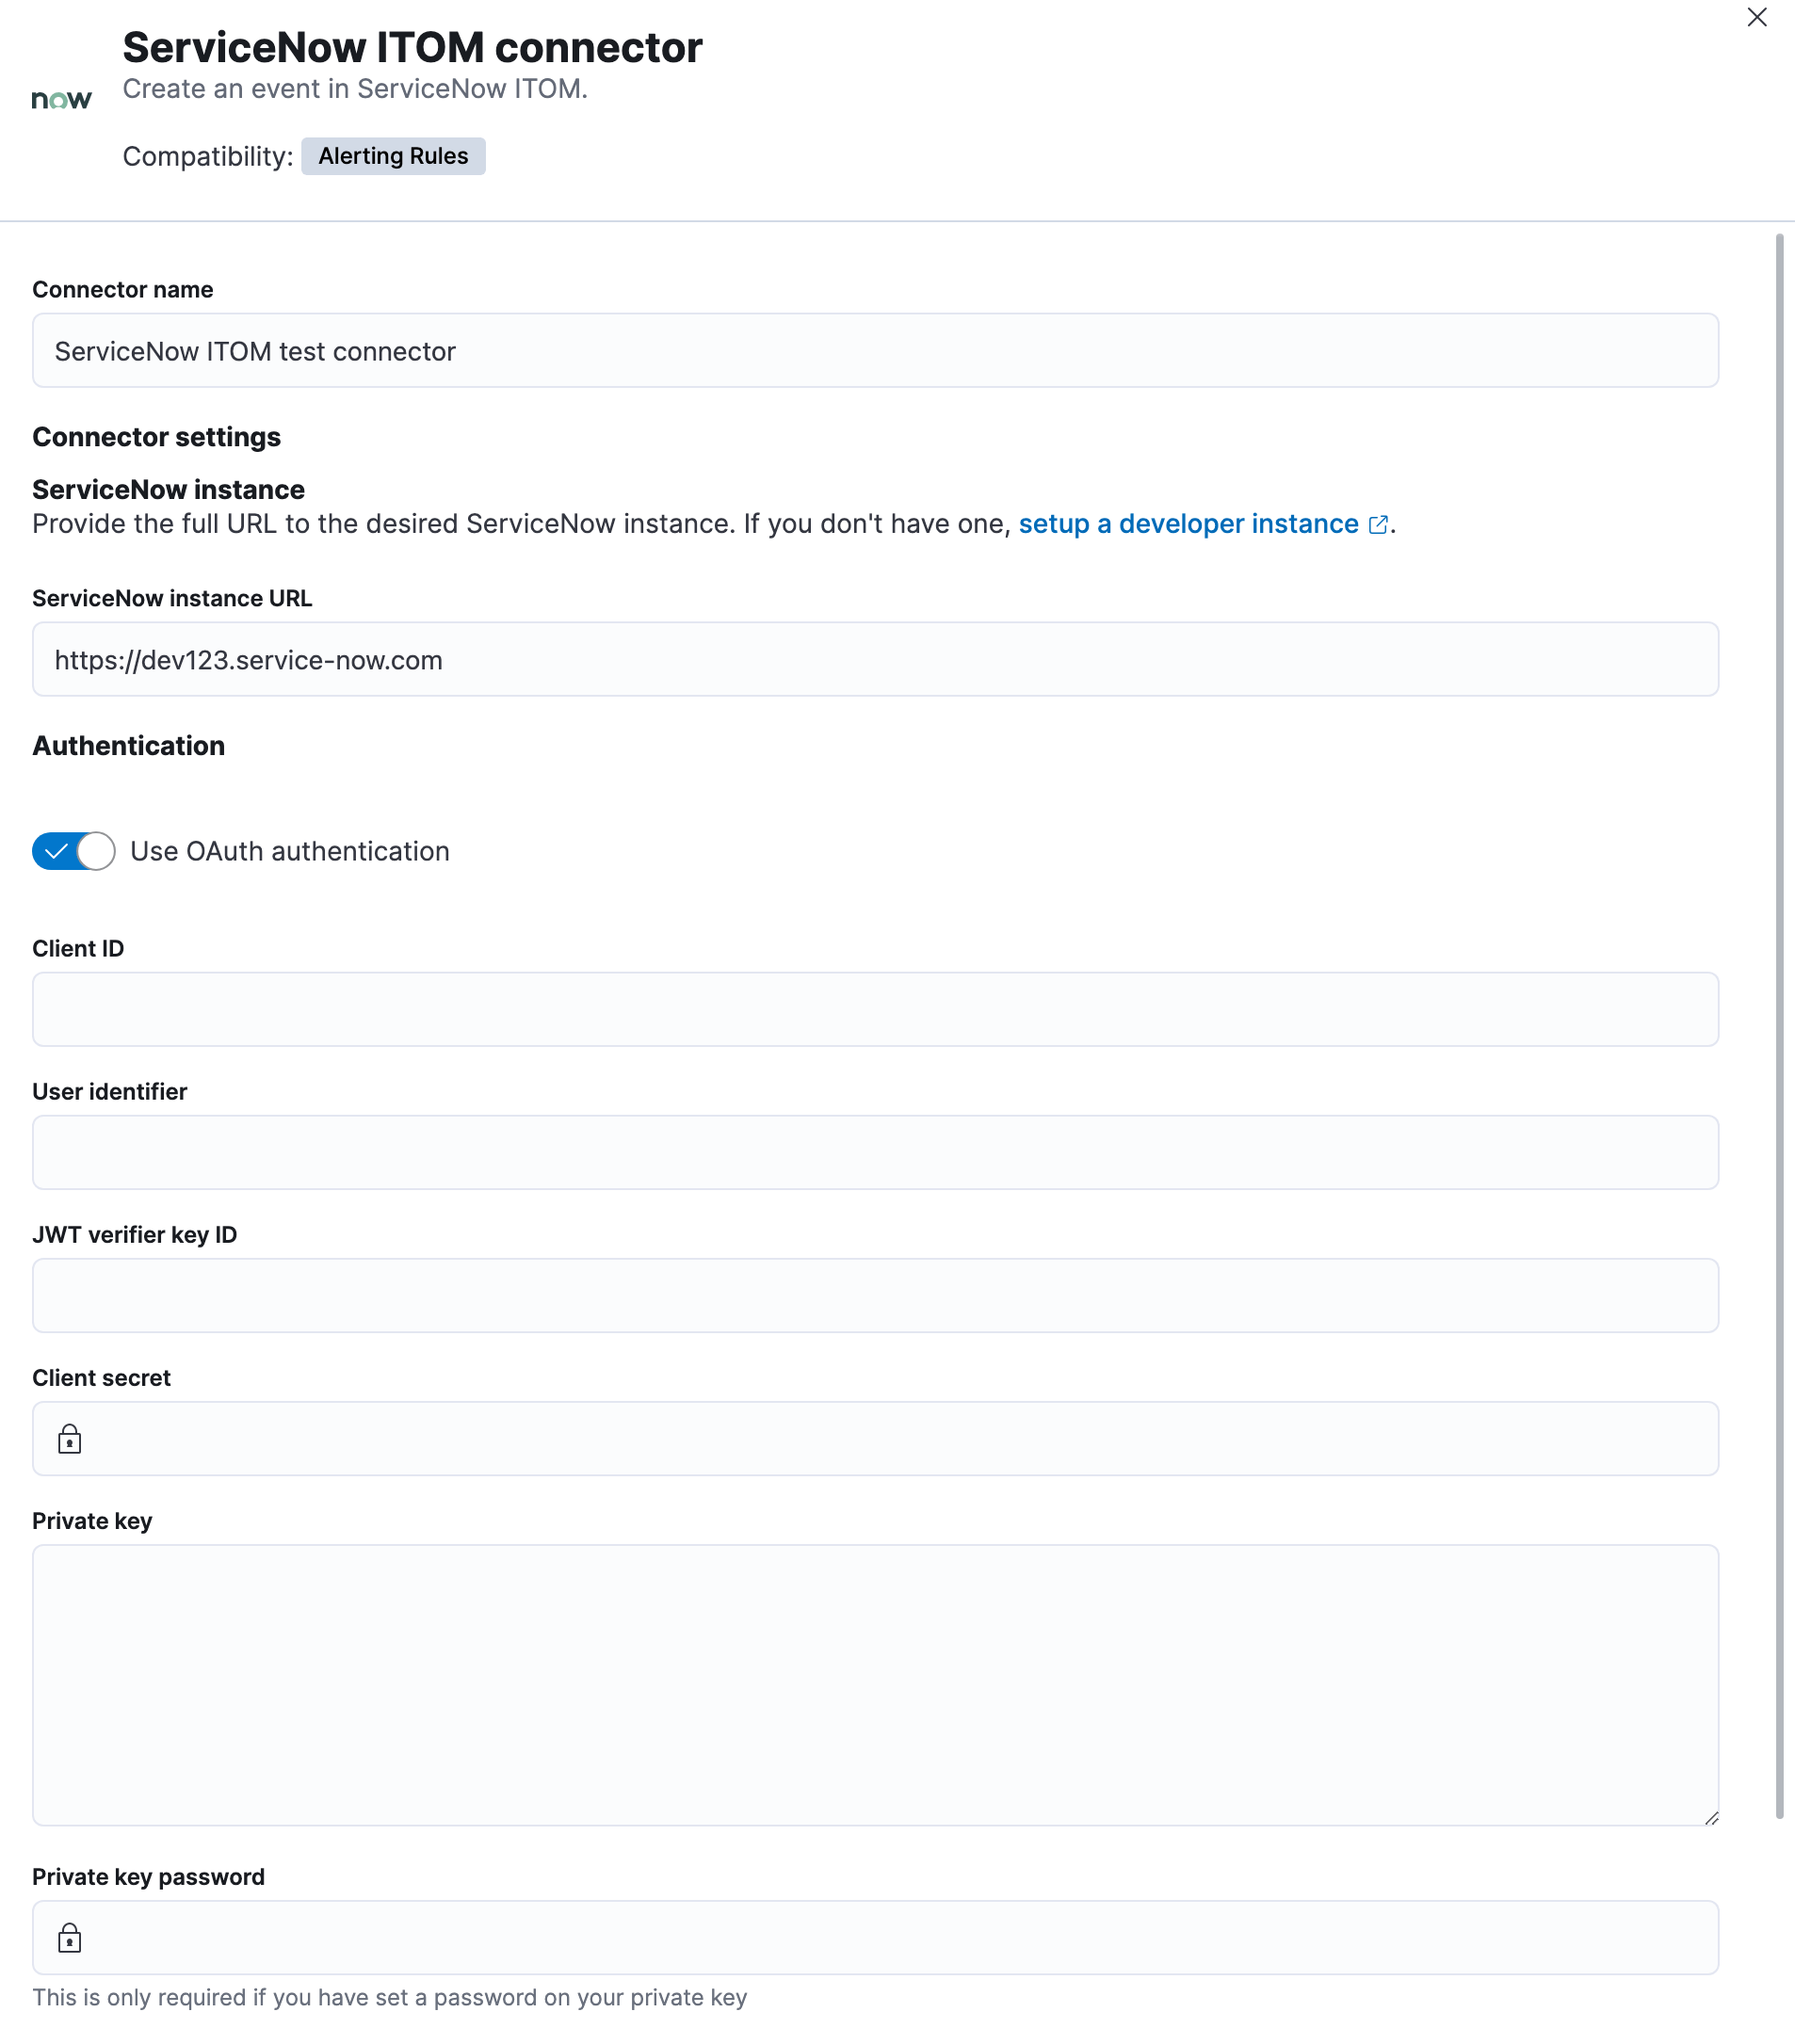
You can create connectors in **Stack Management > Connectors** or as needed when you’re creating a rule. You must choose whether to use OAuth for authentication.
### Connector configuration
ServiceNow ITOM connectors have the following configuration properties:
The client identifier assigned to your OAuth application.
The client secret assigned to your OAuth application.
The key identifier assigned to the JWT verifier map of your OAuth application.
The password for HTTP basic authentication.
The RSA private key that you created for use in ServiceNow.
The password for the RSA private key. This value is required when you set a password for your private key.
The full URL for the ServiceNow instance.
By default, basic authentication is used instead of open authorization (OAuth).
The identifier to use for OAuth type authentication. This identifier should be the user field you selected when you created an OAuth JWT API endpoint for external clients in your ServiceNow instance. For example, if the selected user field is `Email`, the user identifier should be the user’s email address.
The username for HTTP basic authentication.
## Test connectors
You can test connectors as you’re creating or editing the connector in Kibana. For example:
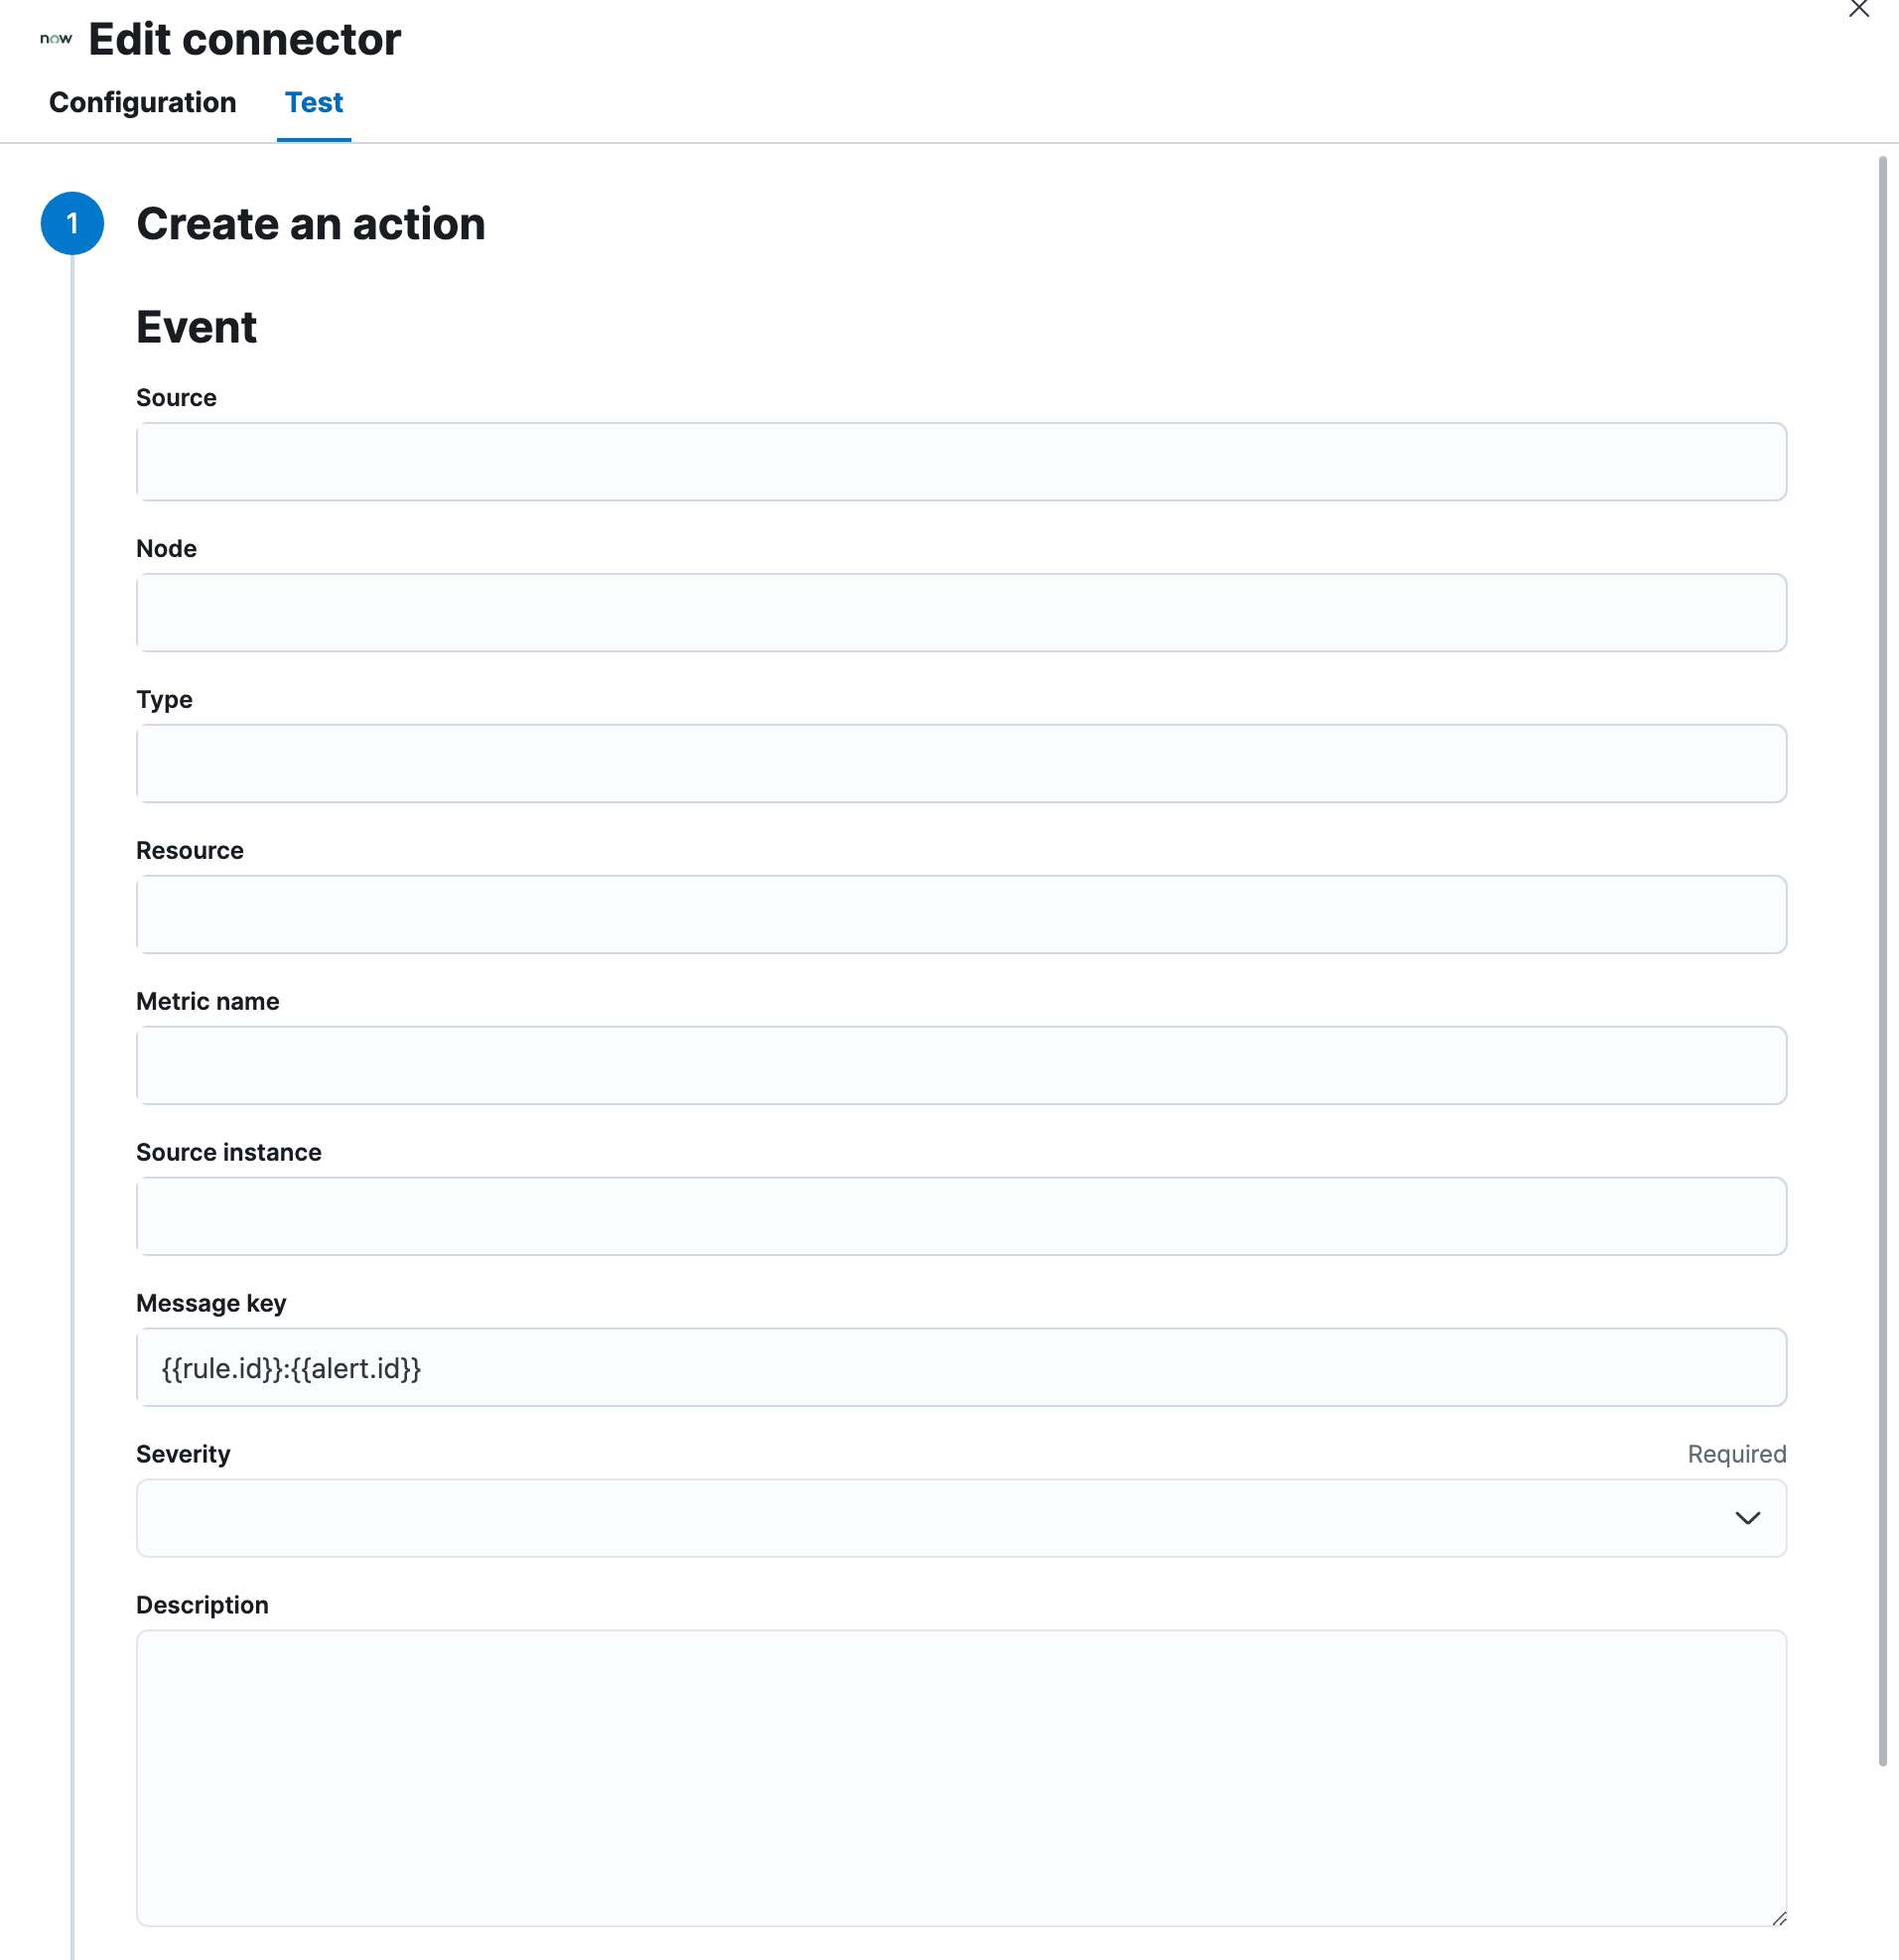
ServiceNow ITOM actions have the following configuration properties.
The details about the event.
All actions sharing this key are associated with the same ServiceNow alert. The default value is `{{rule.id}}:{{alert.id}}`.
The name of the metric.
The host that the event was triggered for.
The name of the resource.
The severity of the event.
The name of the event source type.
A specific instance of the source.
The type of event.
Refer to [ServiceNow documentation](https://docs.servicenow.com/bundle/rome-it-operations-management/page/product/event-management/task/send-events-via-web-service.md) for more information about the properties.
## Connector networking configuration
Use the [Action configuration settings](/elastic/kibana/pull/280898/reference/configuration-reference/alerting-settings#action-settings) to customize connector networking configurations, such as proxies, certificates, or TLS settings. You can set configurations that apply to all your connectors or use `xpack.actions.customHostSettings` to set per-host configurations.
## Configure ServiceNow ITOM
ServiceNow offers free [Personal Developer Instances](https://developer.servicenow.com/dev.do#!/guides/madrid/now-platform/pdi-guide/obtaining-a-pdi), which you can use to test incidents.
### Prerequisites
1. [Create a ServiceNow integration user and assign it the appropriate roles.](#servicenow-itom-connector-prerequisites-integration-user)
2. If you use open authorization (OAuth), you must also:
1. [Create an RSA keypair and add an X.509 Certificate](#servicenow-itom-connector-prerequisites-rsa-key).
2. [Create an OAuth JWT API endpoint for external clients with a JWT Verifiers Map](#servicenow-itom-connector-prerequisites-endpoint).
### Create a ServiceNow integration user
To ensure authenticated communication between Elastic and ServiceNow, create a ServiceNow integration user and assign it the appropriate roles.
1. In your ServiceNow instance, go to **System Security → Users and Groups → Users**.
2. Click **New**.
3. Complete the form, then right-click on the menu bar and click **Save**.
4. Go to the **Roles** tab and click **Edit**.
5. Assign the integration user the following roles:
- `personalize_choices`: Allows the user to retrieve Choice element options, such as Severity.
- `evt_mgmt_integration`: Enables integration with external event sources by allowing the user to create events.
6. Click **Save**.
### Create an RSA keypair and add an X.509 Certificate
This step is required to use OAuth for authentication between Elastic and ServiceNow.
#### Create an RSA keypair
1. Use [OpenSSL](https://www.openssl.org/docs/man1.0.2/man1/genrsa.md) to generate an RSA private key.
- To create a private key with a password, use the `passout` option. For example:
```sh
openssl genrsa -passout pass:foobar -out example-private-key-with-password.pem 3072
```
- To create a private key without a password, omit the `passout` option. For example:
```sh
openssl genrsa -out example-private-key.pem 3072
```
2. Use [OpenSSL](https://www.openssl.org/docs/man1.0.2/man1/req.md) to generate the matching public key:
```sh
openssl req -new -x509 -key example-private-key.pem -out example-sn-cert.pem -days 360
```
#### Add an X.509 certificate to ServiceNow
1. In your ServiceNow instance, go to **Certificates** and select **New**.
2. Configure the certificate as follows:
- **Name**: Name the certificate.
- **PEM Certificate**: Copy the generated public key into this text field.
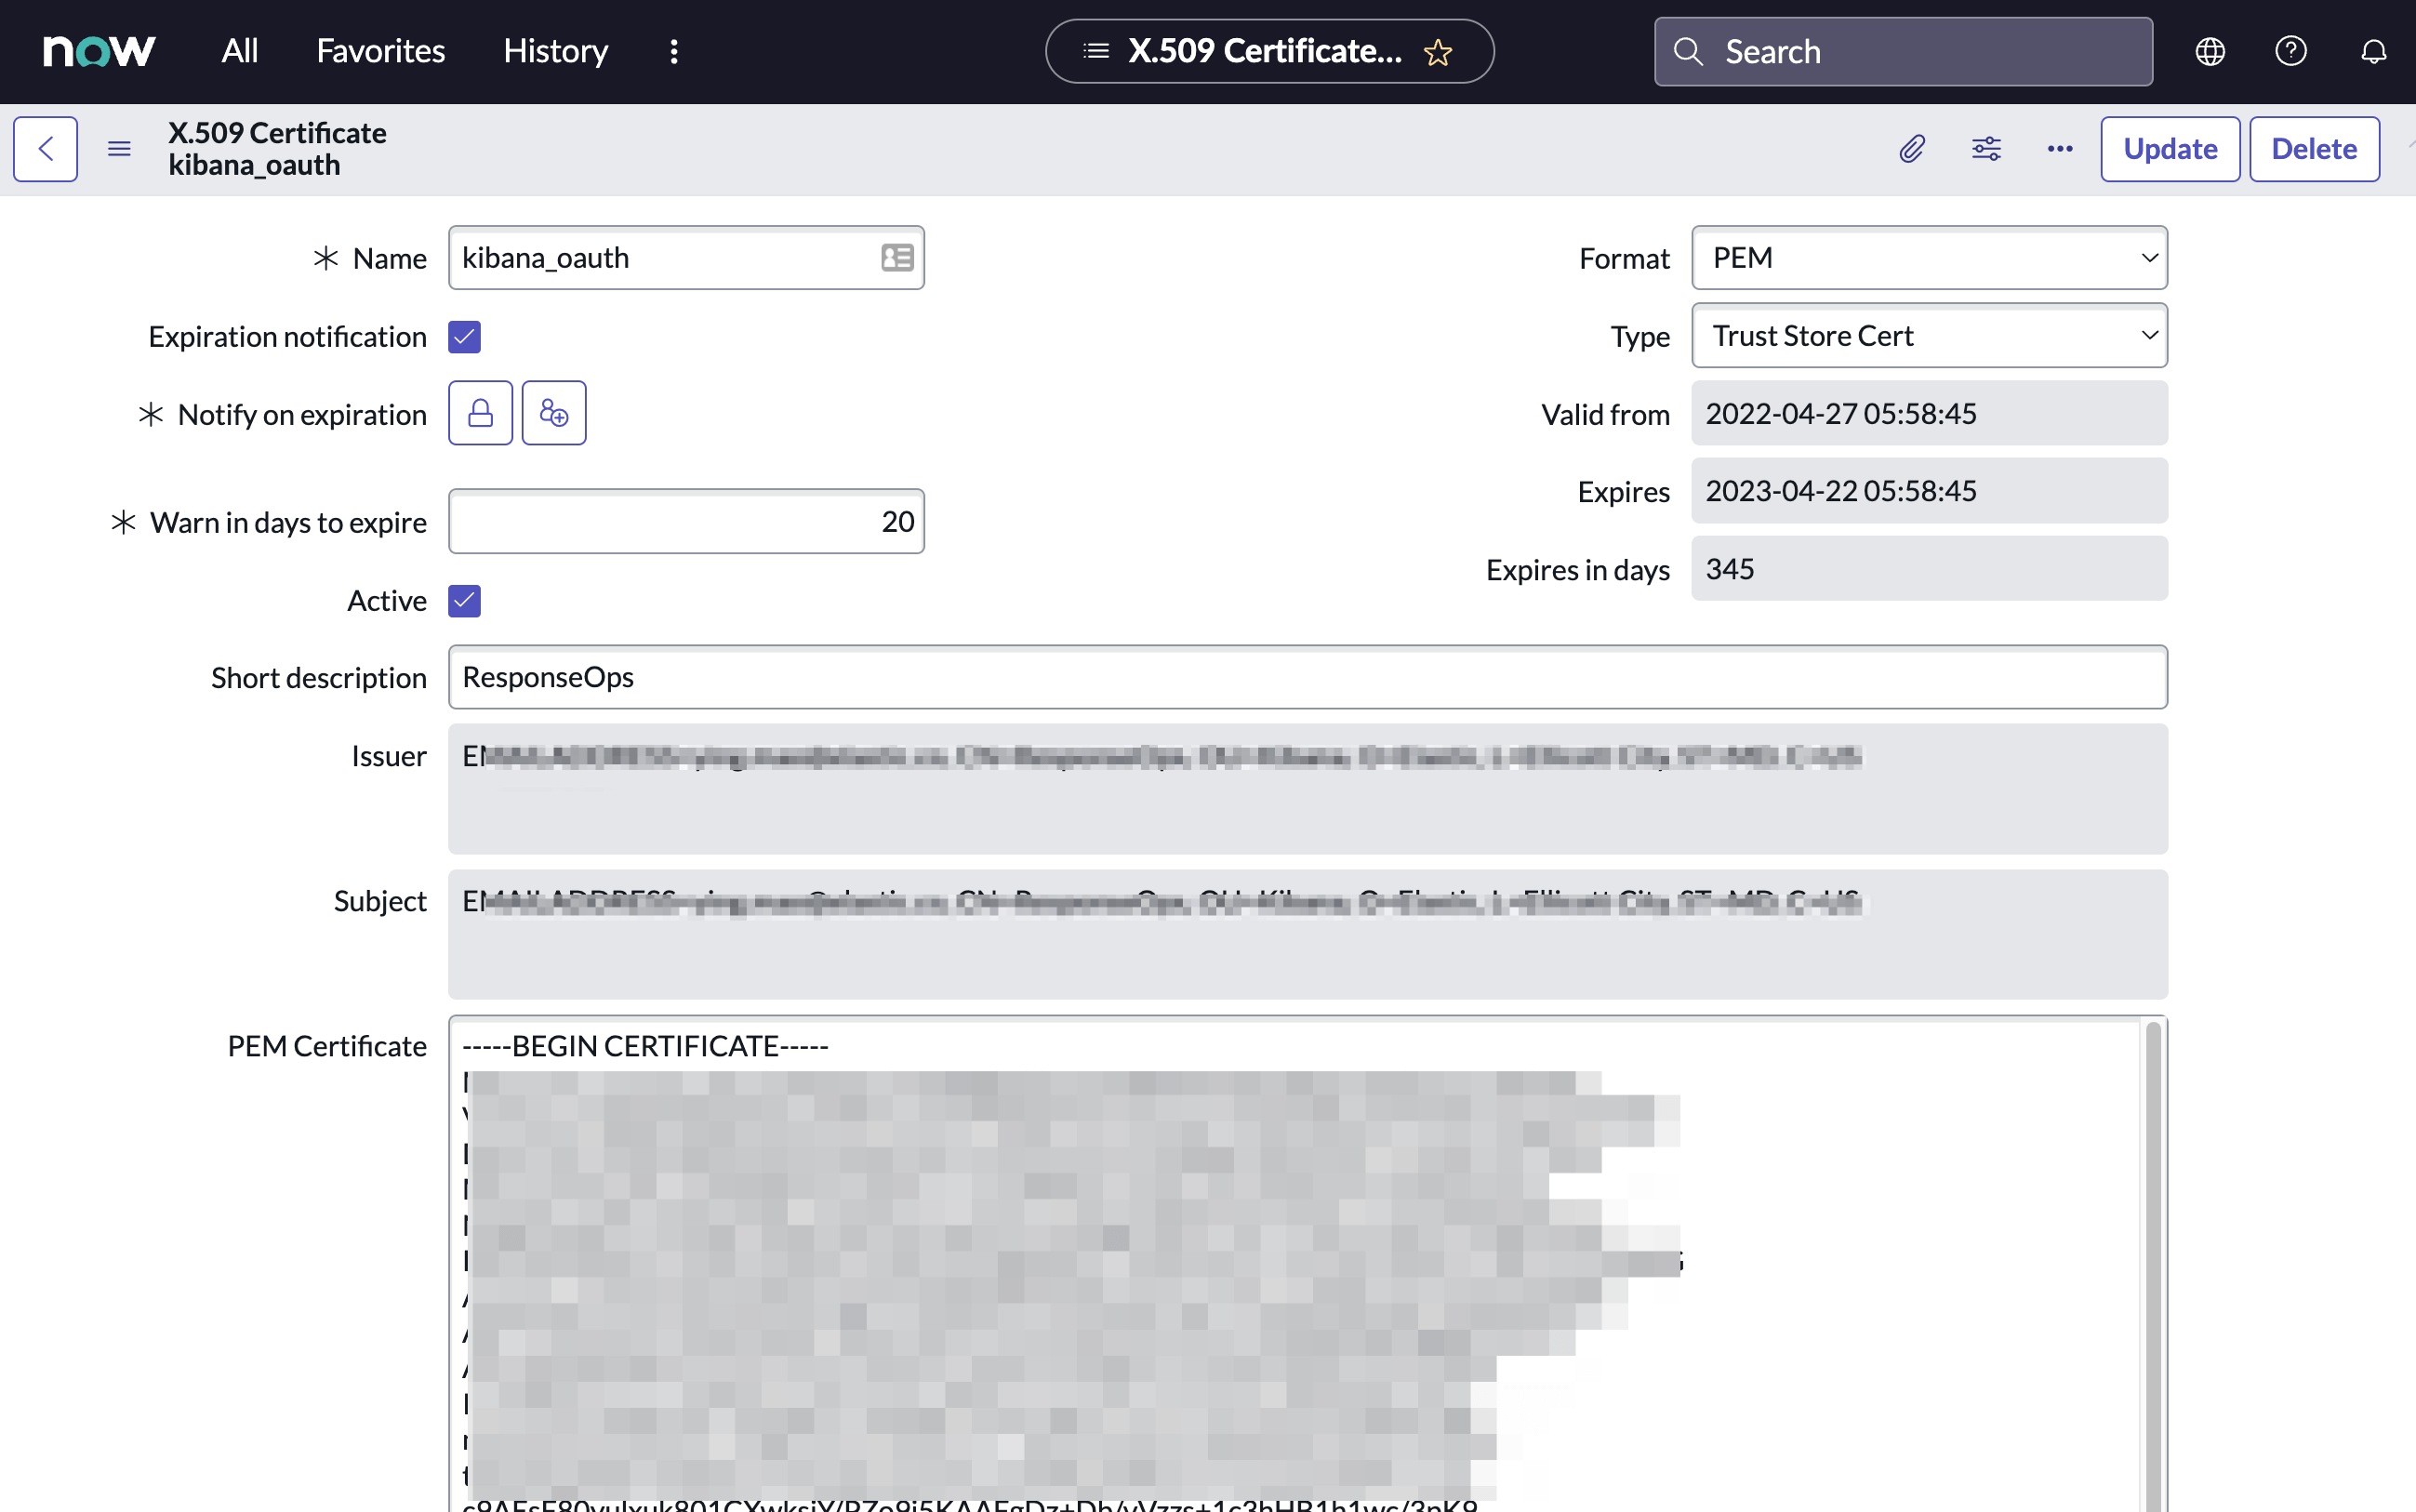
3. Click **Submit** to create the certificate.
### Create an OAuth JWT API endpoint for external clients with a JWT Verifiers Map
This step is required to use OAuth for authentication between Elastic and ServiceNow.
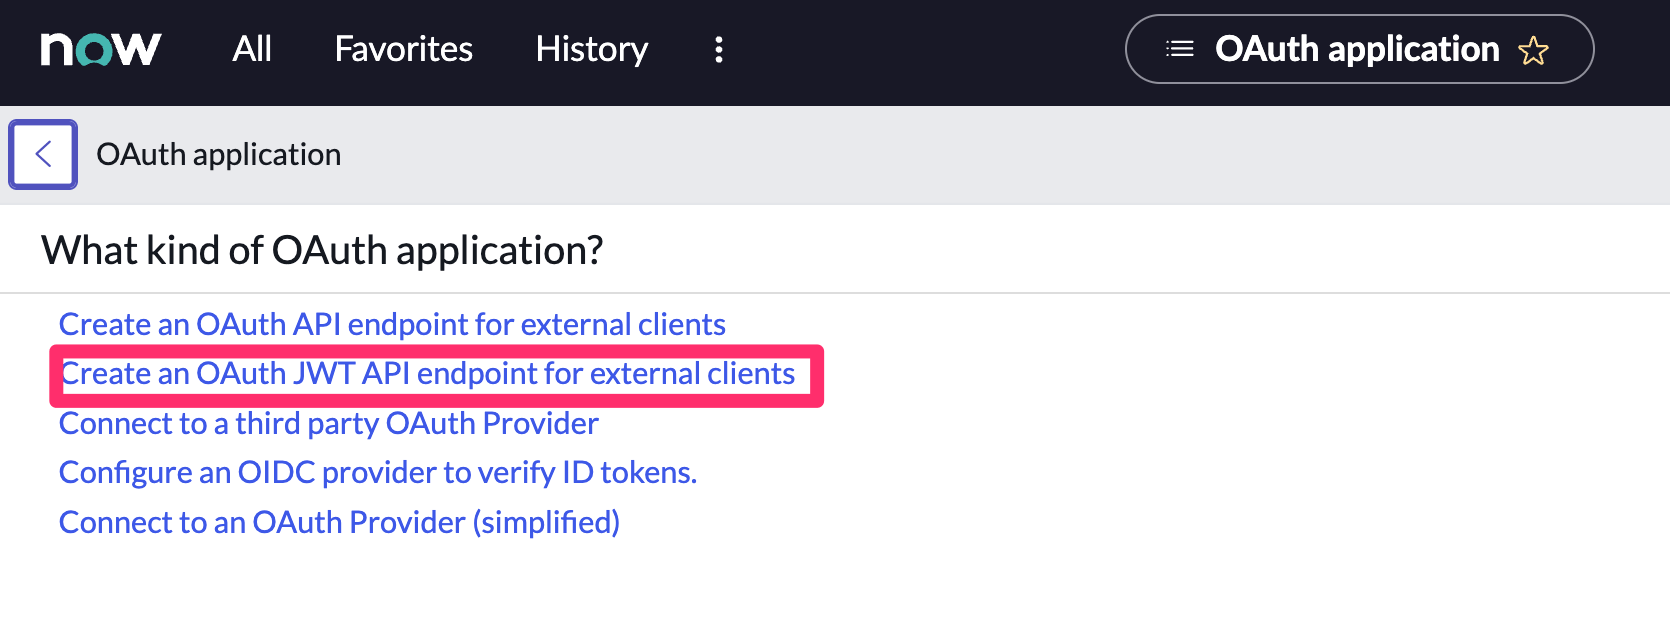
1. In your ServiceNow instance, go to **Application Registry** and select **New**.
2. Select **Create an OAuth JWT API endpoint for external clients** from the list of options.
3. Configure the application as follows:
- **Name**: Name the application.
- **User field**: Select the field to use as the user identifier.
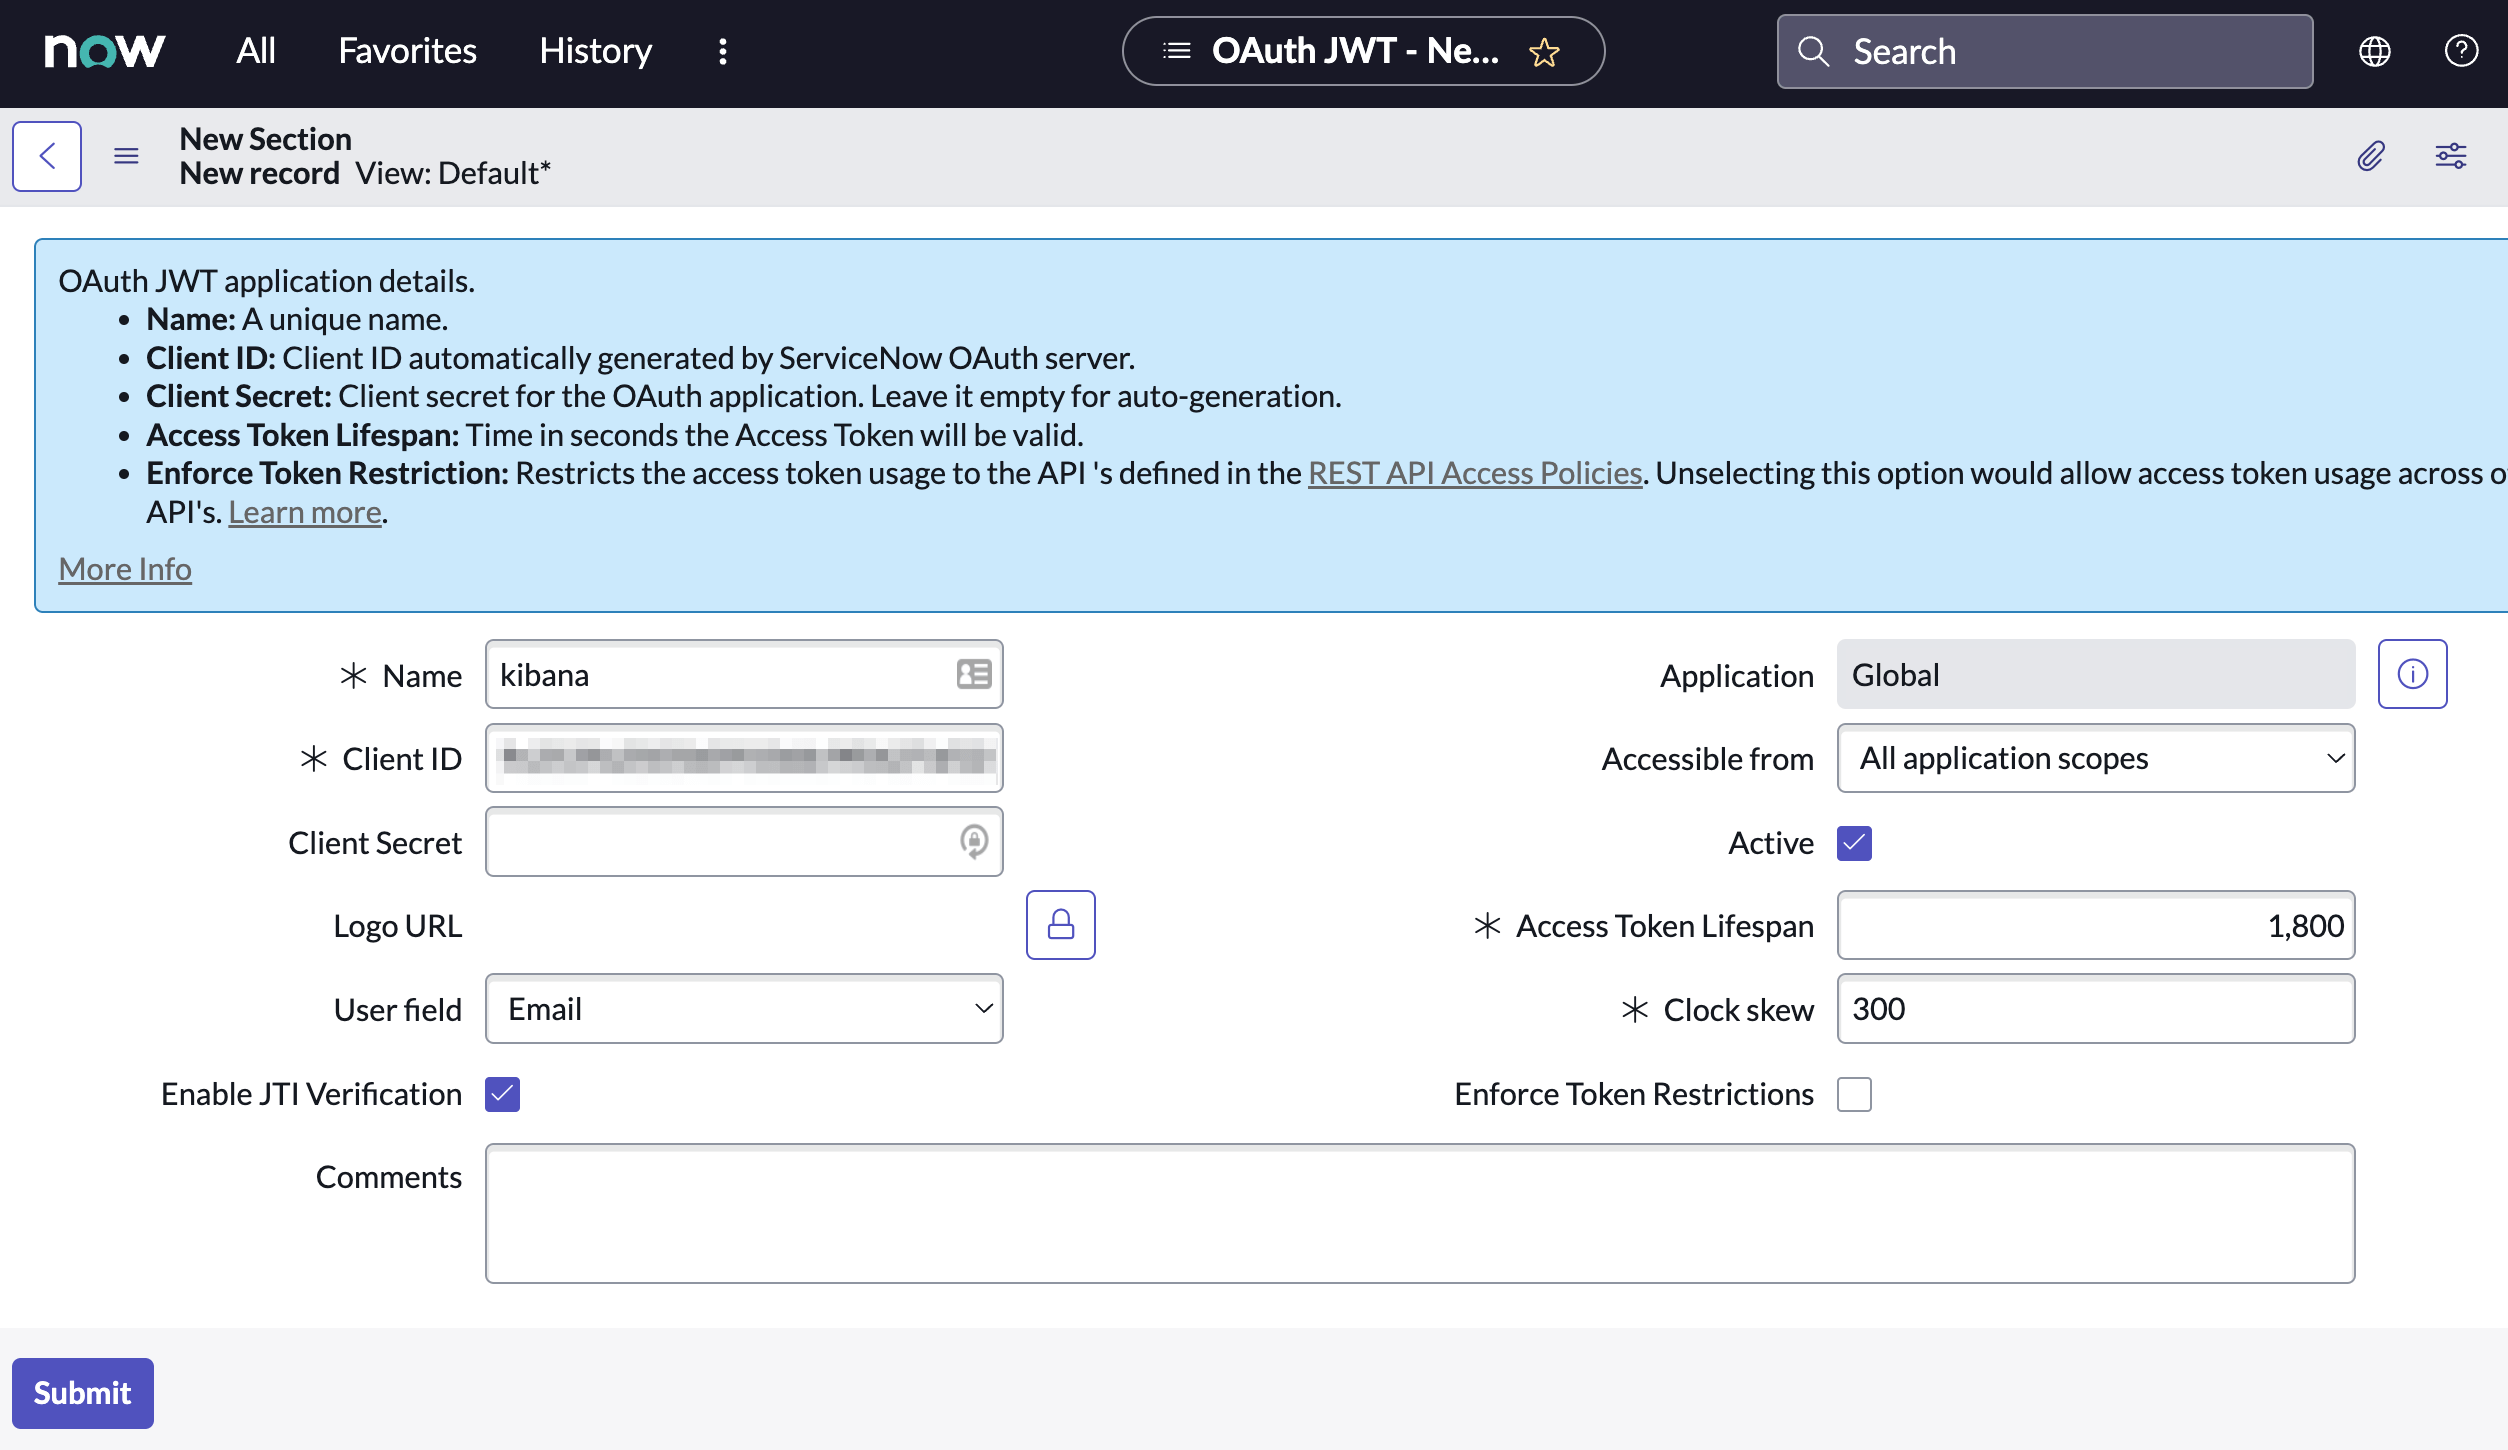
Remember the selected user field. You will use this as the **User Identifier Value** when creating the connector. For example, if you selected **Email** for **User field**, you will use the user’s email for the **User Identifier Value**.
4. Click **Submit** to create the application. You will be redirected to the list of applications.
5. Select the application you just created.
6. Find the **Jwt Verifier Maps** tab and click **New**.
7. Configure the new record as follows:
- **Name**: Name the JWT Verifier Map.
- **Sys certificate**: Click the search icon and select the name of the certificate created in the previous step.
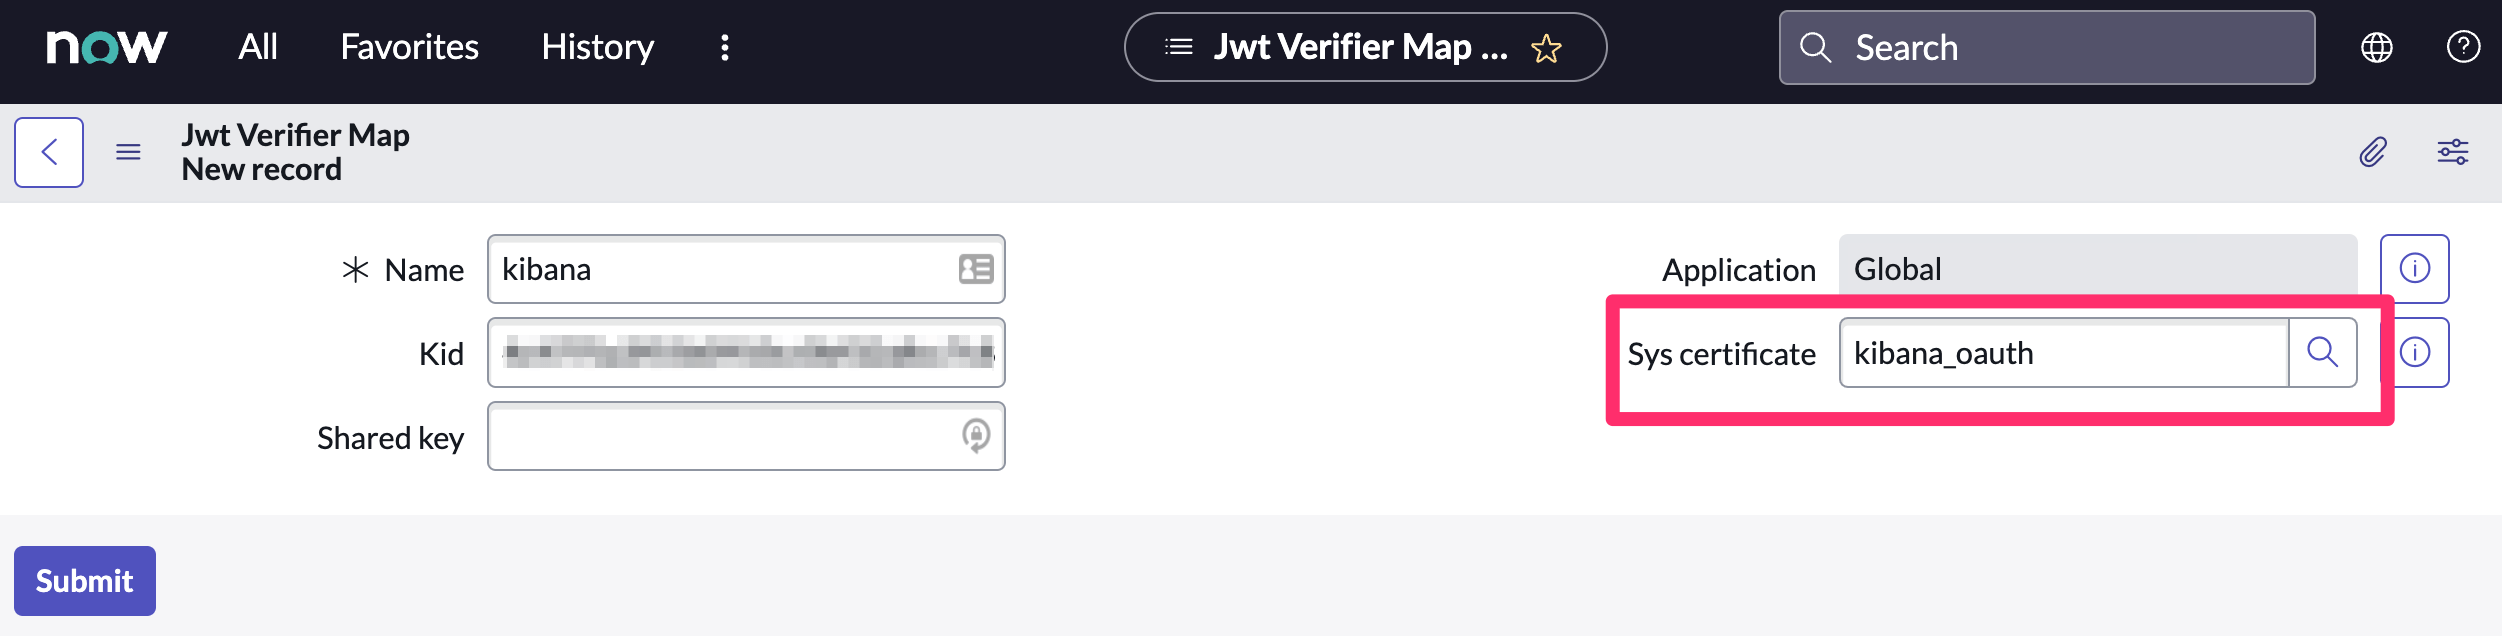
8. Click **Submit** to create the verifier map.
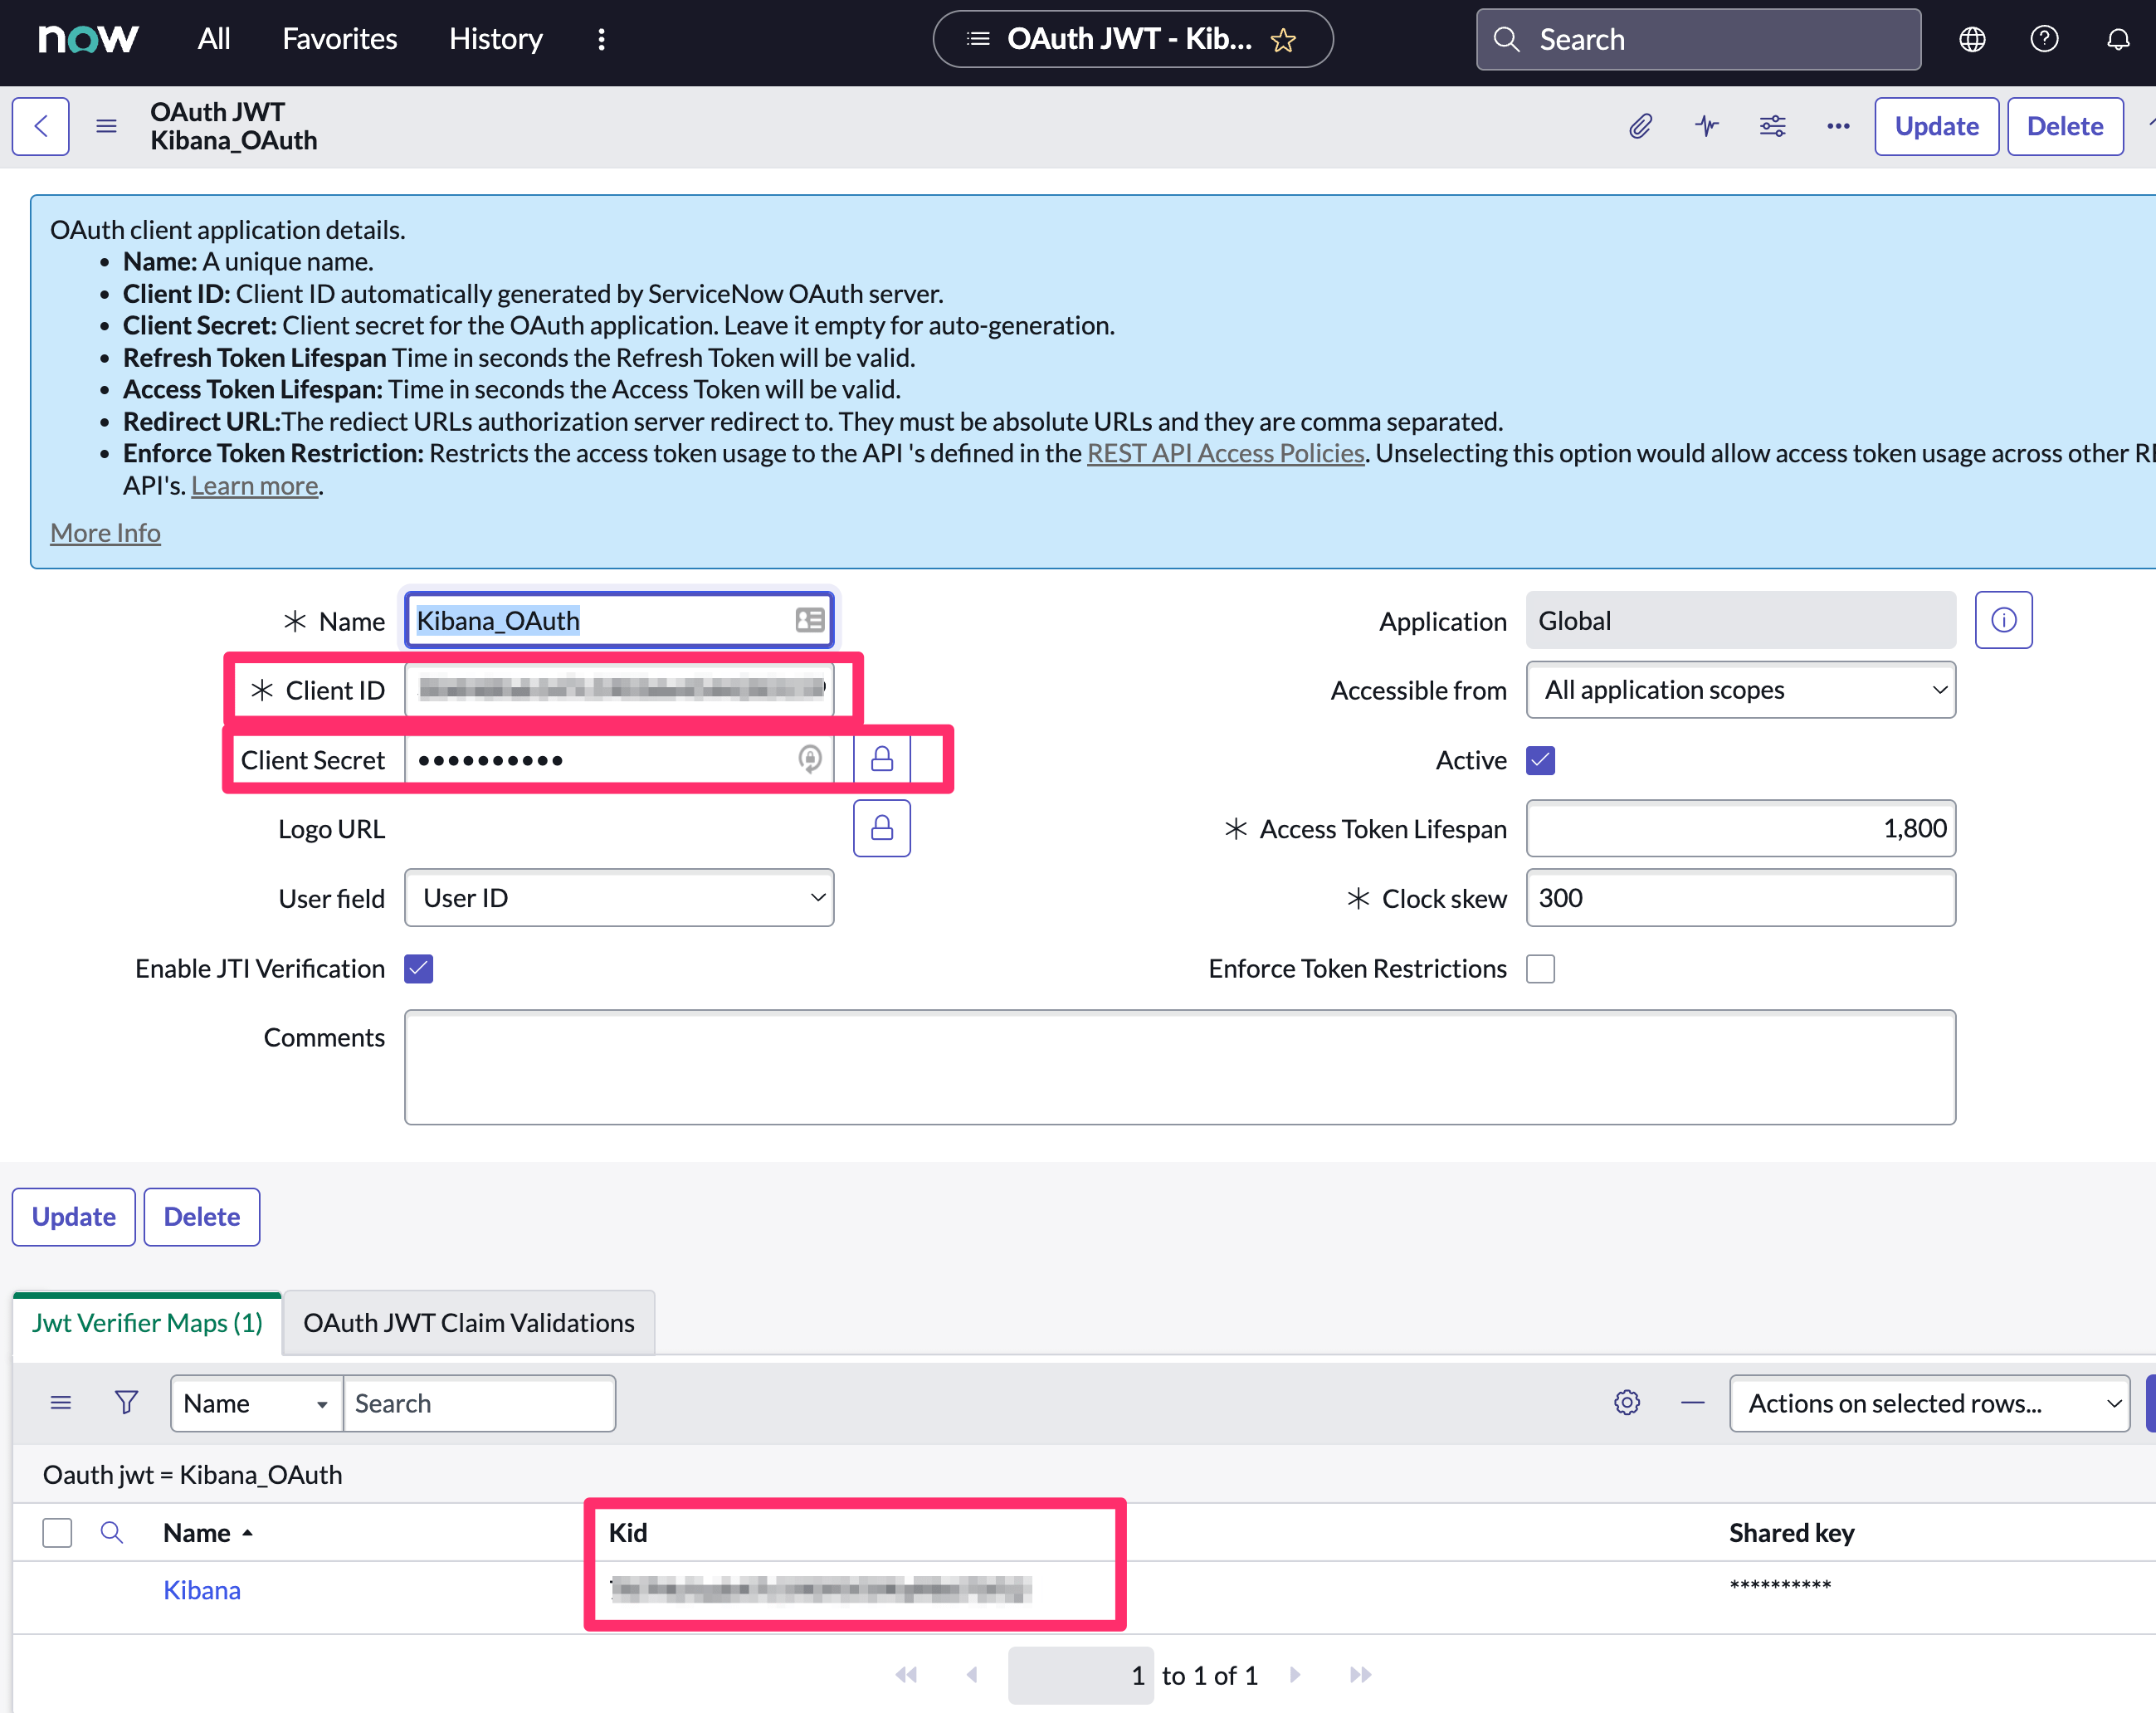
9. Note the **Client ID**, **Client Secret** and **JWT Key ID**. You will need these values to create your ServiceNow connector.