---
title: ServiceNow SecOps connector and action
description: The ServiceNow SecOps connector uses the import set API to create ServiceNow security incidents. You can use the connector for rule actions and cases...
url: https://docs-v3-preview.elastic.dev/elastic/kibana/pull/280898/reference/connectors-kibana/servicenow-sir-action-type
products:
- Kibana
applies_to:
- Serverless Observability projects: Generally available
- Serverless Security projects: Generally available
- Elastic Stack: Generally available
---
# ServiceNow SecOps connector and action
The ServiceNow SecOps connector uses the [import set API](https://developer.servicenow.com/dev.do#!/reference/api/sandiego/rest/c_ImportSetAPI) to create ServiceNow security incidents. You can use the connector for rule actions and cases.
## Create connectors in Kibana
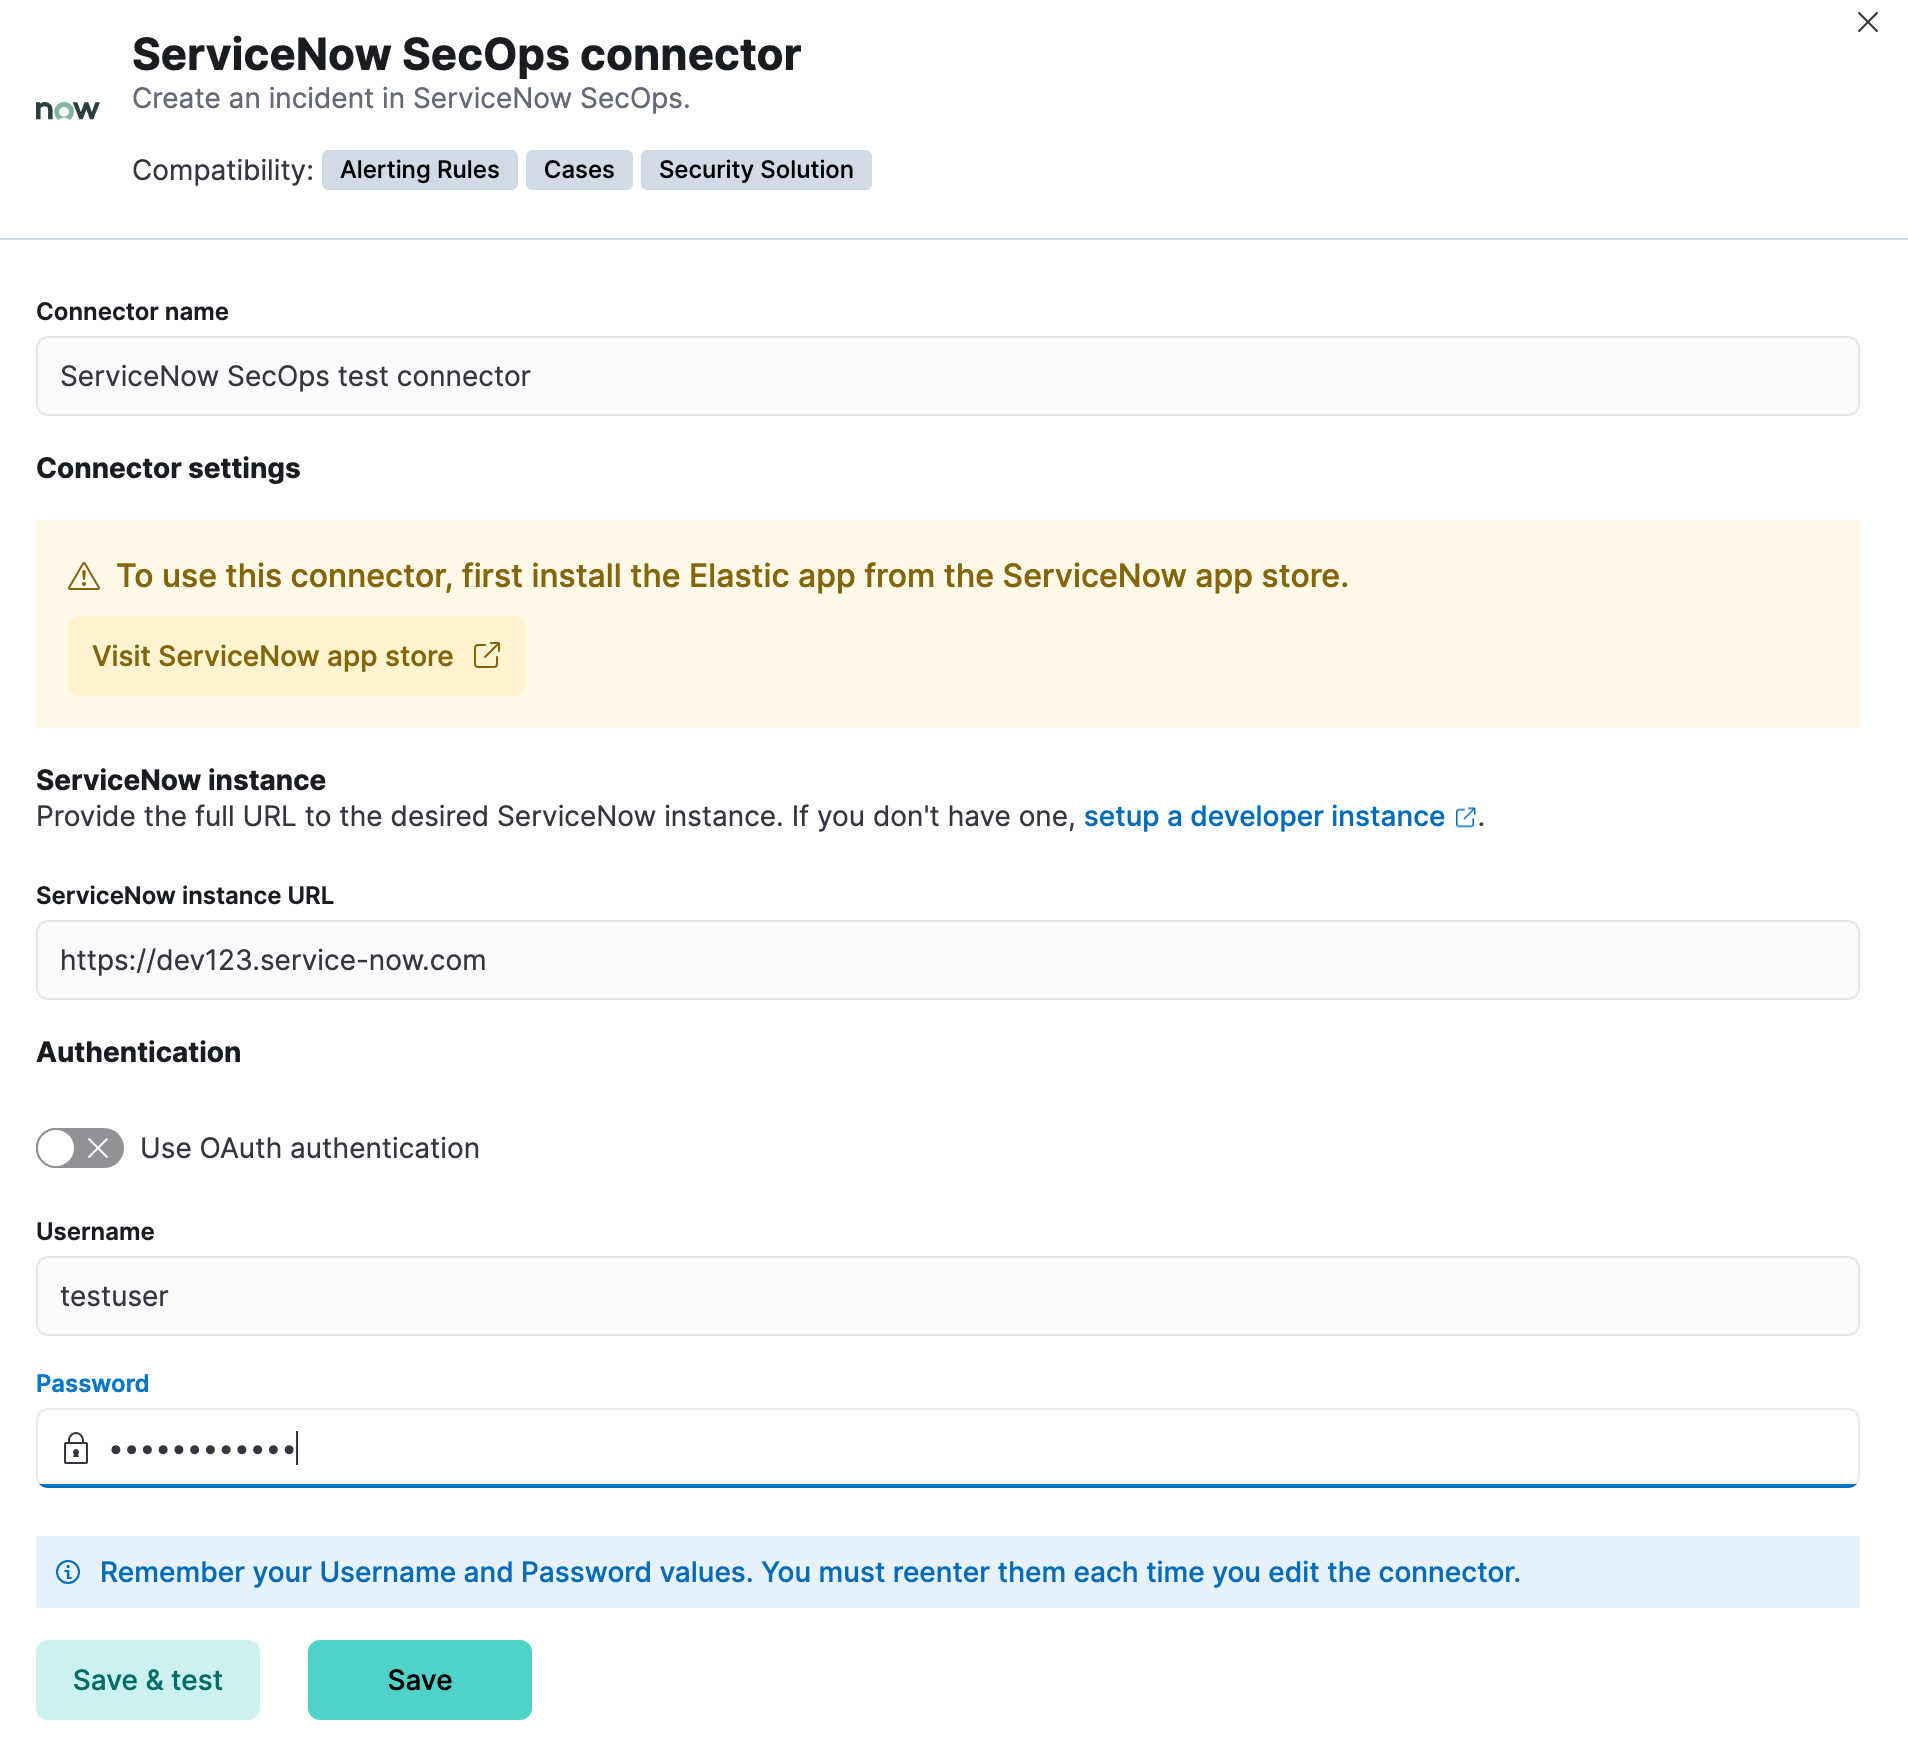
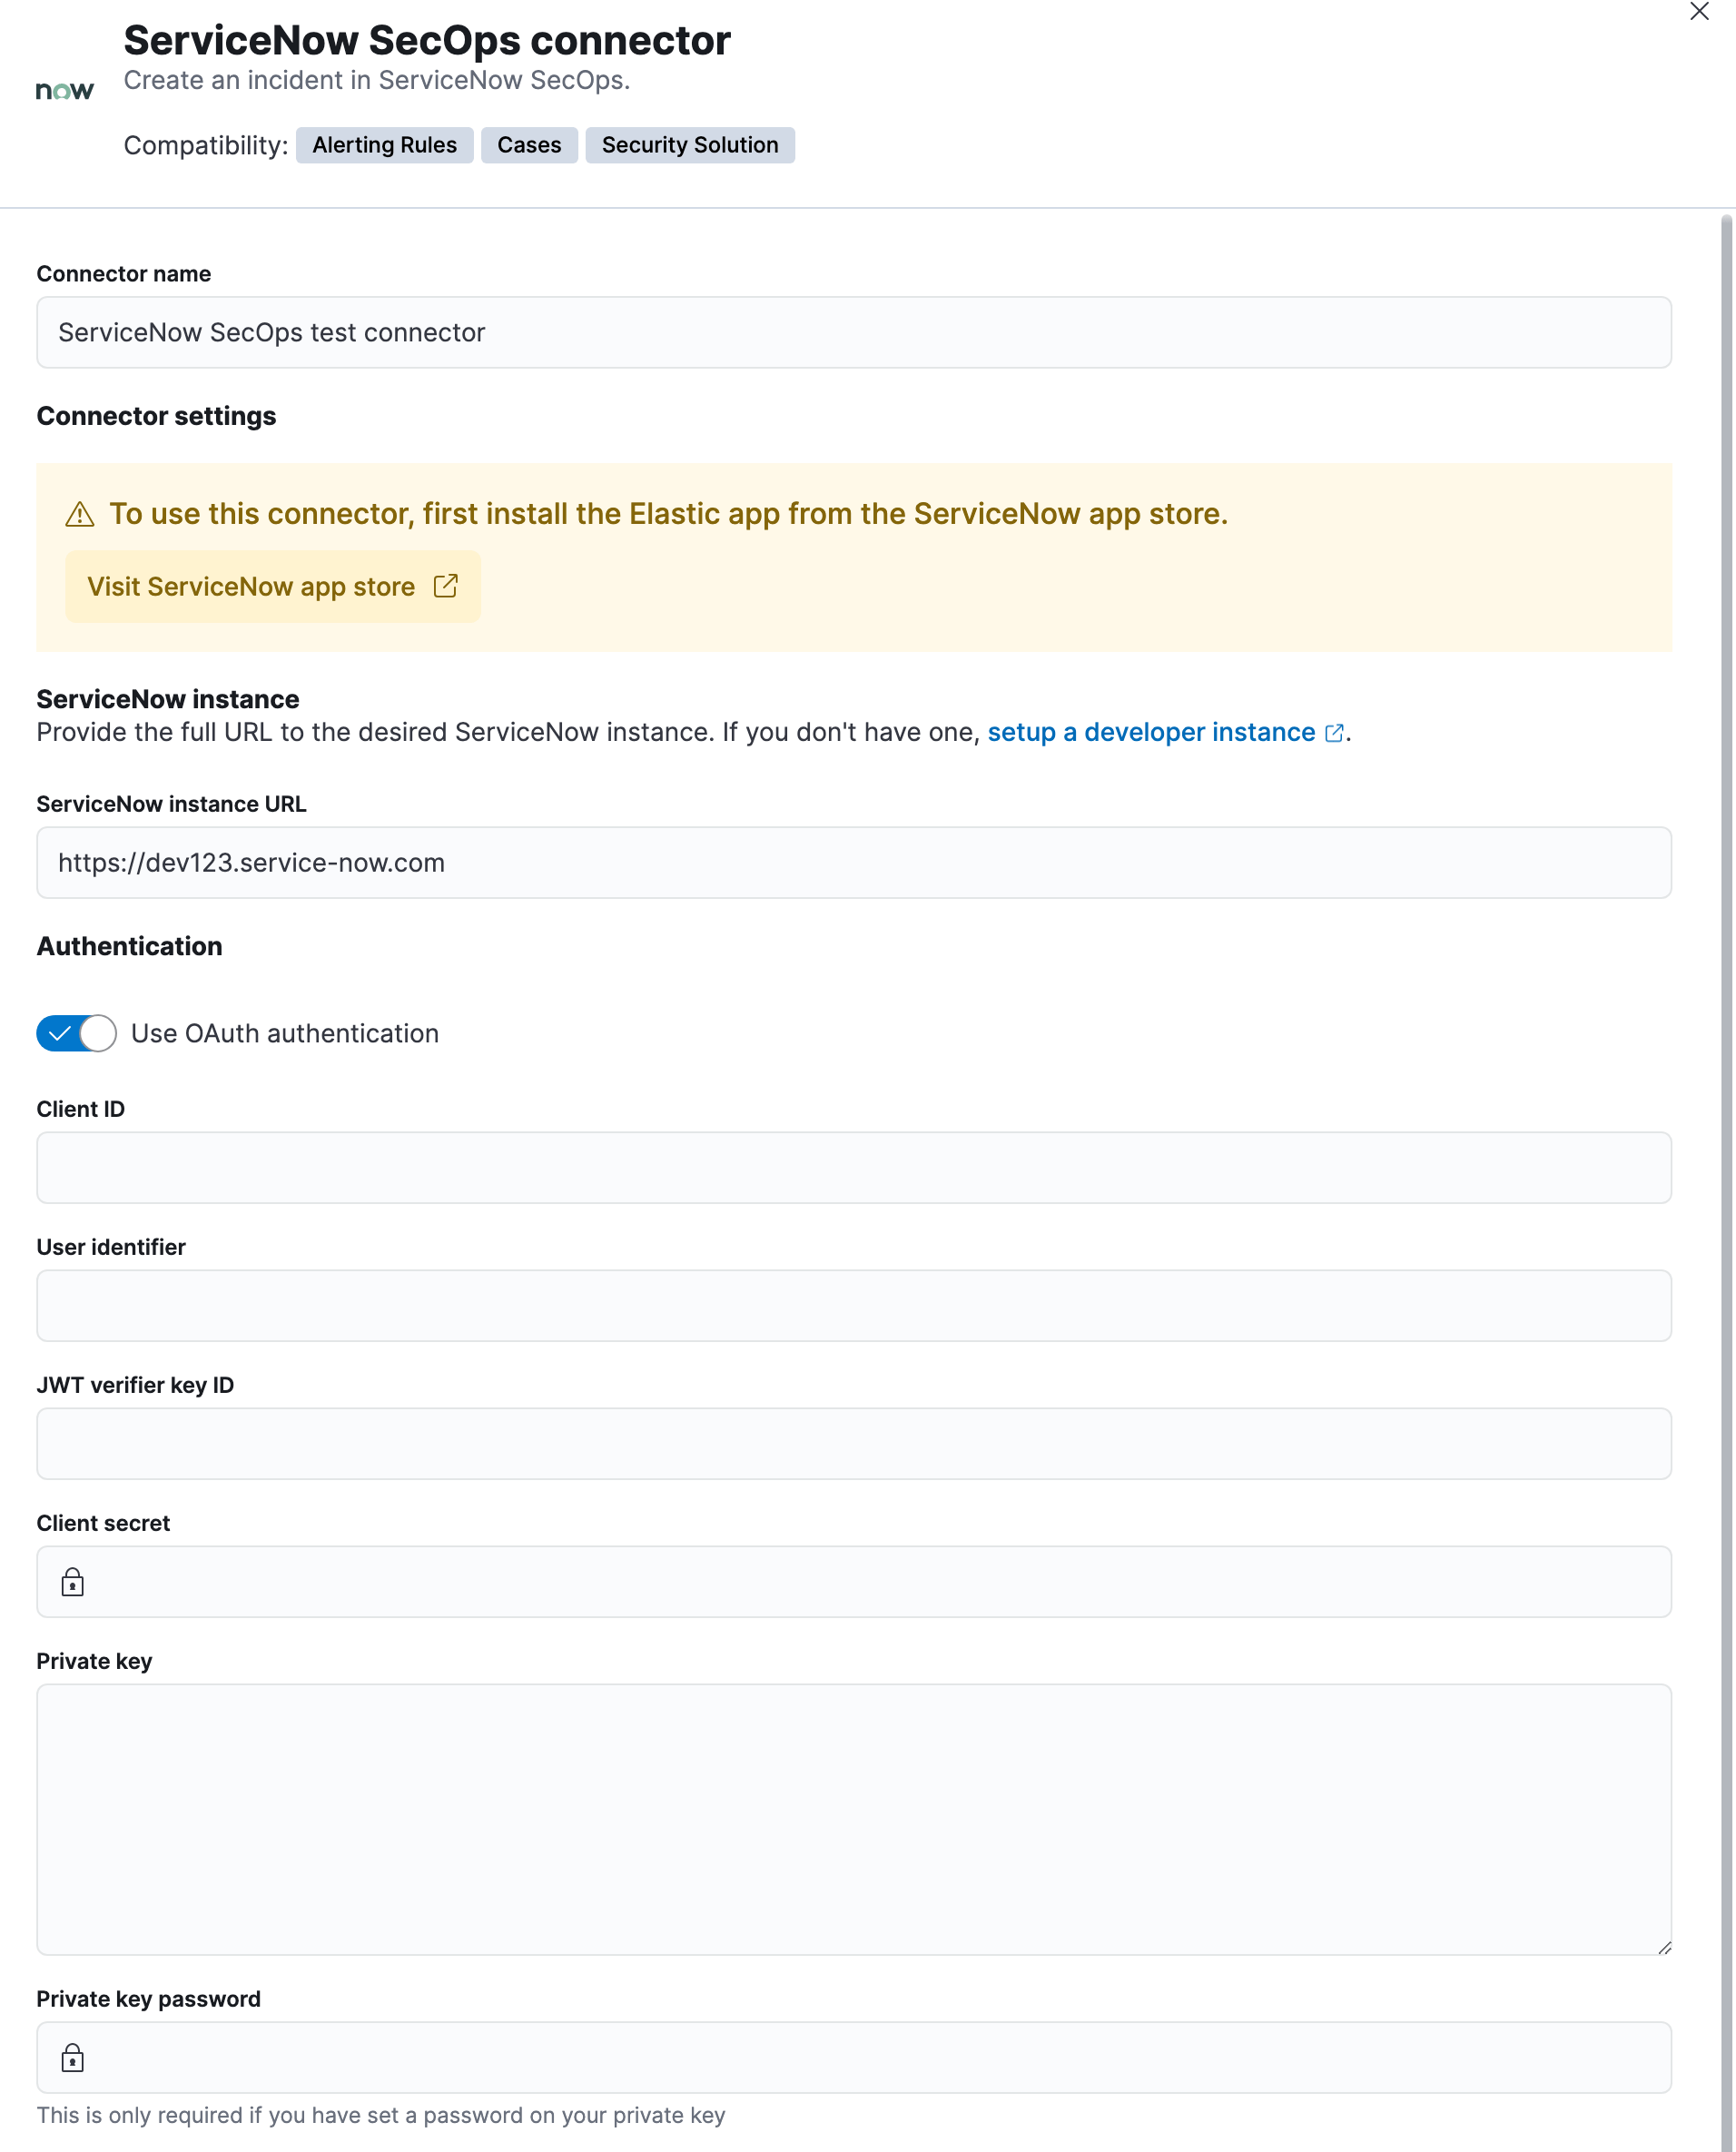
You can create connectors in **Stack Management > Connectors** or as needed when you're creating a rule. You must choose whether to use OAuth for authentication.
### Connector configuration
ServiceNow SecOps connectors have the following configuration properties:
The client ID assigned to your OAuth application.
The client secret assigned to your OAuth application.
The key identifier assigned to the JWT verifier map of your OAuth application.
The password for HTTP basic authentication.
The RSA private key that you created for use in ServiceNow.
The password for the RSA private key. This value is required if you set a password for your private key.
The full ServiceNow instance URL.
By default, basic authentication is used instead of open authorization (OAuth).
The identifier to use for OAuth type authentication. This identifier should be the user field you selected during setup. For example, if the selected user field is `Email`, the user identifier should be the user's email address.
The username for HTTP basic authentication.
## Test connectors
You can test connectors as you're creating or editing the connector in Kibana. For example:
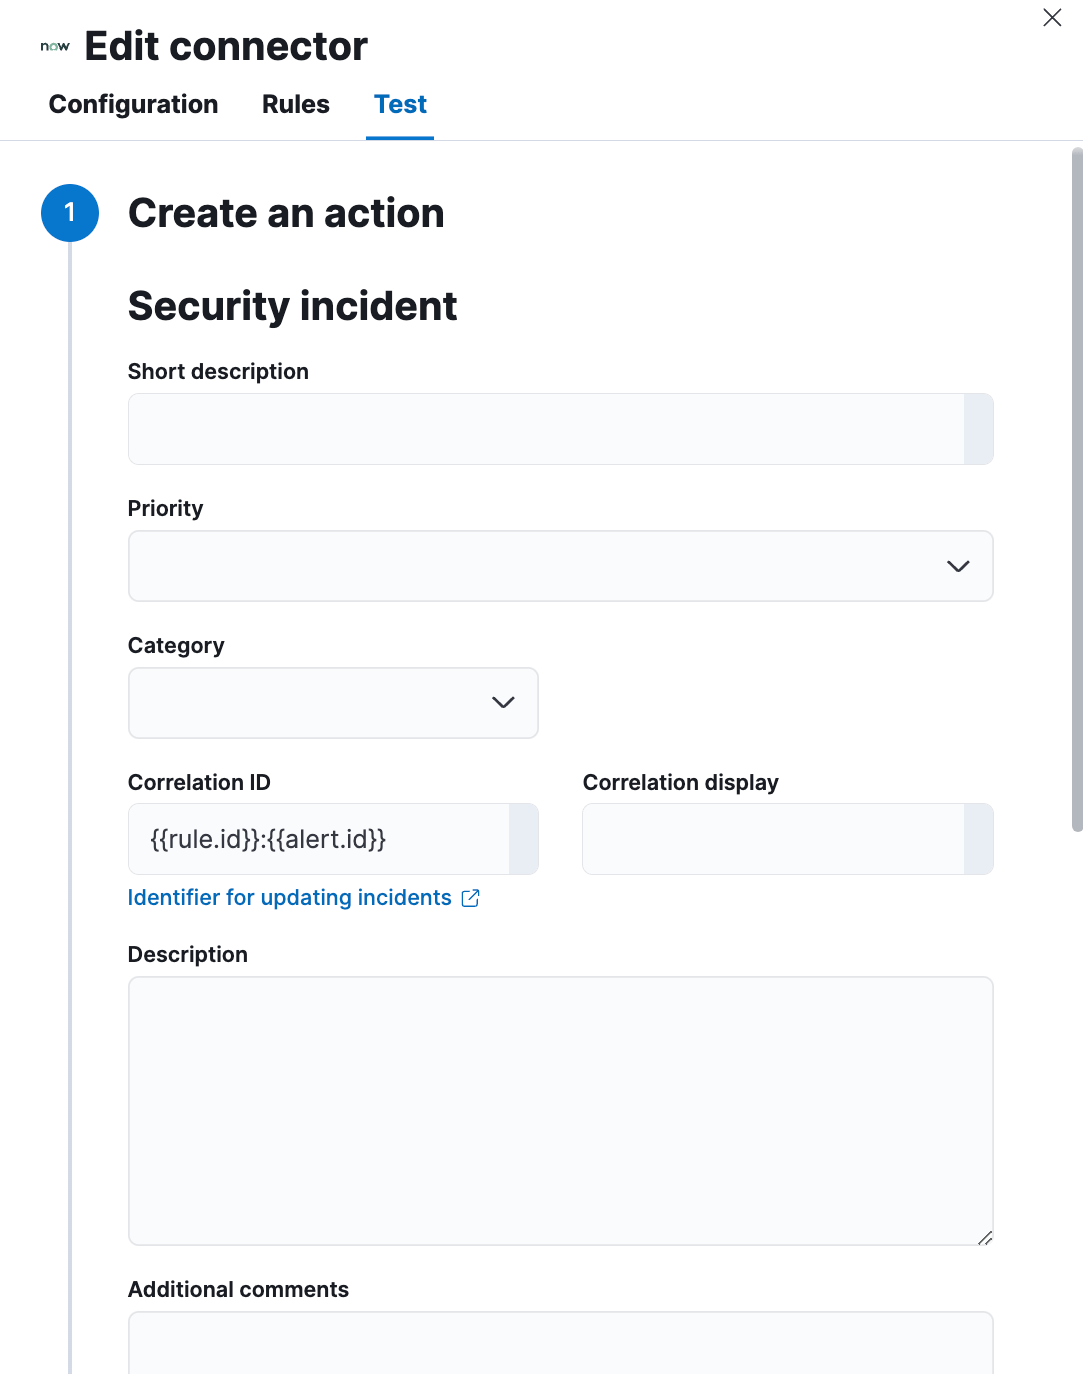
ServiceNow SecOps actions have the following configuration properties.
Additional information for the client, such as how to troubleshoot the issue.
An object that contains custom field identifiers and their values. These fields must exist in the Elastic ServiceNow application and must be specified in JSON format.
For example:
```sh
{
"u_cmdb_ci": "host-a",
"u_company": "My company",
"u_assignment_group": "Testing"
}
```
Note that the default source field names in the Elastic ServiceNow application are prefixed with "u_".
The category of the incident.
A descriptive label of the alert for correlation purposes in ServiceNow.
Connectors using the same correlation ID will be associated with the same ServiceNow incident. This value determines whether a new ServiceNow incident will be created or an existing one is updated. Modifying this value is optional; if not modified, the rule ID and alert ID are combined as `{{ruleID}}:{{alert ID}}` to form the correlation ID value in ServiceNow. The maximum character length for this value is 100 characters.
Using the default configuration of `{{ruleID}}:{{alert ID}}` ensures that ServiceNow will create a separate incident record for every generated alert that uses a unique alert ID. If the rule generates multiple alerts that use the same alert IDs, ServiceNow creates and continually updates a single incident record for the alert.
The details about the incident.
The priority of the incident.
A short description for the incident, used for searching the contents of the knowledge base.
The subcategory of the incident.
## Connector networking configuration
Use the [Action configuration settings](/elastic/kibana/pull/280898/reference/configuration-reference/alerting-settings#action-settings) to customize connector networking configurations, such as proxies, certificates, or TLS settings. You can set configurations that apply to all your connectors or use `xpack.actions.customHostSettings` to set per-host configurations.
## Configure ServiceNow SecOps
ServiceNow offers free [Personal Developer Instances](https://developer.servicenow.com/dev.do#!/guides/madrid/now-platform/pdi-guide/obtaining-a-pdi), which you can use to test incidents.
### Prerequisites
After upgrading from Elastic Stack version 7.15.0 or earlier to version 7.16.0 or later, you must complete the following within your ServiceNow instance before creating a new ServiceNow SecOps connector or [updating an existing one](#servicenow-sir-connector-update):
1. Install [Elastic for Security Operations (SecOps)](https://store.servicenow.com/sn_appstore_store.do#!/store/application/2f0746801baeb01019ae54e4604bcb0f) from the ServiceNow Store.
2. [Assign cross-scope privileges for the Elastic for Security Operations app](#servicenow-sir-connector-privileges).
3. [Create a ServiceNow integration user and assign it the appropriate roles](#servicenow-sir-connector-prerequisites-integration-user).
4. [Create a Cross-Origin Resource Sharing (CORS) rule](#servicenow-sir-connector-prerequisites-cors-rule).
5. If you use open authorization (OAuth), you must also:
1. [Create an RSA keypair and add an X.509 Certificate](#servicenow-sir-connector-prerequisites-rsa-key).
2. [Create an OAuth JWT API endpoint for external clients with a JWT Verifiers Map](#servicenow-sir-connector-prerequisites-endpoint).
### Assign cross-scope privileges
The Elastic for Security Operations app requires specific cross-scope privilege records to run successfully. In particular, you must have a privilege record for the `Elastic for Security Operations` application with the status set to `Allowed` for each of the following targets:
| Target scope | Name | Type | Operation |
|------------------------------------|----------------------------------------|------------|-------------|
| Global | Glide API: string utilities | Scriptable | Execute API |
| Global | GlideRecord.insert | Scriptable | Execute API |
| Global | GlideRecord.setValue | Scriptable | Execute API |
| Global | GlideRecordSecure.getValue | Scriptable | Execute API |
| Global | RESTAPIRequest | Scriptable | Execute API |
| Global | RESTAPIRequestBody | Scriptable | Execute API |
| Global | ScopedGlideElement | Scriptable | Execute API |
| Global | ScriptableServiceResultBuilder.setBody | Scriptable | Execute API |
| Security incident response | sn_si_incident | Table | Read |
| Threat intelligence support common | sn_ti_m2m_task_observable | Table | Create |
| Threat intelligence support common | sn_ti_m2m_task_observable | Table | Read |
| Threat intelligence support common | sn_ti_observable | Table | Create |
| Threat intelligence support common | sn_ti_observable | Table | Read |
| Threat intelligence support common | sn_ti_observable_type | Table | Read |
To access the cross scope privileges table:
1. Log into ServiceNow and set your application scope to Elastic for Security Operations.
2. Click **All** and search for `sys_scope_privilege`.
For more details, refer to the [ServiceNow product documentation](https://docs.servicenow.com/).
### Create a ServiceNow integration user
To ensure authenticated communication between Elastic and ServiceNow, create a ServiceNow integration user and assign it the appropriate roles.
1. In your ServiceNow instance, go to **System Security → Users and Groups → Users**.
2. Click **New**.
3. Complete the form, then right-click on the menu bar and click **Save**.
4. Go to the **Roles** tab and click **Edit**.
5. Assign the integration user the following roles:
- `import_set_loader`
- `import_transformer`
- `personalize_choices`
- `sn_si.basic`
- `x_elas2_sir_int.integration_user`
6. Click **Save**.
### Create a CORS rule
A CORS rule is required for communication between Elastic and ServiceNow. To create a CORS rule:
1. In your ServiceNow instance, go to **System Web Services → REST → CORS Rules**.
2. Click **New**.
3. Configure the rule as follows:
- **Name**: Name the rule.
- **REST API**: Set the rule to use the Elastic SecOps API by choosing `Elastic SIR API [x_elas2_sir_int/elastic_api]`.
- **Domain**: Enter the Kibana URL, including the port number.
4. Go to the **HTTP methods** tab and select **GET**.
5. Click **Submit** to create the rule.
### Create an RSA keypair and add an X.509 Certificate
This step is required to use OAuth for authentication between Elastic and ServiceNow.
#### Create an RSA keypair
1. Use [OpenSSL](https://www.openssl.org/docs/man1.0.2/man1/genrsa.md) to generate an RSA private key.
- To create a private key with a password, use the `passout` option. For example:
```sh
openssl genrsa -passout pass:foobar -out example-private-key-with-password.pem 3072
```
- To create a private key without a password, omit the `passout` option. For example:
```sh
openssl genrsa -out example-private-key.pem 3072
```
2. Use [OpenSSL](https://www.openssl.org/docs/man1.0.2/man1/req.md) to generate the matching public key:
```sh
openssl req -new -x509 -key example-private-key.pem -out example-sn-cert.pem -days 360
```
#### Add an X.509 certificate to ServiceNow
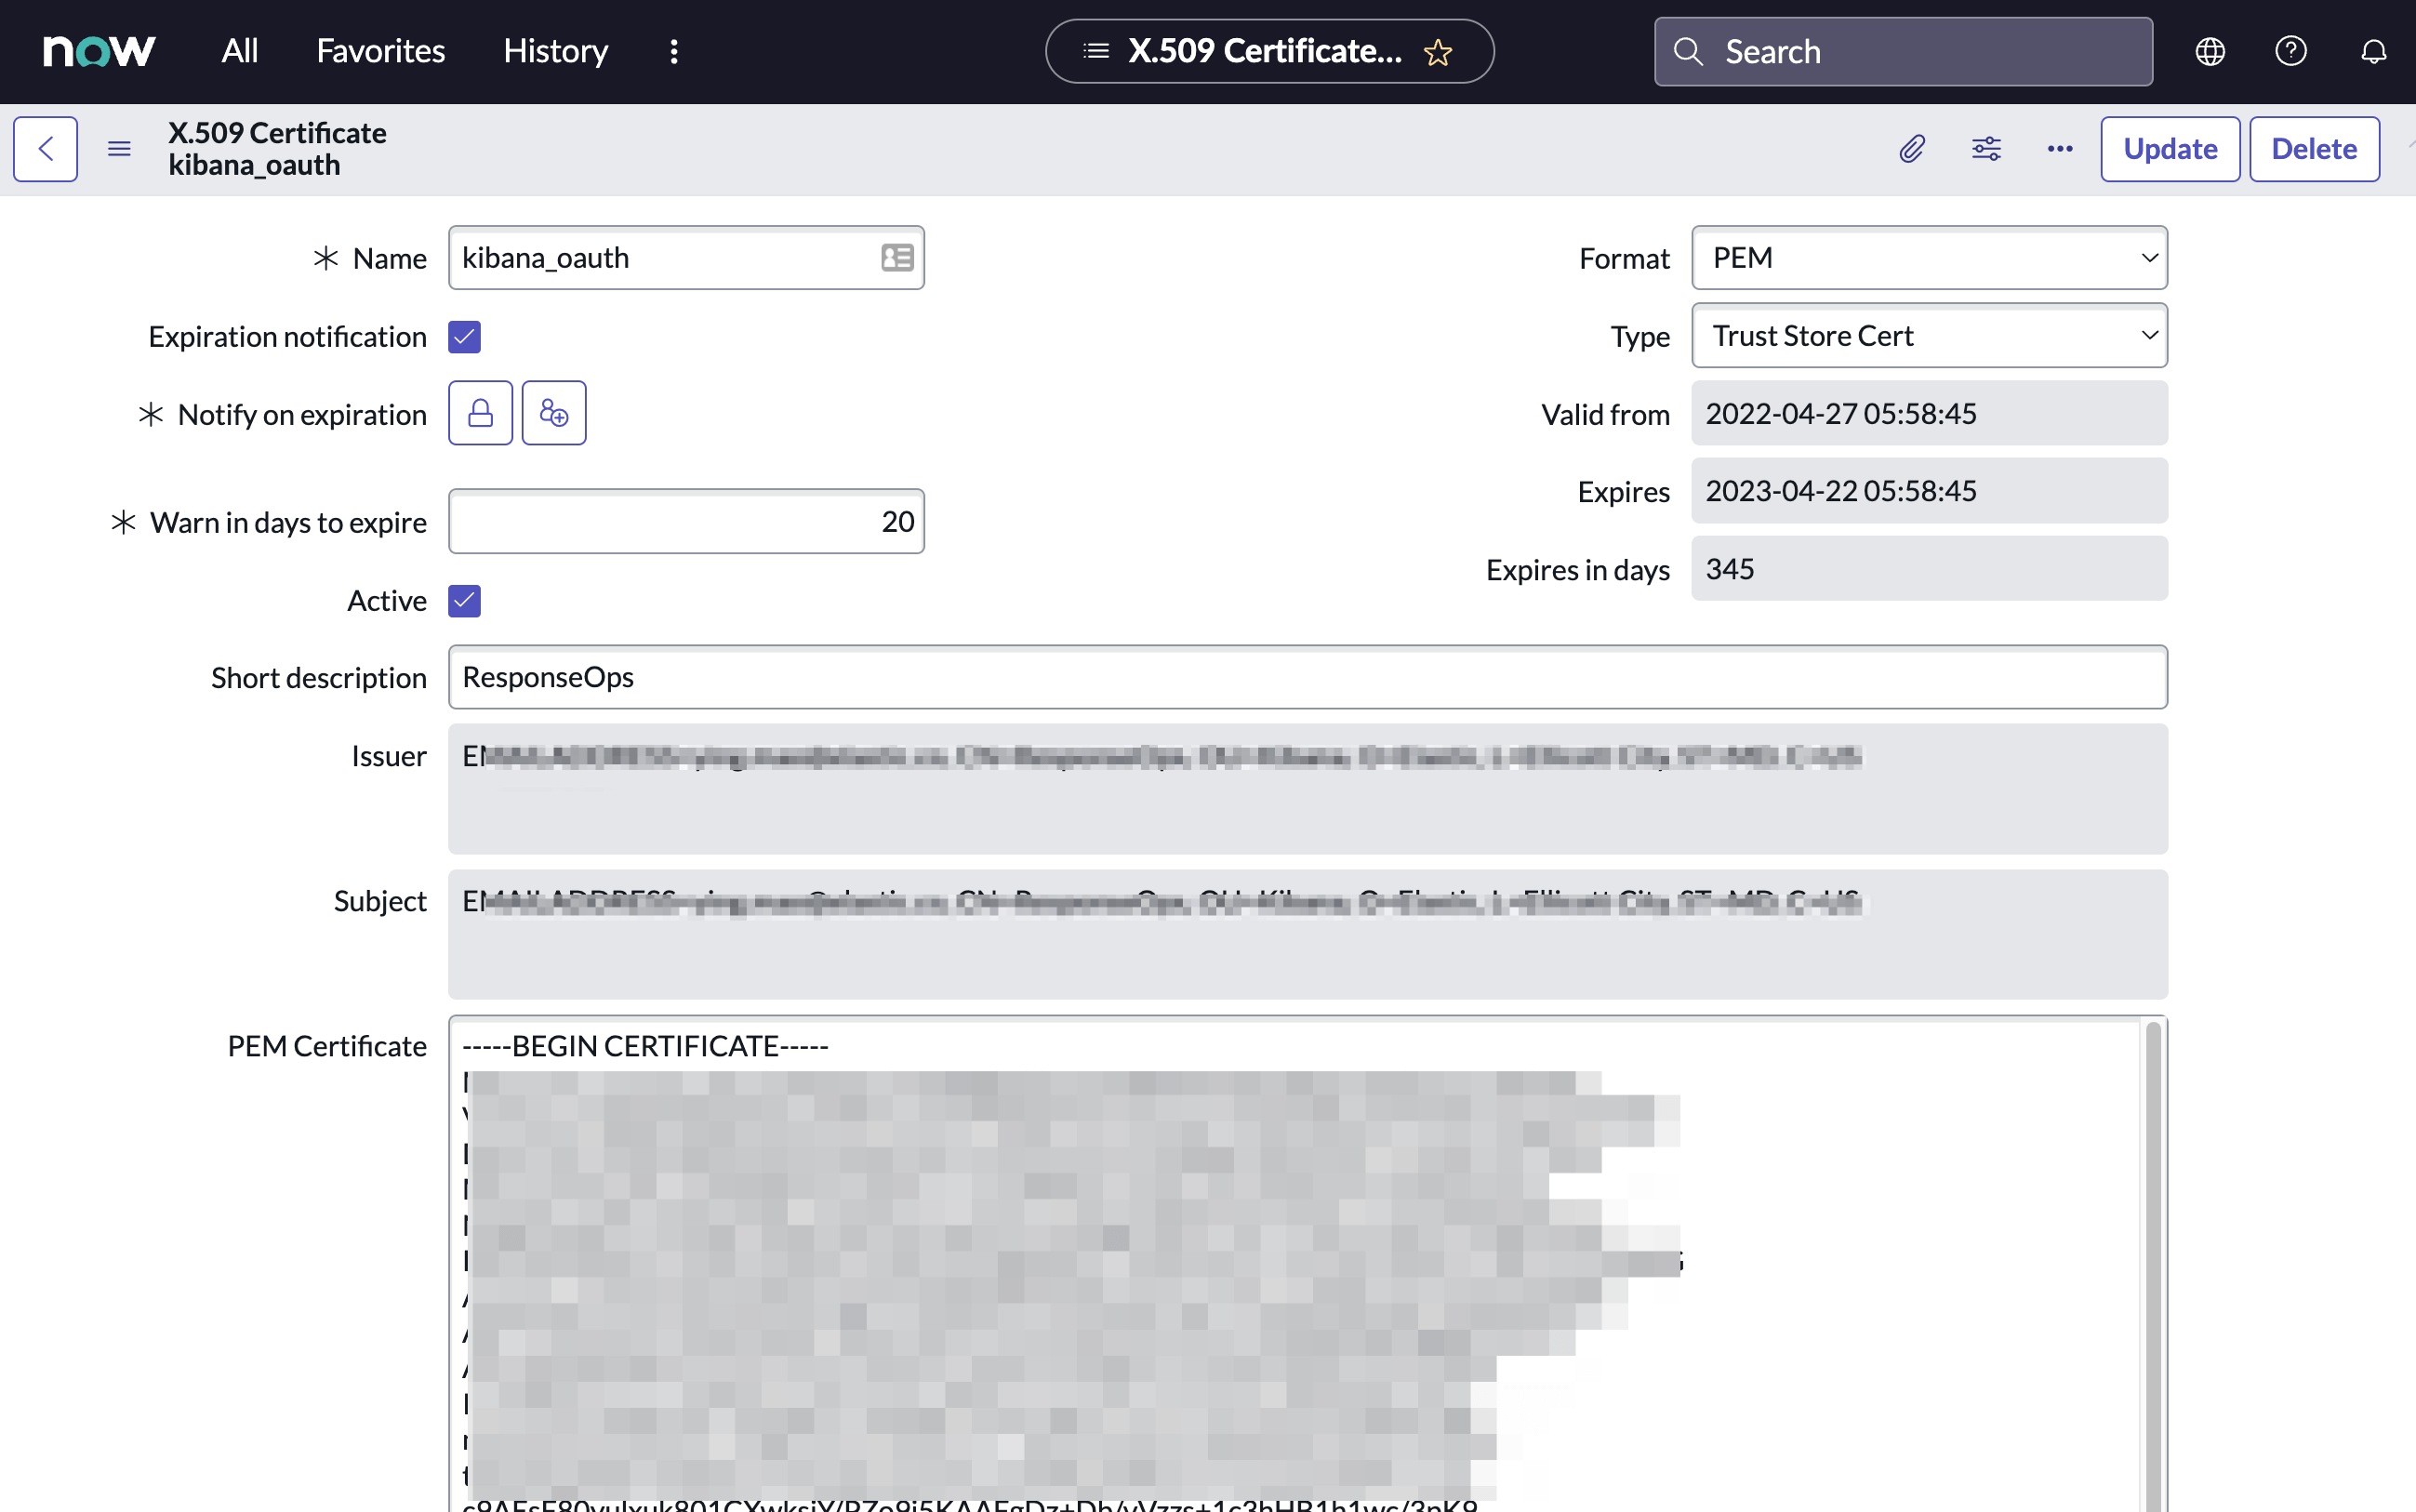
1. In your ServiceNow instance, go to **Certificates** and select **New**.
2. Configure the certificate as follows:
- **Name**: Name the certificate.
- **PEM Certificate**: Copy the generated public key into this text field.
3. Click **Submit** to create the certificate.
### Create an OAuth JWT API endpoint for external clients with a JWT Verifiers Map
This step is required to use OAuth for authentication between Elastic and ServiceNow.
1. In your ServiceNow instance, go to **Application Registry** and select **New**.
2. Select **Create an OAuth JWT API endpoint for external clients** from the list of options.
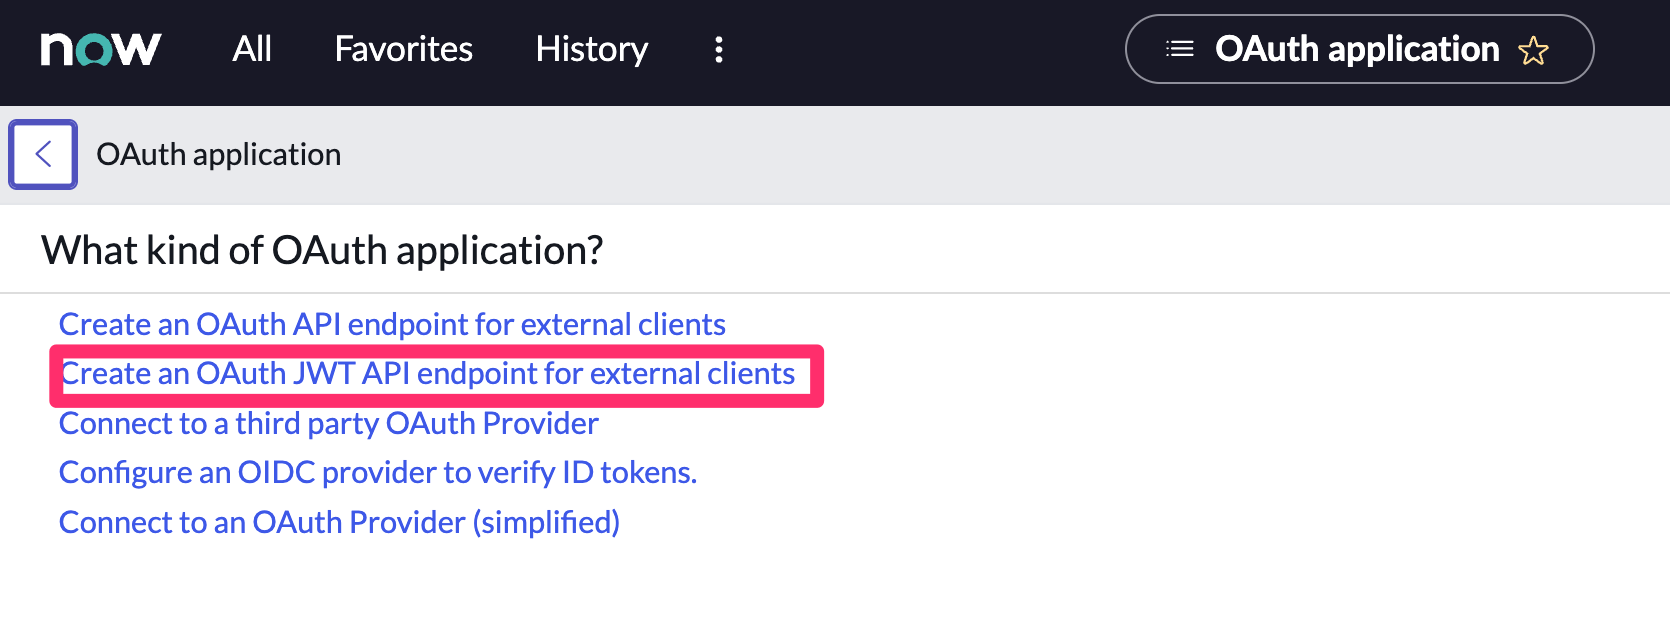
3. Configure the application as follows:
- **Name**: Name the application.
- **User field**: Select the field to use as the user identifier.
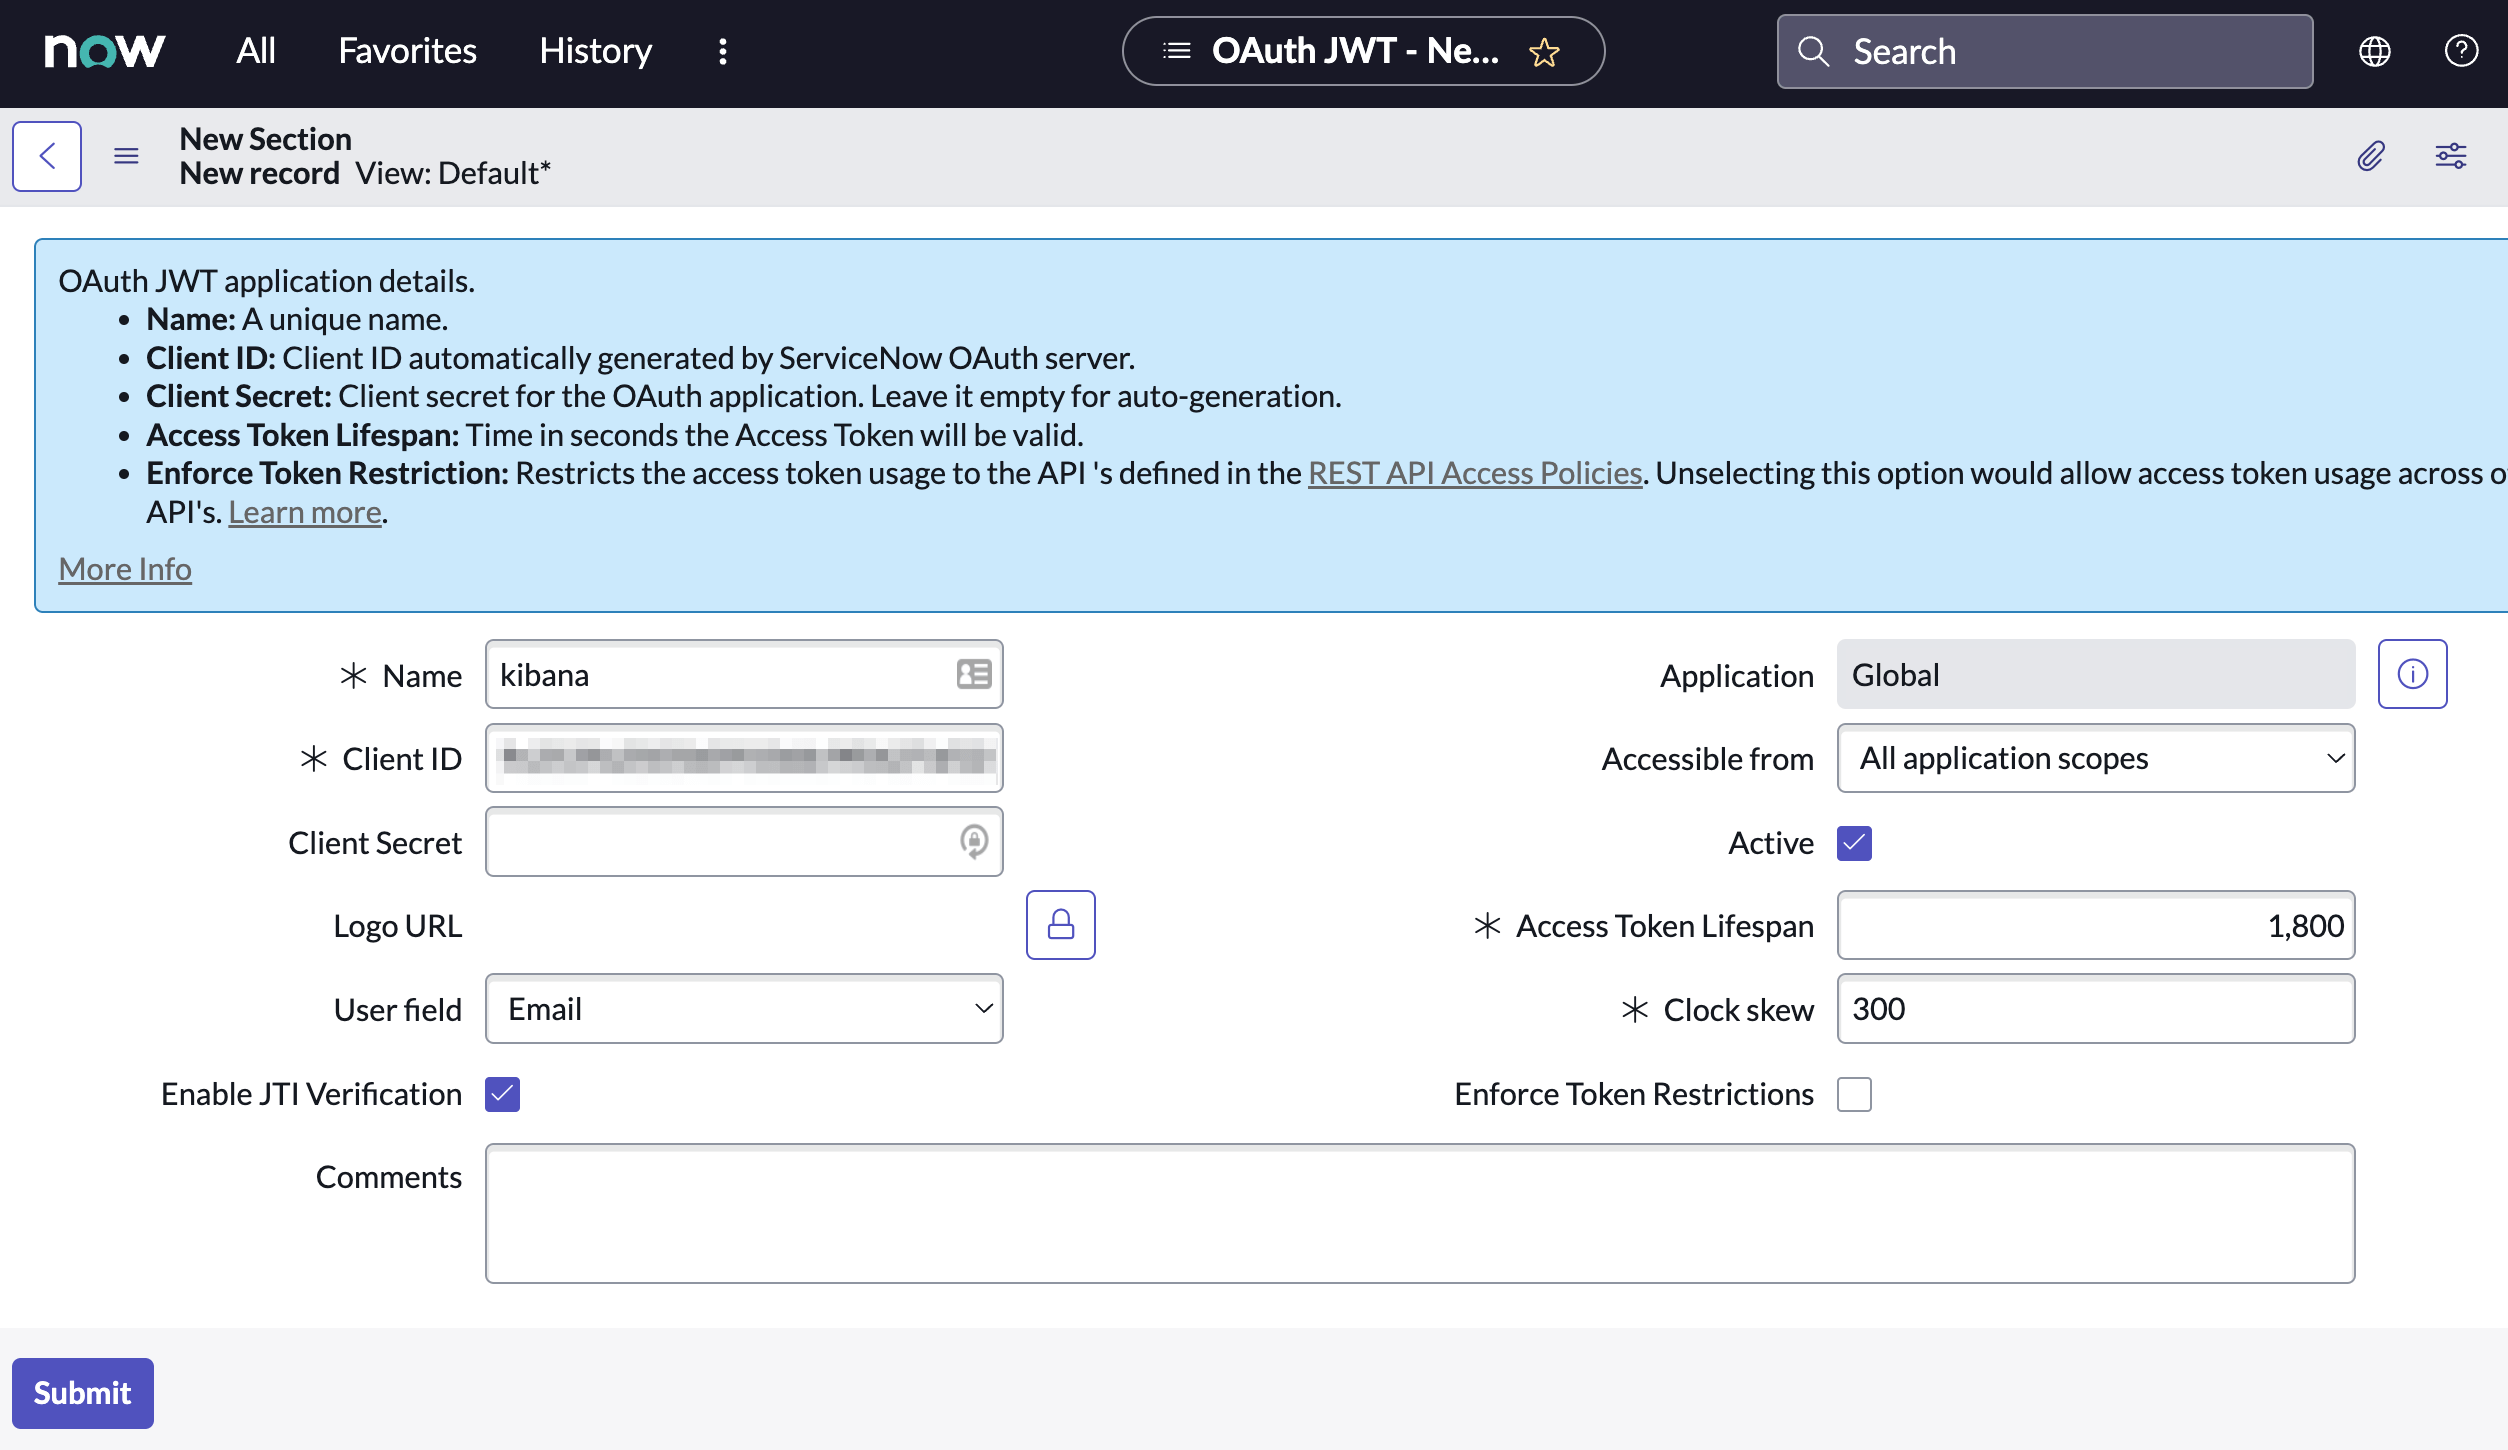
Remember the selected user field. You will use this as the **User Identifier Value** when creating the connector. For example, if you selected **Email** for **User field**, you will use the user's email for the **User Identifier Value**.
4. Click **Submit** to create the application. You will be redirected to the list of applications.
5. Select the application you just created.
6. Find the **Jwt Verifier Maps** tab and click **New**.
7. Configure the new record as follows:
- **Name**: Name the JWT Verifier Map.
- **Sys certificate**: Click the search icon and select the name of the certificate created in the previous step.
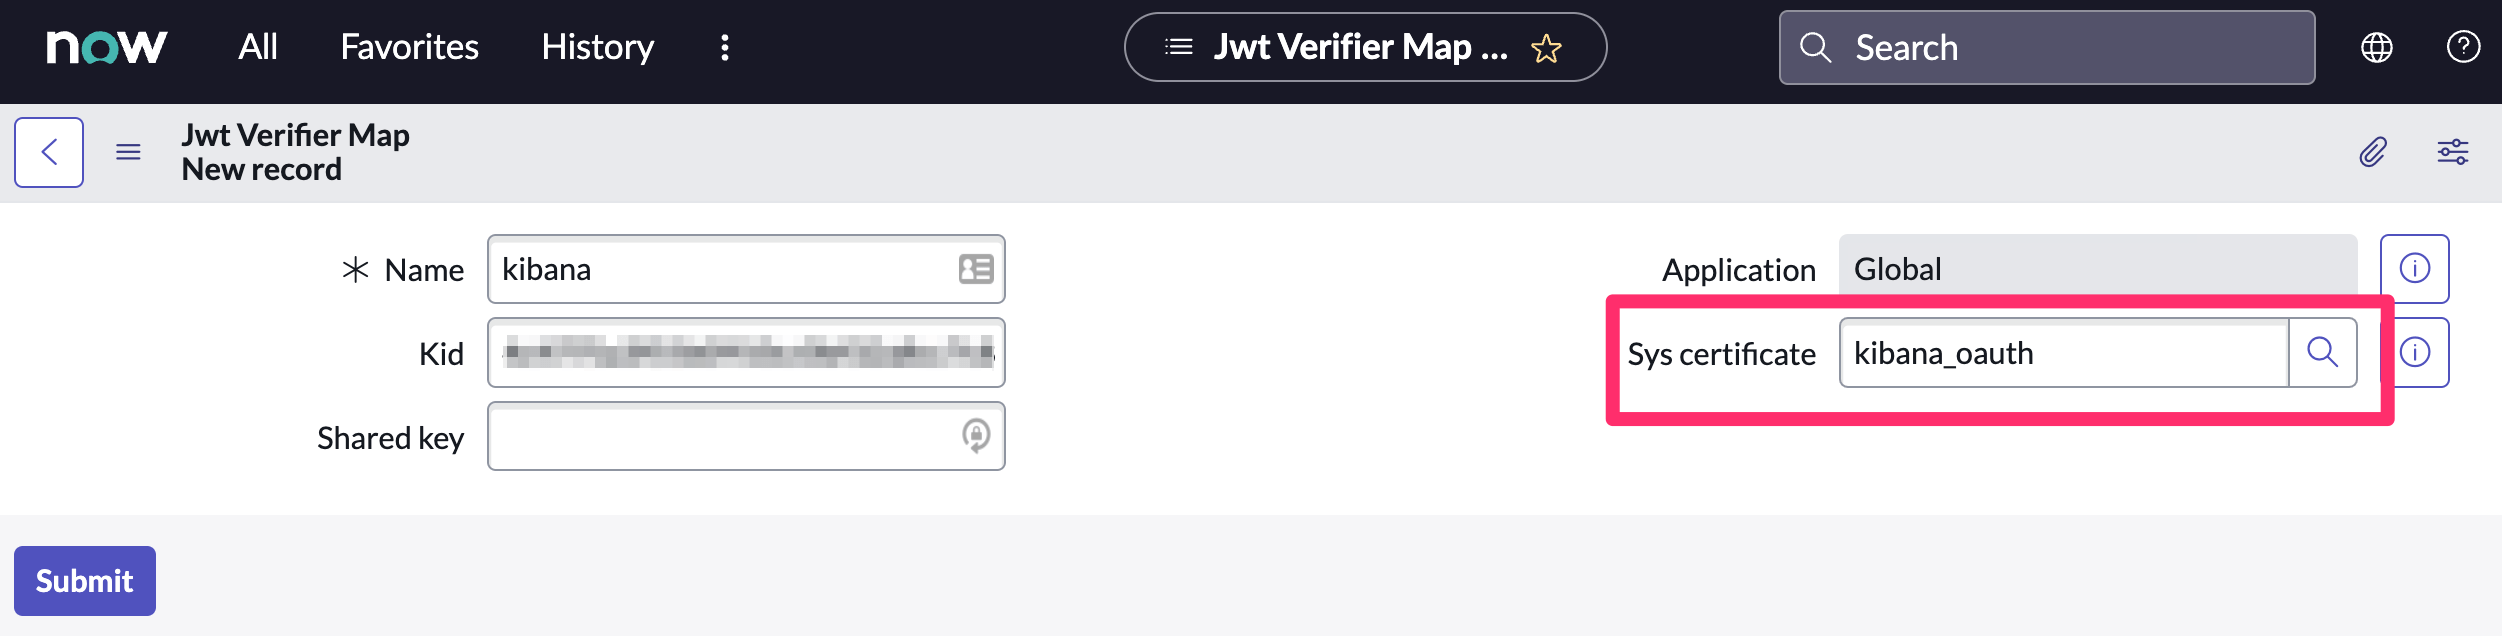
8. Click **Submit** to create the verifier map.
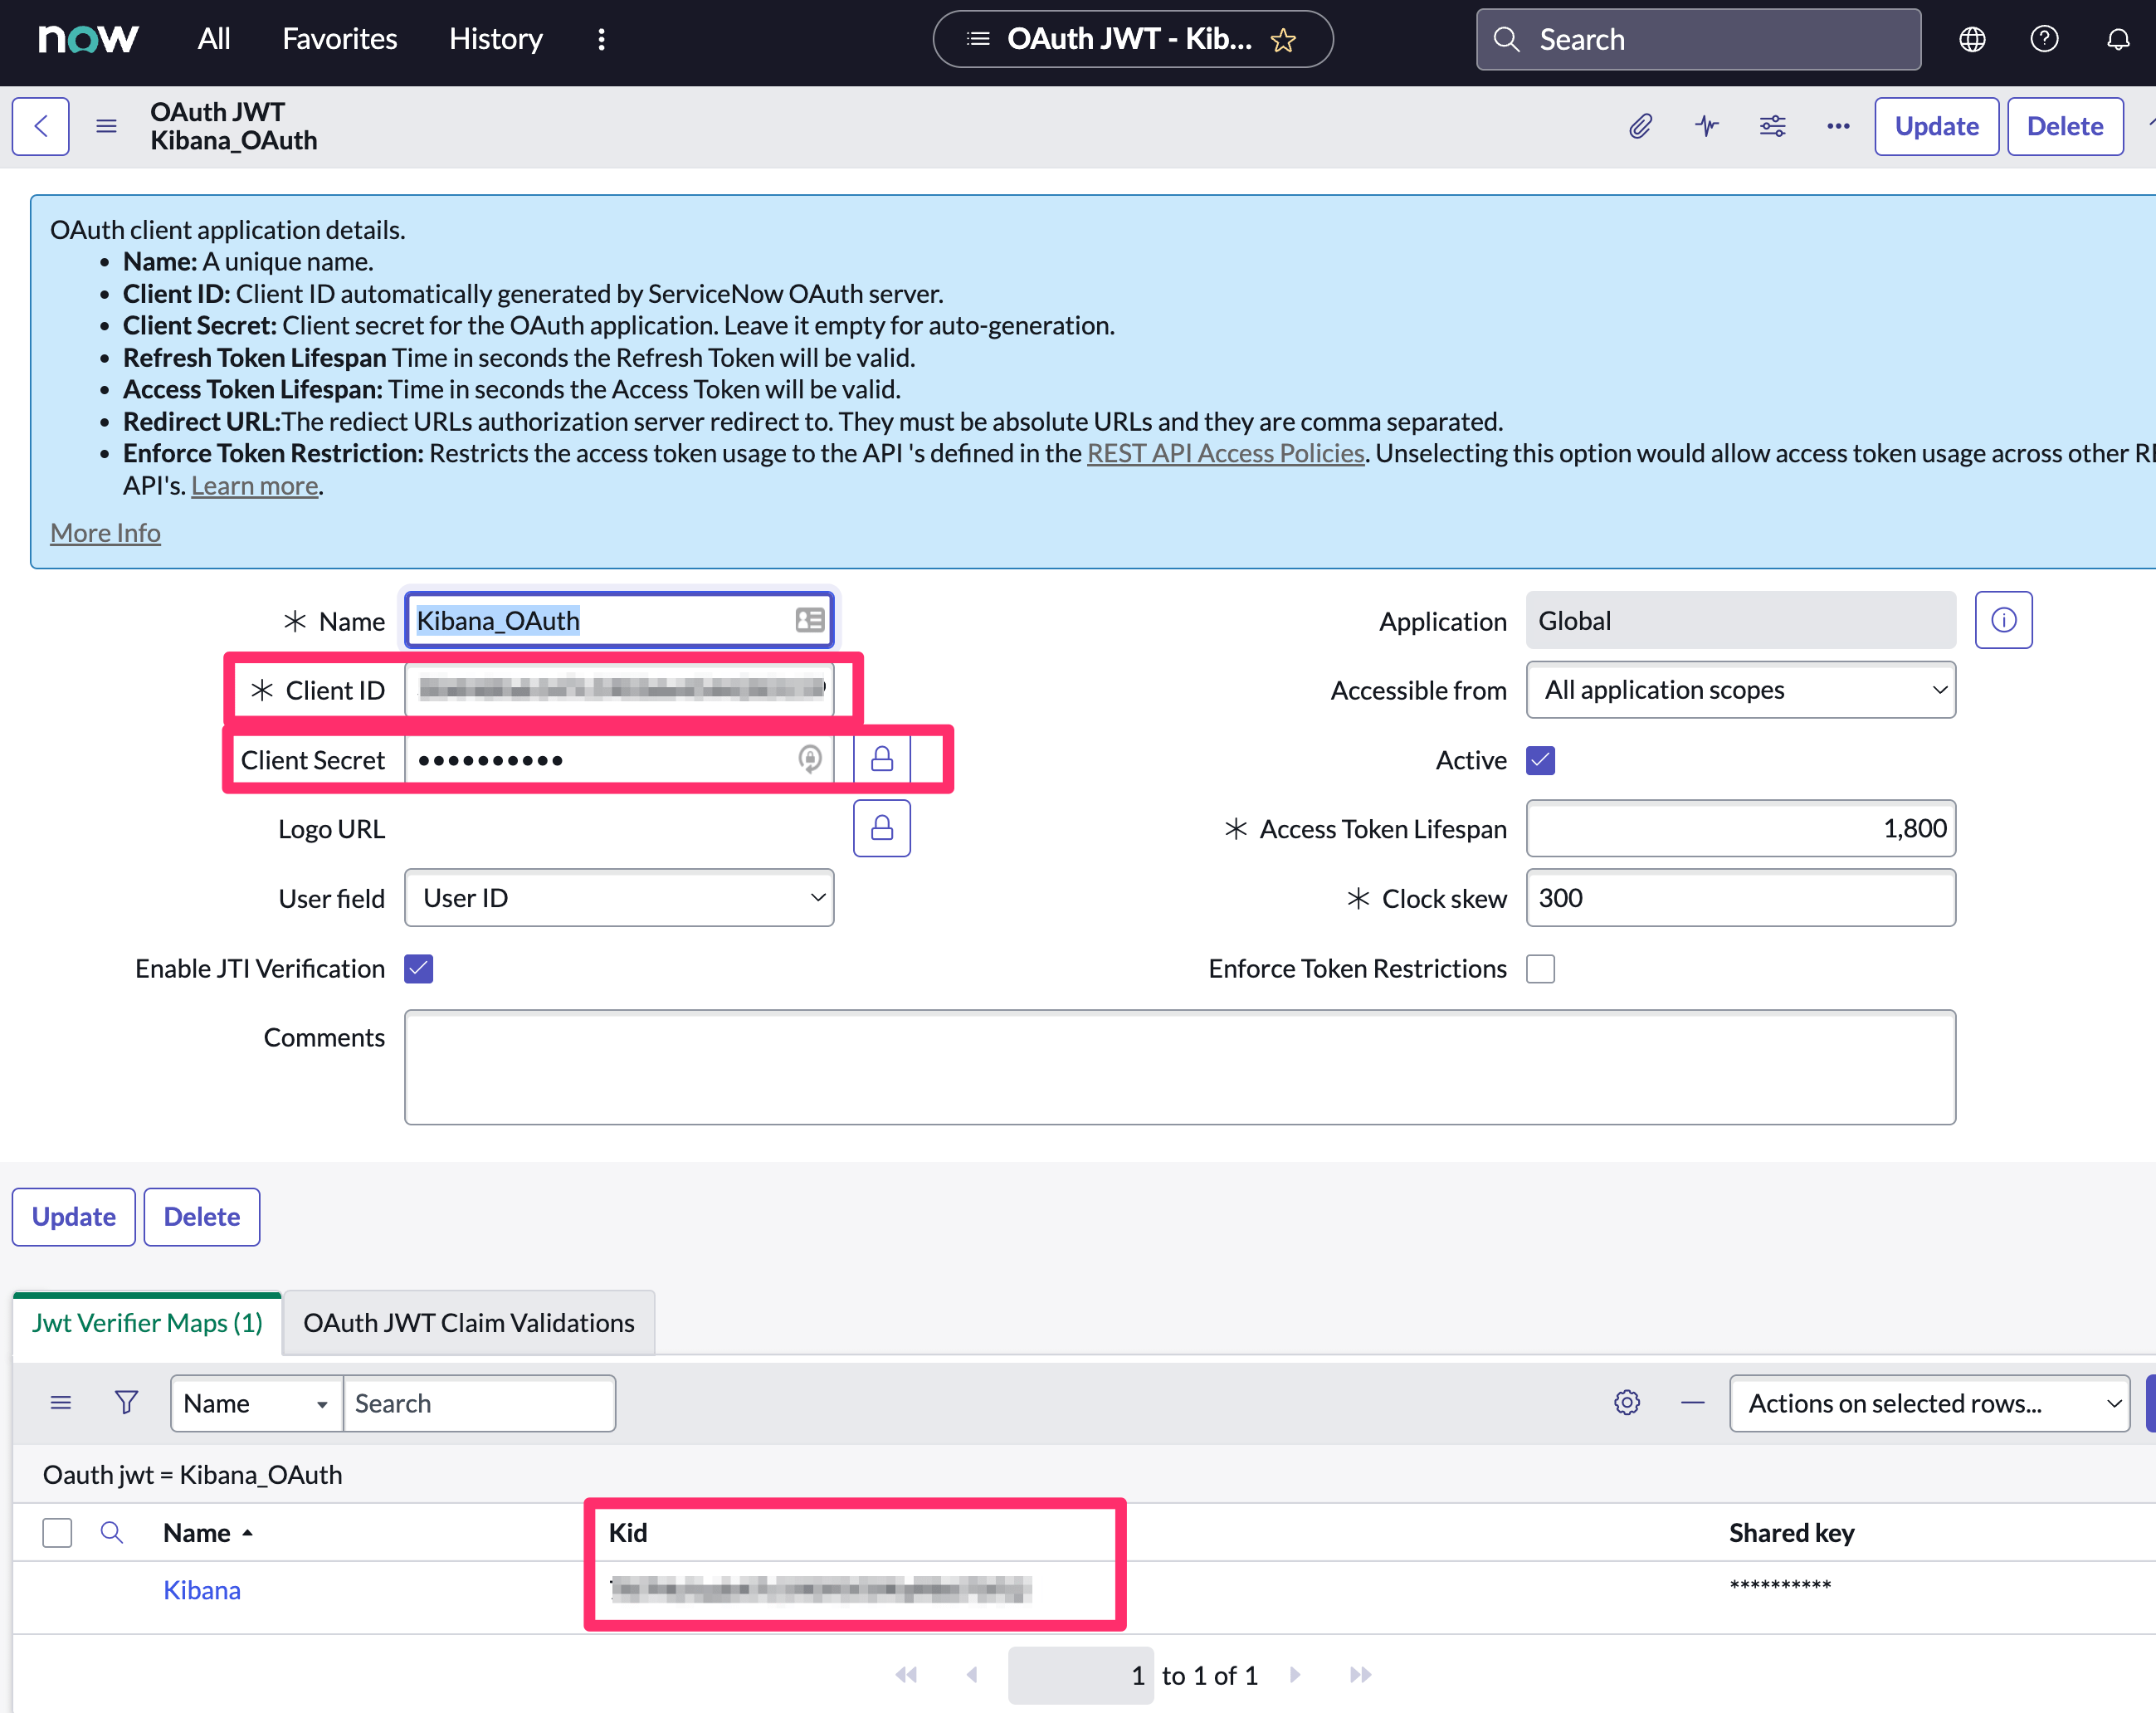
9. Note the **Client ID**, **Client Secret** and **JWT Key ID**. You will need these values to create your ServiceNow connector.
## Update a deprecated ServiceNow SecOps connector
ServiceNow SecOps connectors created in Elastic Stack version 7.15.0 or earlier are marked as deprecated after you upgrade to version 7.16.0 or later. Deprecated connectors have a yellow icon after their name and display a warning message when selected.
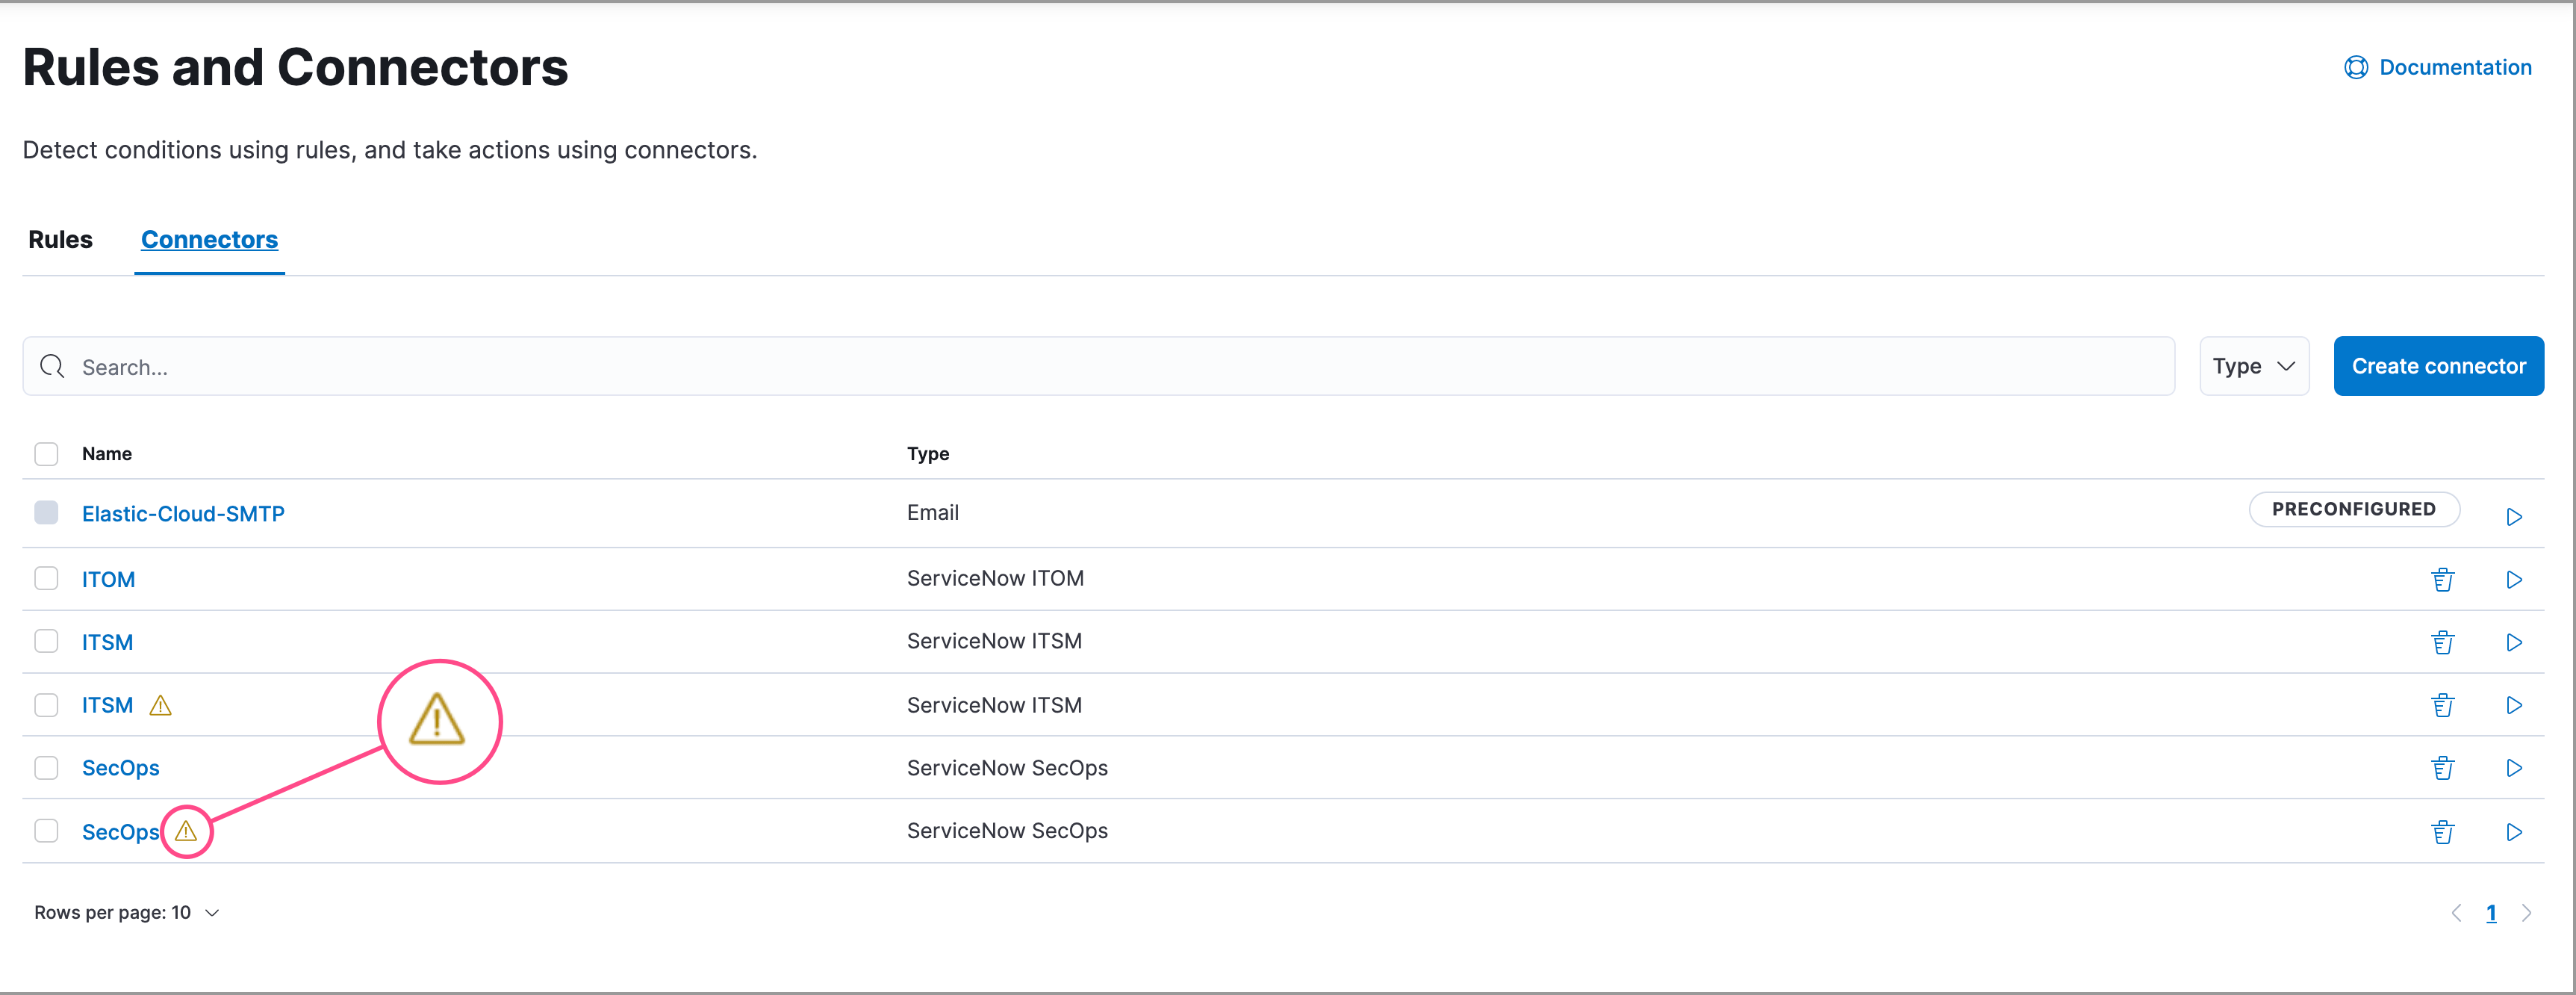
Deprecated connectors will continue to function with the rules they were added to and can be assigned to new rules. However, it is strongly recommended to update deprecated connectors or [create new ones](/elastic/kibana/pull/280898/reference/connectors-kibana#creating-new-connector) to ensure you have access to connector enhancements, such as updating incidents.
To update a deprecated connector:
1. Go to the **Connectors** page using the navigation menu or the [global search field](https://docs-v3-preview.elastic.dev/elastic/docs-content/tree/main/explore-analyze/find-and-organize/find-apps-and-objects).
2. Select the deprecated connector to open the **Edit connector** flyout.
3. In the warning message, click **Update this connector**.
4. Complete the guided steps in the **Edit connector** flyout.
1. Install [Elastic for Security Operations (SecOps)](https://store.servicenow.com/sn_appstore_store.do#!/store/application/2f0746801baeb01019ae54e4604bcb0f) from the ServiceNow Store and complete the [required prerequisites](#servicenow-sir-connector-prerequisites).
2. Enter the URL of your ServiceNow instance.
3. Enter the username and password of your ServiceNow instance.
5. Click **Update**.