Deploy Elastic Defend on macOS with mobile device management
To silently install and deploy Elastic Defend, you need to configure a mobile device management (MDM) profile for Elastic Endpoint—the installed component that performs Elastic Defend's threat monitoring and prevention. This allows you to pre-approve the Elastic Endpoint system extension and grant Full Disk Access to all the necessary components.
This page explains how to deploy Elastic Defend silently using Jamf. First, configure a Jamf MDM profile for Elastic Endpoint. For macOS Ventura (13) and later, also configure Managed Login Items in a separate profile to prevent users from disabling Elastic Agent in Login Items.
In Jamf, create a configuration profile for Elastic Endpoint. Follow these steps to configure the profile:
- Approve the system extension.
- Approve network content filtering.
- Enable notifications.
- Enable Full Disk Access.
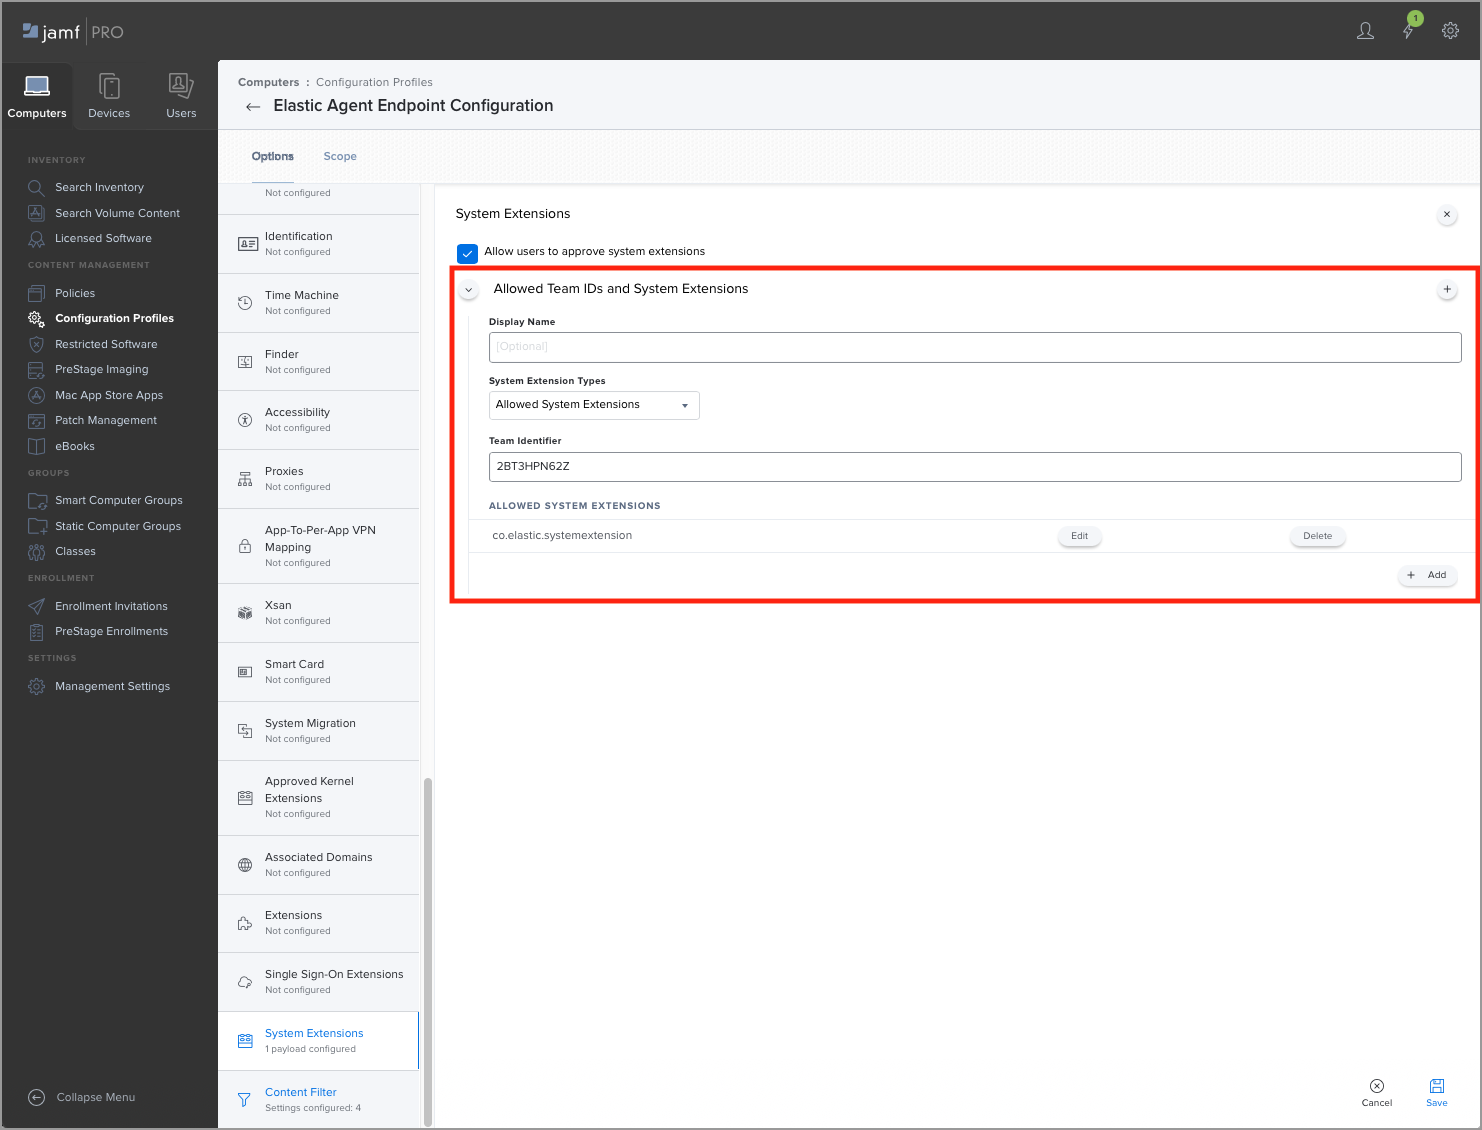
Select the System Extensions option to configure the system extension policy for the Elastic Endpoint configuration profile.
Make sure that Allow users to approve system extensions is selected.
In the Allowed Team IDs and System Extensions section, add the Elastic Endpoint system extension:
- (Optional) Enter a Display Name for the Elastic Endpoint system extension.
- From the System Extension Types dropdown, select Allowed System Extensions.
- Under Team Identifier, enter
2BT3HPN62Z. - Under Allowed System Extensions, enter
co.elastic.systemextension.
Save the configuration.
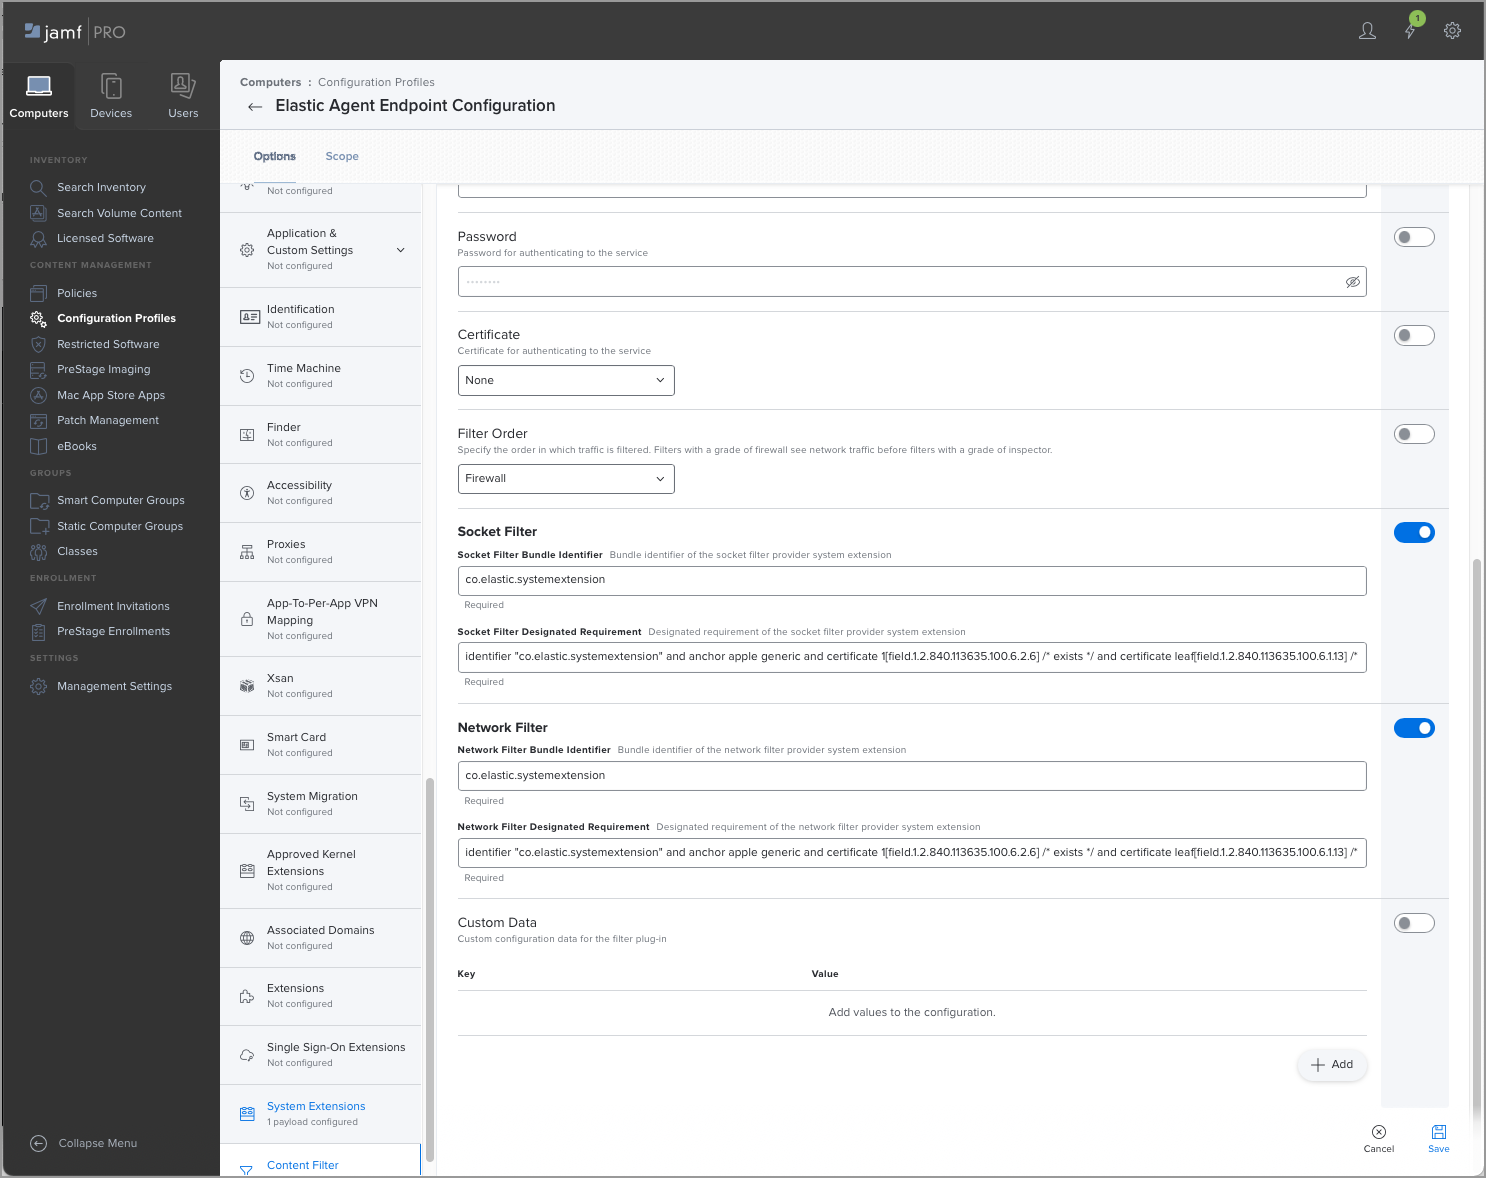
Select the Content Filter option to configure the Network Extension policy for the Elastic Endpoint configuration profile.
Under Filter Name, enter
ElasticEndpoint.Under Identifier, enter
co.elastic.endpoint.In the Socket Filter section, fill in these fields:
Socket Filter Bundle Identifier: Enter
co.elastic.systemextensionSocket Filter Designated Requirement: Enter the following:
identifier "co.elastic.systemextension" and anchor apple generic and certificate 1[field.1.2.840.113635.100.6.2.6] /* exists */ and certificate leaf[field.1.2.840.113635.100.6.1.13] /* exists */ and certificate leaf[subject.OU] = "2BT3HPN62Z"
In the Network Filter section, fill in these fields:
Network Filter Bundle Identifier: Enter
co.elastic.systemextensionNetwork Filter Designated Requirement: Enter the following:
identifier "co.elastic.systemextension" and anchor apple generic and certificate 1[field.1.2.840.113635.100.6.2.6] /* exists */ and certificate leaf[field.1.2.840.113635.100.6.1.13] /* exists */ and certificate leaf[subject.OU] = "2BT3HPN62Z"
Save the configuration.
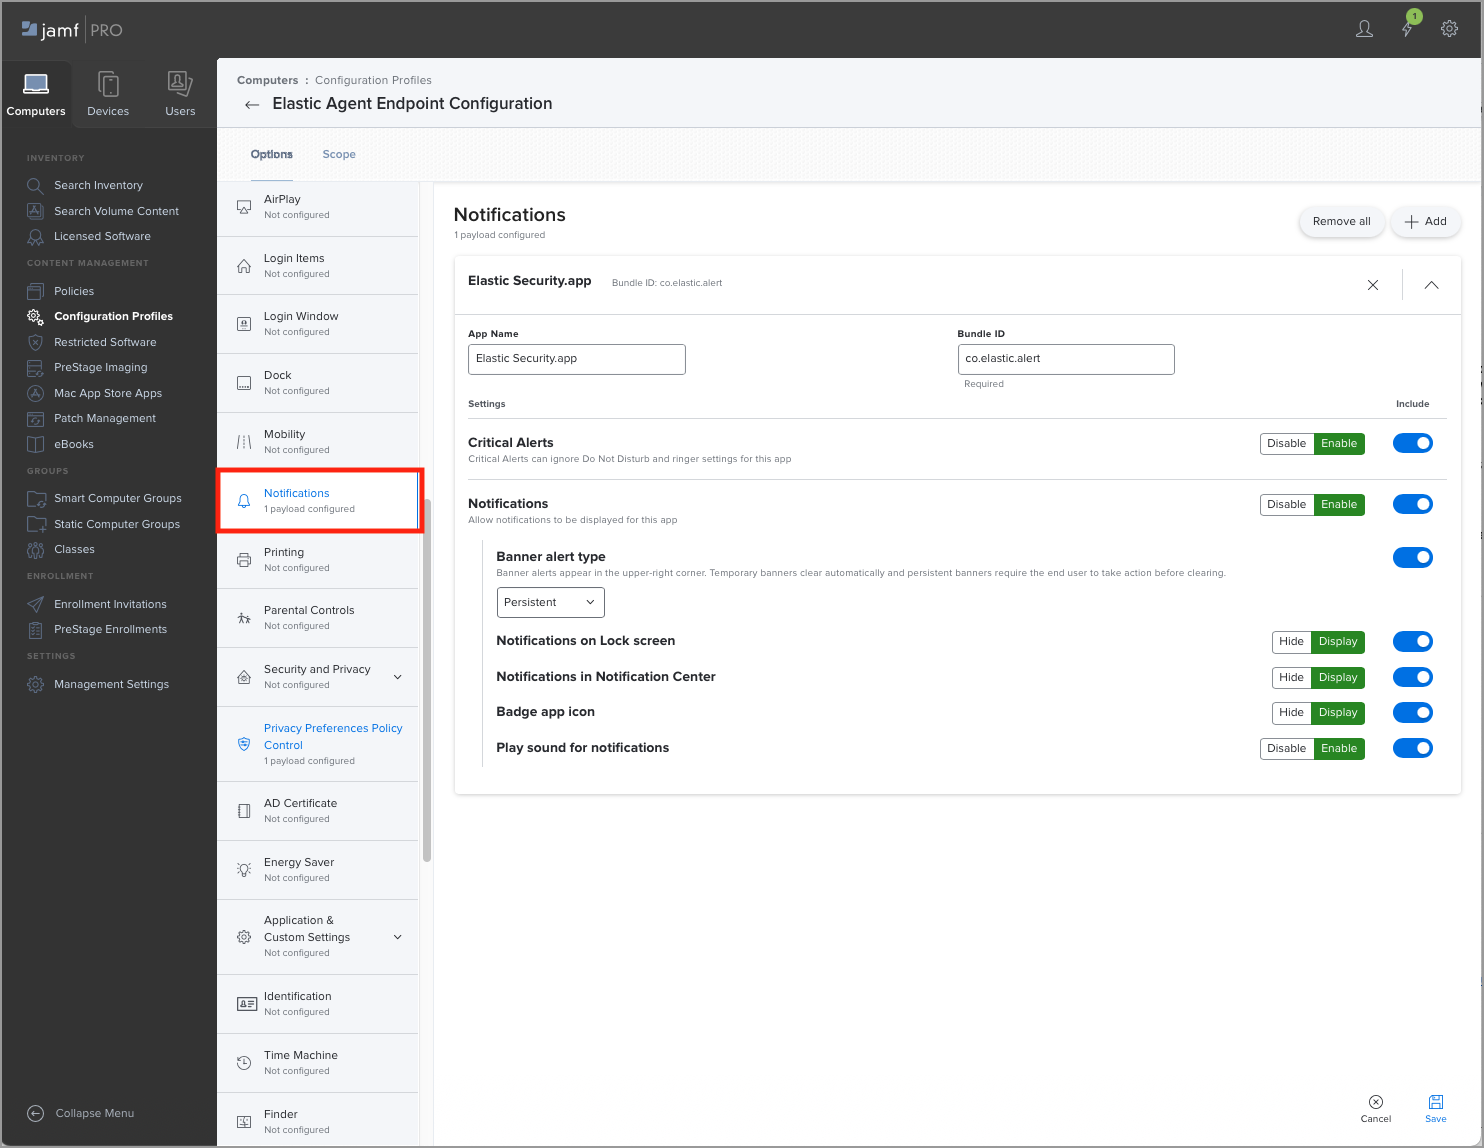
Select the Notifications option to configure the Notification Center policy for the Elastic Endpoint configuration profile.
Under App Name, enter
Elastic Security.app.Under Bundle ID, enter
co.elastic.alert.In the Settings section, include these options with the following settings:
- Critical Alerts: Enable
- Notifications: Enable
- Banner alert type: Persistent
- Notifications on Lock Screen: Display
- Notifications in Notification Center: Display
- Badge app icon: Display
- Play sound for notifications: Enable
Save the configuration.
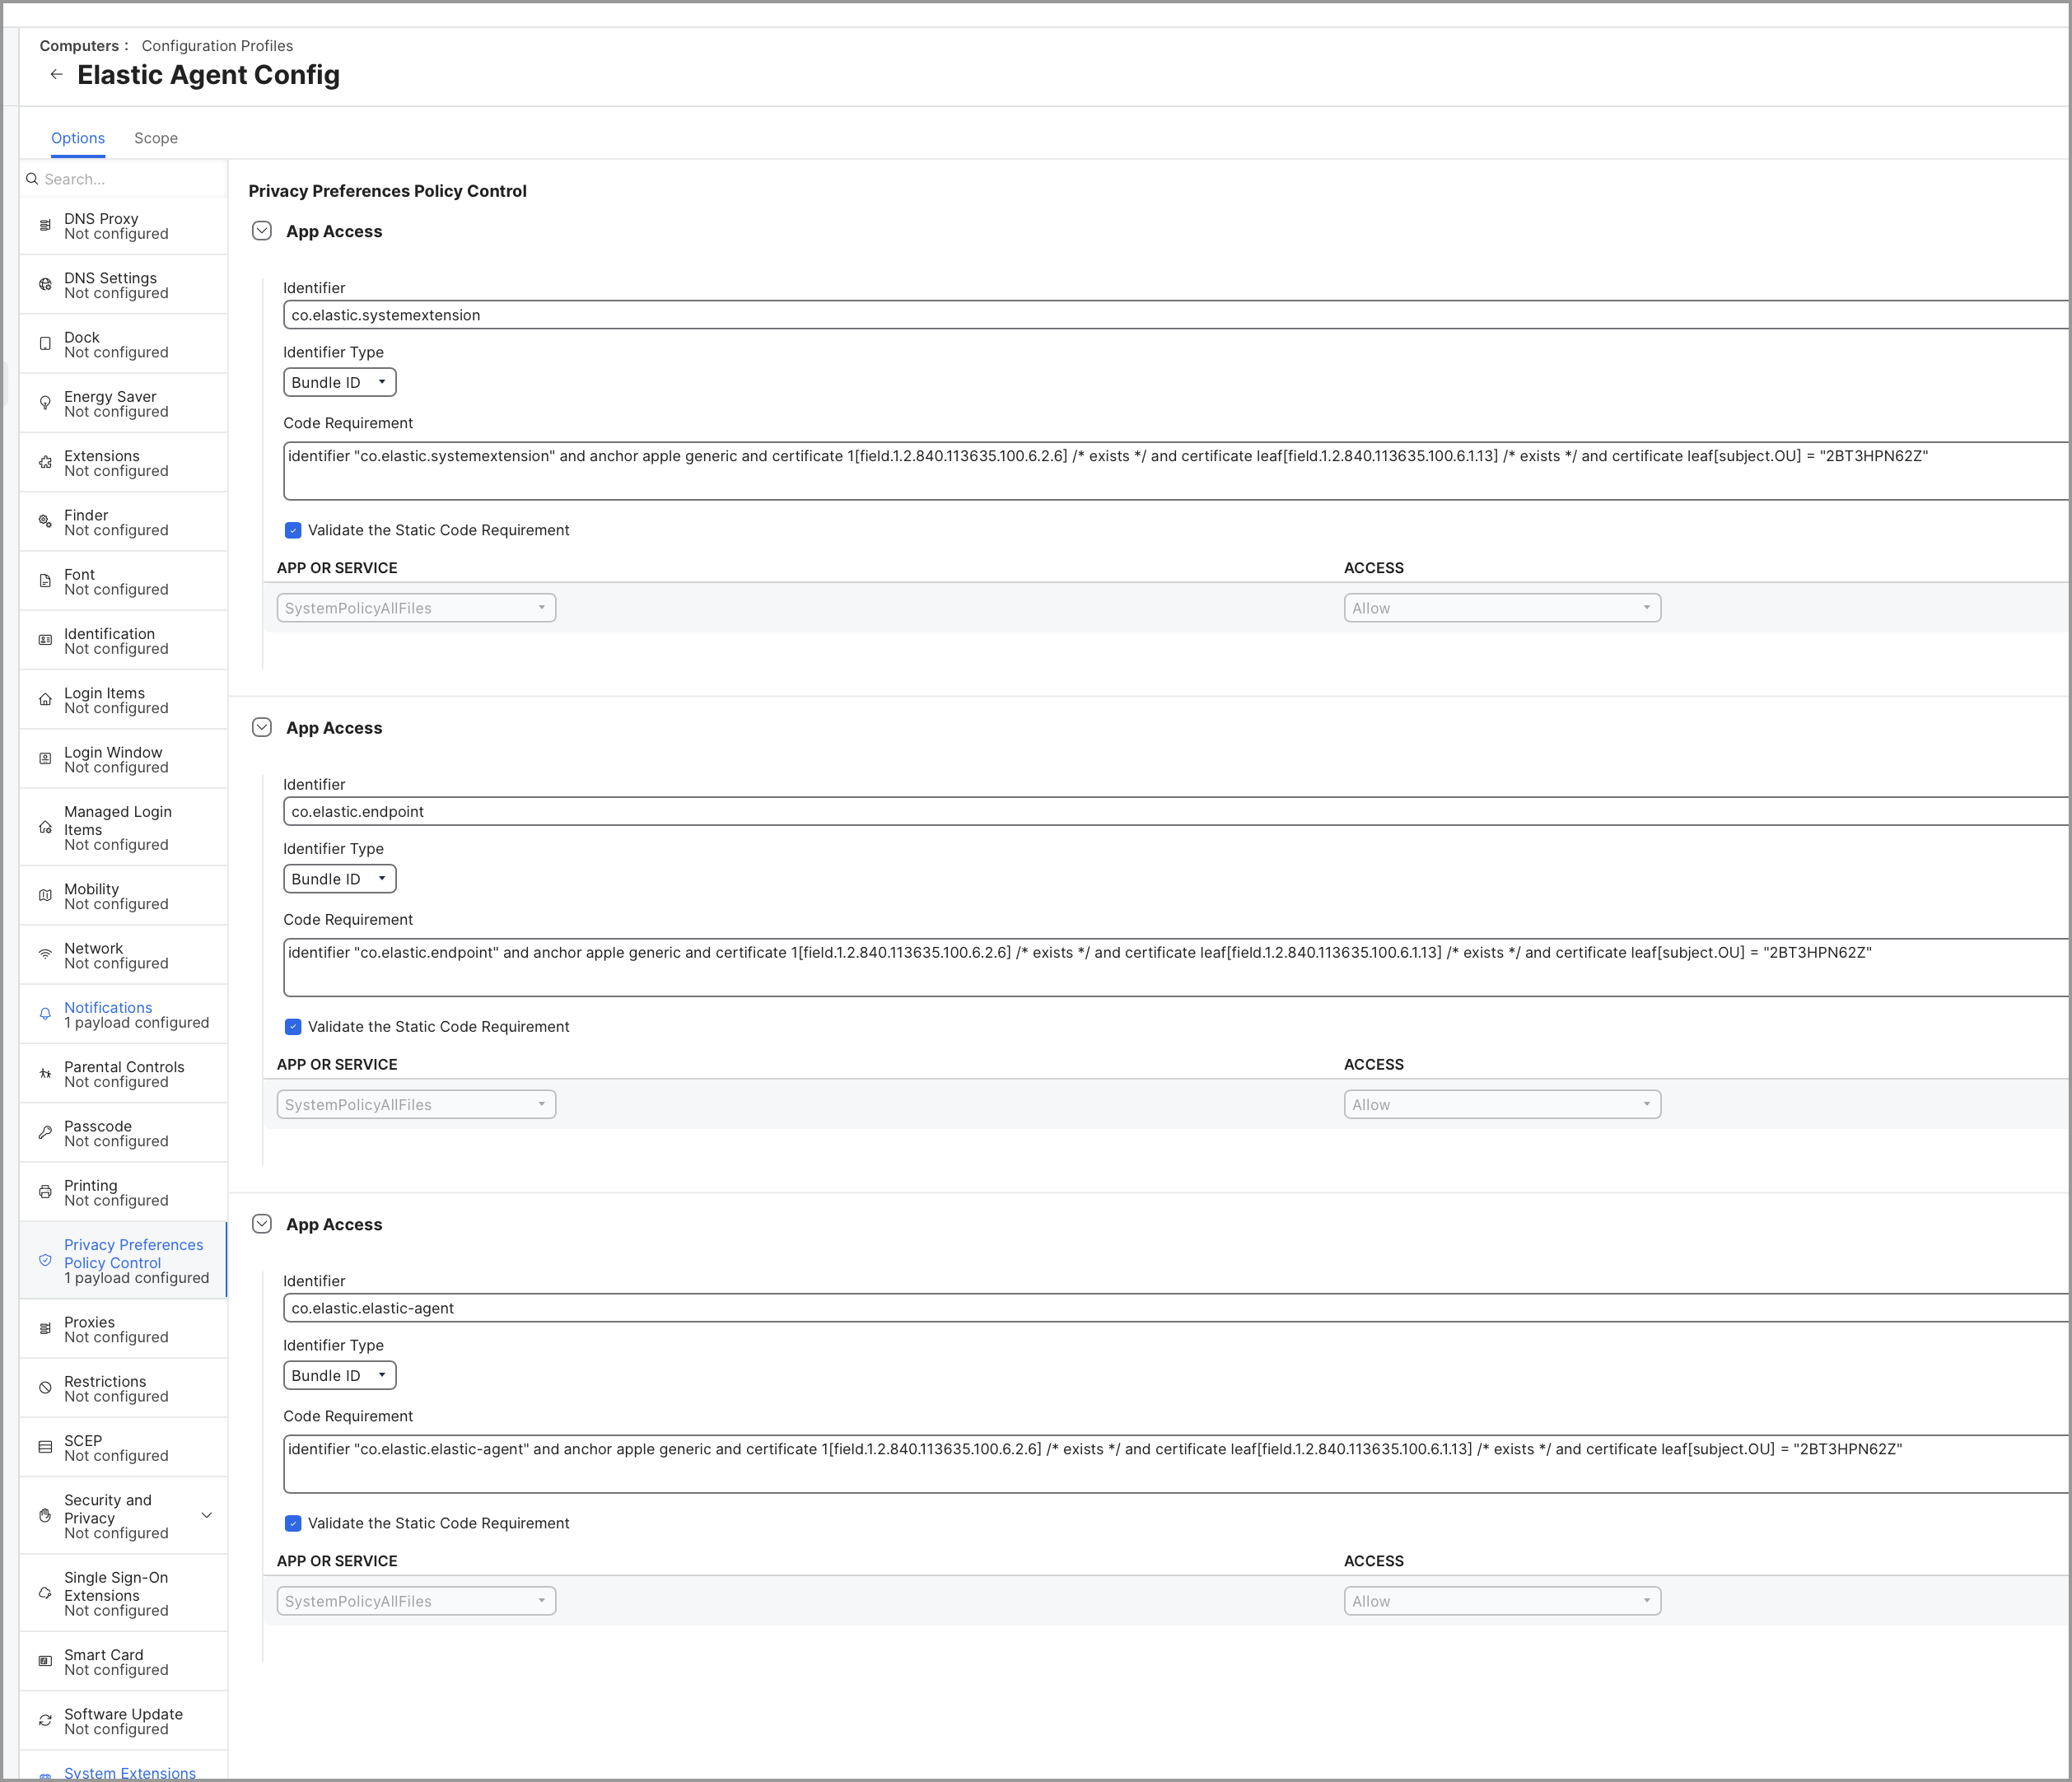
Select the Privacy Preferences Policy Control option to configure the Full Disk Access policy for the Elastic Endpoint configuration profile.
Add a new entry with the following details:
Under Identifier, enter
co.elastic.systemextension.From the Identifier Type dropdown, select Bundle ID.
Under Code Requirement, enter the following:
identifier "co.elastic.systemextension" and anchor apple generic and certificate 1[field.1.2.840.113635.100.6.2.6] /* exists */ and certificate leaf[field.1.2.840.113635.100.6.1.13] /* exists */ and certificate leaf[subject.OU] = "2BT3HPN62Z"Make sure that Validate the Static Code Requirement is selected.
Under APP or SERVICE, select
SystemPolicyAllFilesand set it toAllow.
Add a second entry with the following details:
Under Identifier, enter
co.elastic.endpoint.From the Identifier Type dropdown, select Bundle ID.
Under Code Requirement, enter the following:
identifier "co.elastic.endpoint" and anchor apple generic and certificate 1[field.1.2.840.113635.100.6.2.6] /* exists */ and certificate leaf[field.1.2.840.113635.100.6.1.13] /* exists */ and certificate leaf[subject.OU] = "2BT3HPN62Z"Make sure that Validate the Static Code Requirement is selected.
Under APP or SERVICE, select
SystemPolicyAllFilesand set it toAllow.
Add a third entry with the following details:
Under Identifier, enter
co.elastic.elastic-agent.From the Identifier Type dropdown, select Bundle ID.
Under Code Requirement, enter the following:
identifier "co.elastic.elastic-agent" and anchor apple generic and certificate 1[field.1.2.840.113635.100.6.2.6] /* exists */ and certificate leaf[field.1.2.840.113635.100.6.1.13] /* exists */ and certificate leaf[subject.OU] = "2BT3HPN62Z"Make sure that Validate the Static Code Requirement is selected.
Under APP or SERVICE, select
SystemPolicyAllFilesand set it toAllow.
Save the configuration.
After you complete these steps, generate the mobile configuration profile and install it onto the macOS machines. Once the profile is installed, Elastic Defend can be deployed without the need for user interaction.
On macOS Ventura (13) and later, users can disable Elastic Agent in System Settings → General → Login Items. That stops Elastic Agent and can make the host appear offline.
To prevent this, create a separate configuration profile with a Managed Login Items payload, and deploy it only to macOS 13 and later. If you install this payload on an earlier macOS version and later upgrade the Mac, the payload might not take effect.
Create a new configuration profile, then select the Managed Login Items payload.
Add a rule with the following details:
- From the Rule Type dropdown, select Label.
- Under Rule Value, enter
co.elastic.elastic-agent.
Add a second rule with the following details:
- From the Rule Type dropdown, select Label.
- Under Rule Value, enter
co.elastic.endpoint.
Save the configuration.
Deploy this configuration profile only to hosts running macOS Ventura (13) or later.
Use the Label rule type. Other rule types, such as Bundle Identifier, Bundle Identifier Prefix, and Team Identifier, do not prevent users from disabling Elastic Agent in Login Items.