Add or remove data tiers in Elastic Cloud Hosted or Elastic Cloud Enterprise
In Elastic Cloud Hosted and Elastic Cloud Enterprise, you add warm, cold, or frozen capacity from the deployment editor, and you remove a tier only after data can migrate away safely. The default configuration includes a shared tier for hot and content data; that tier is required and cannot be removed.
Review Elasticsearch data tiers so you choose the right tier for your workload.
- On the Create deployment page, click Advanced Settings.
- Click + Add capacity for any data tiers to add.
- Click Create deployment at the bottom of the page to save your changes.
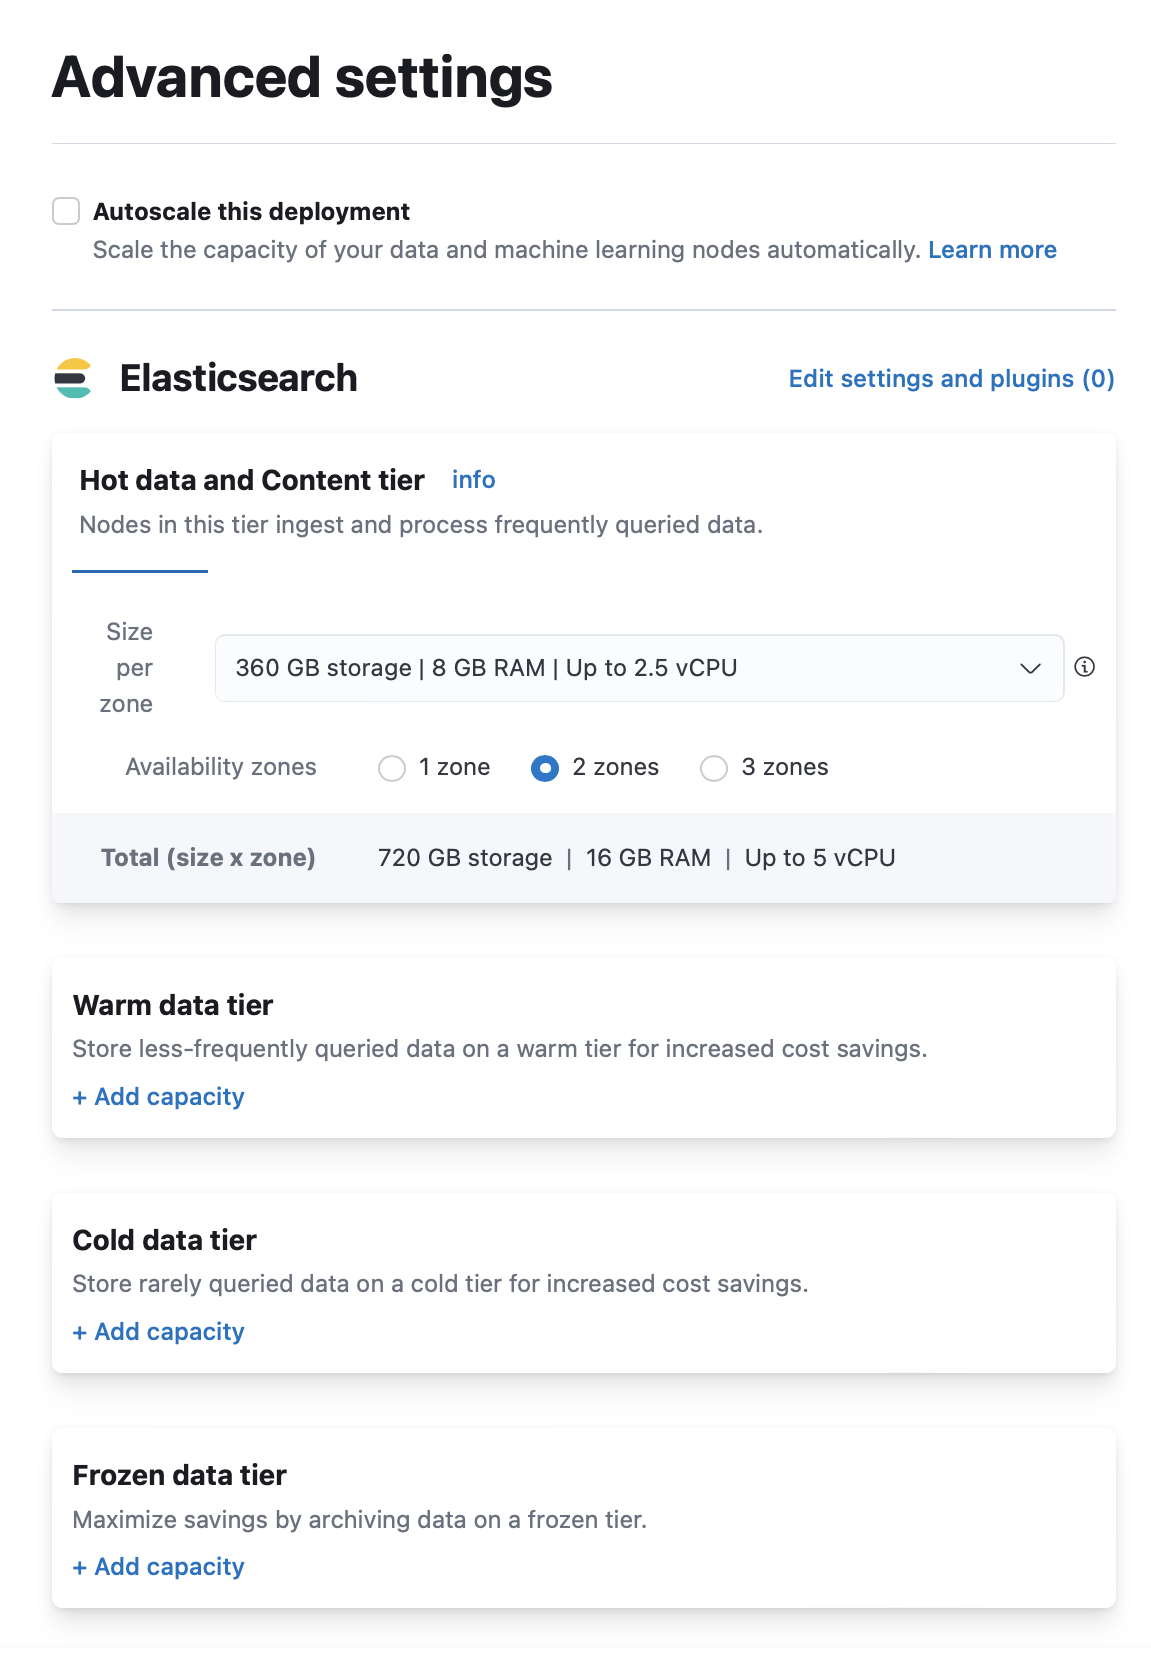
Log in to the Elastic Cloud Console or ECE Cloud UI.
On the home page, find your deployment.
TipIf you have many deployments, you can instead go to the Hosted deployments (Elastic Cloud Hosted) or Deployments (Elastic Cloud Enterprise) page. On that page, you can narrow your deployments by name, ID, or choose from several other filters.
Select Manage.
- From the navigation menu, select Edit.
- Click + Add capacity for any data tiers to add.
- Click Save at the bottom of the page to save your changes.
Follow this section when you need to remove the warm, cold, or frozen tier from an Elastic Cloud Hosted or Elastic Cloud Enterprise deployment. The shared hot and content tier is required and cannot be removed.
The steps differ depending on whether the tier holds regular indices or searchable snapshot indices (typical for cold or frozen when using index lifecycle management (ILM)).
Disabling a data tier, attempting to scale nodes down in size, reducing availability zones, or reverting an autoscaling change can all result in cluster instability, cluster inaccessibility, and even data corruption or loss in extreme cases.
To avoid this, especially for production environments, and in addition to making configuration changes to your indices and ILM as described in this guide:
- Review the disk size, CPU, JVM memory pressure, and other performance metrics of your deployment before attempting to perform the scaling down action.
- Make sure that you have enough resources and availability zones to handle your workloads after scaling down.
- Check that your deployment hardware profile (for Elastic Cloud Hosted) or deployment template (for Elastic Cloud Enterprise) is correct for your business use case. For example, if you need to scale due to CPU pressure increases and are using a Storage Optimized hardware profile, consider switching to a CPU Optimized configuration instead.
- Review disk watermarks and ensure the remaining nodes are not close to their limits.
Read https://www.elastic.co/cloud/shared-responsibility for additional details. If in doubt, reach out to Support.
Check whether the tier you are removing holds regular indices, searchable snapshots, or both. Use the guidance for the tier you are removing:
Warm tier: This tier typically holds regular indices. Follow Remove a tier with regular indices unless you have manually mounted searchable snapshots on the tier.
Cold tier: This tier can hold regular indices or fully mounted searchable snapshots. Check for standard ILM-managed searchable snapshot indices:
GET /_cat/indices/restored-*?expand_wildcards=allFor each returned index, check its current data tier preference to determine whether it is on the tier you are removing.
Exclude any fully mounted indices associated with the hot tier from the removal inventory. The hot tier is required and is not removed by this procedure.
Frozen tier: This tier only holds partially mounted searchable snapshots. Check for standard ILM-managed indices:
GET /_cat/indices/partial-*?expand_wildcards=all
Manually mounted searchable snapshots might not use the standard restored-* or partial-* prefixes. If you mounted snapshots manually, adapt the index names or patterns in these requests to match your configuration.
- If the tier does not contain any searchable snapshot indices, follow Remove a tier with regular indices.
- If the tier contains searchable snapshot indices, review Remove a tier with searchable snapshots and select the appropriate procedure based on how the indices are mounted. If regular indices also remain, restore or move the searchable snapshot indices first, but do not disable the tier yet. Then return to the regular indices procedure.
To learn more about ILM or shard allocation filtering, refer to Create your index lifecycle policy, Managing the index lifecycle, and Shard allocation filters.
This section covers the removal of a tier that holds regular indices. The goal is to ensure all shard allocation rules allow the data to move to other tiers before you disable the tier. You also need to temporarily stop ILM to prevent new indices from being routed to the tier while you work.
If the tier also holds fully mounted searchable snapshots, you have two options:
- To keep them as searchable snapshots on another tier: apply the same steps in this section. Fully mounted searchable snapshots follow the same shard placement rules as regular indices and can be moved by updating their allocation settings.
- To restore them to regular indices on another tier: follow Remove a tier with searchable snapshots to restore the indices and delete the original searchable snapshot indices, but do not disable the tier yet. Then return to this section to move any regular indices and disable the tier. You can optionally delete source snapshots that you no longer need.
When you update the deployment, Elastic Cloud Hosted and Elastic Cloud Enterprise try to move all data from the nodes that are removed. Before applying this change, make sure that the relevant shard allocation filters allow the data to move.
Determine which nodes will be removed from the cluster.
Log in to the Elastic Cloud Console.
From the Hosted deployments page, select your deployment.
On the Hosted deployments page you can narrow your deployments by name, ID, or choose from several other filters. To customize your view, use a combination of filters, or change the format from a grid to a list.
Filter the list of instances by the Data tier you want to disable.
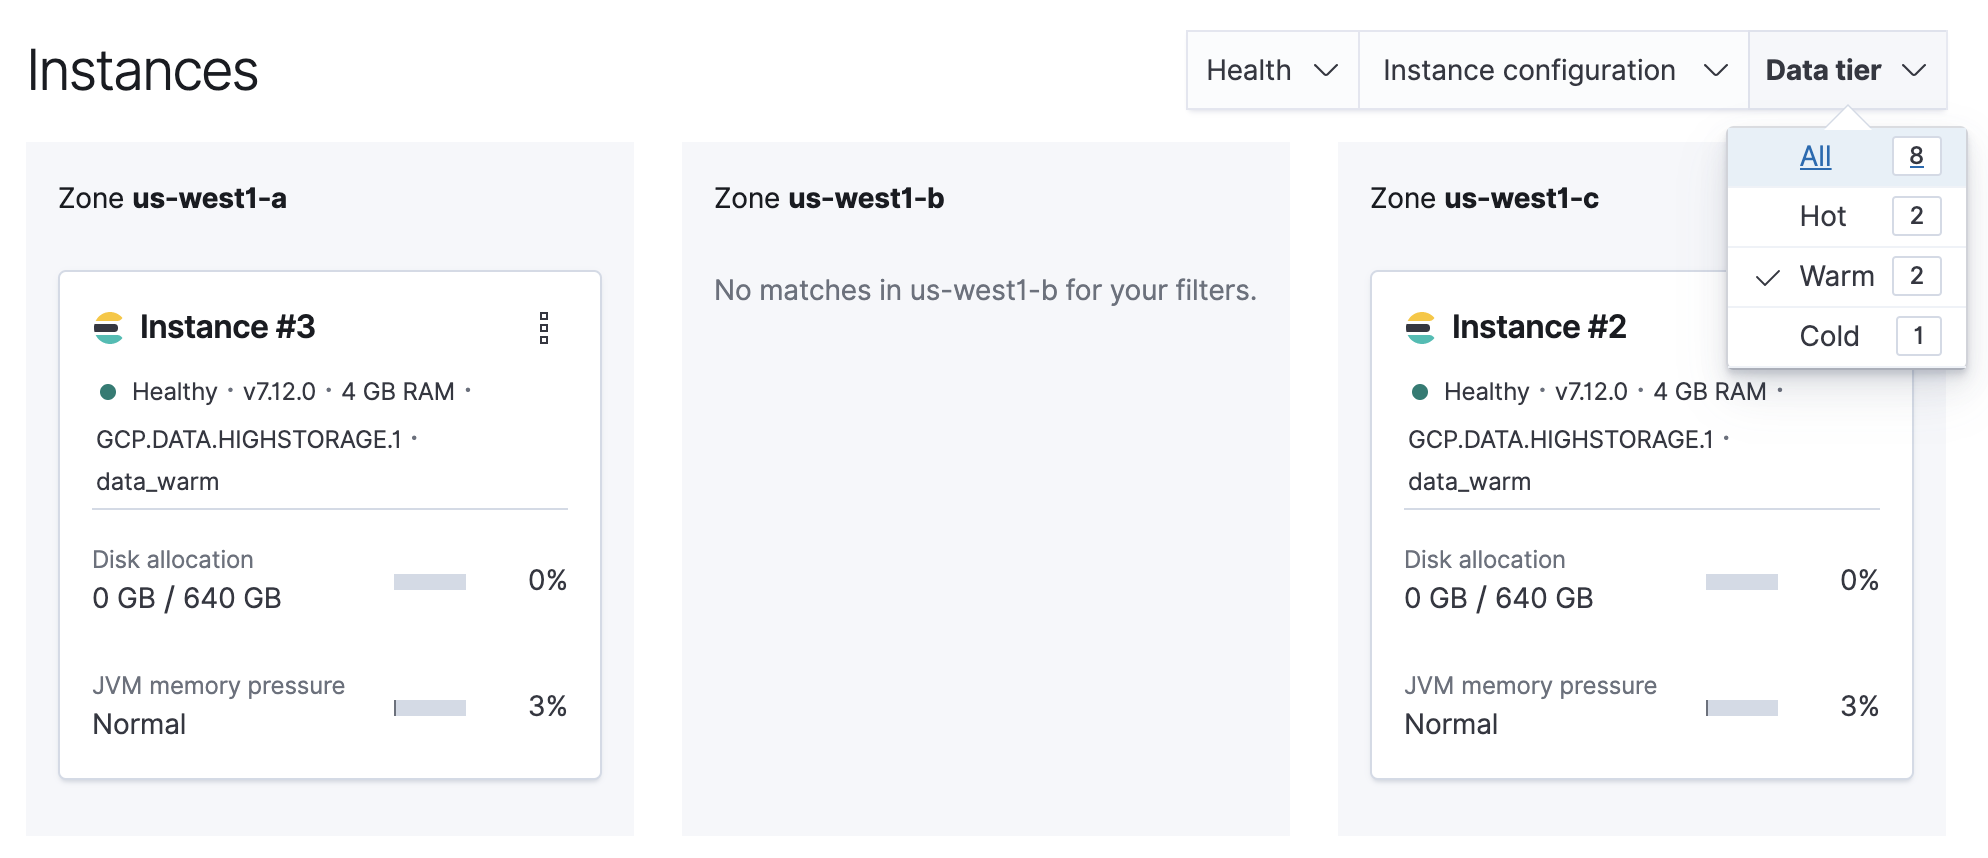
Note the listed instance IDs. In this example, it would be Instance 2 and Instance 3.
From the Deployments page, select your deployment.
Narrow the list by name, ID, or choose from several other filters. To further define the list, use a combination of filters.
Filter the list of instances by the Data tier you want to disable.
Note the listed instance IDs. In this example, it would be Instance 2 and Instance 3.
Stop ILM to prevent new indices from being routed to the tier while you work.
POST /_ilm/stop
GET /_ilm/status
Wait until
operation_modeisSTOPPEDbefore proceeding.Determine which shards are allocated to the nodes you want to remove.
GET /_cat/shards?v&h=index,shard,prirep,state,nodeParse the output, looking for shards allocated to the nodes to be removed from the cluster.
Instance #2is shown asinstance-0000000002in the output.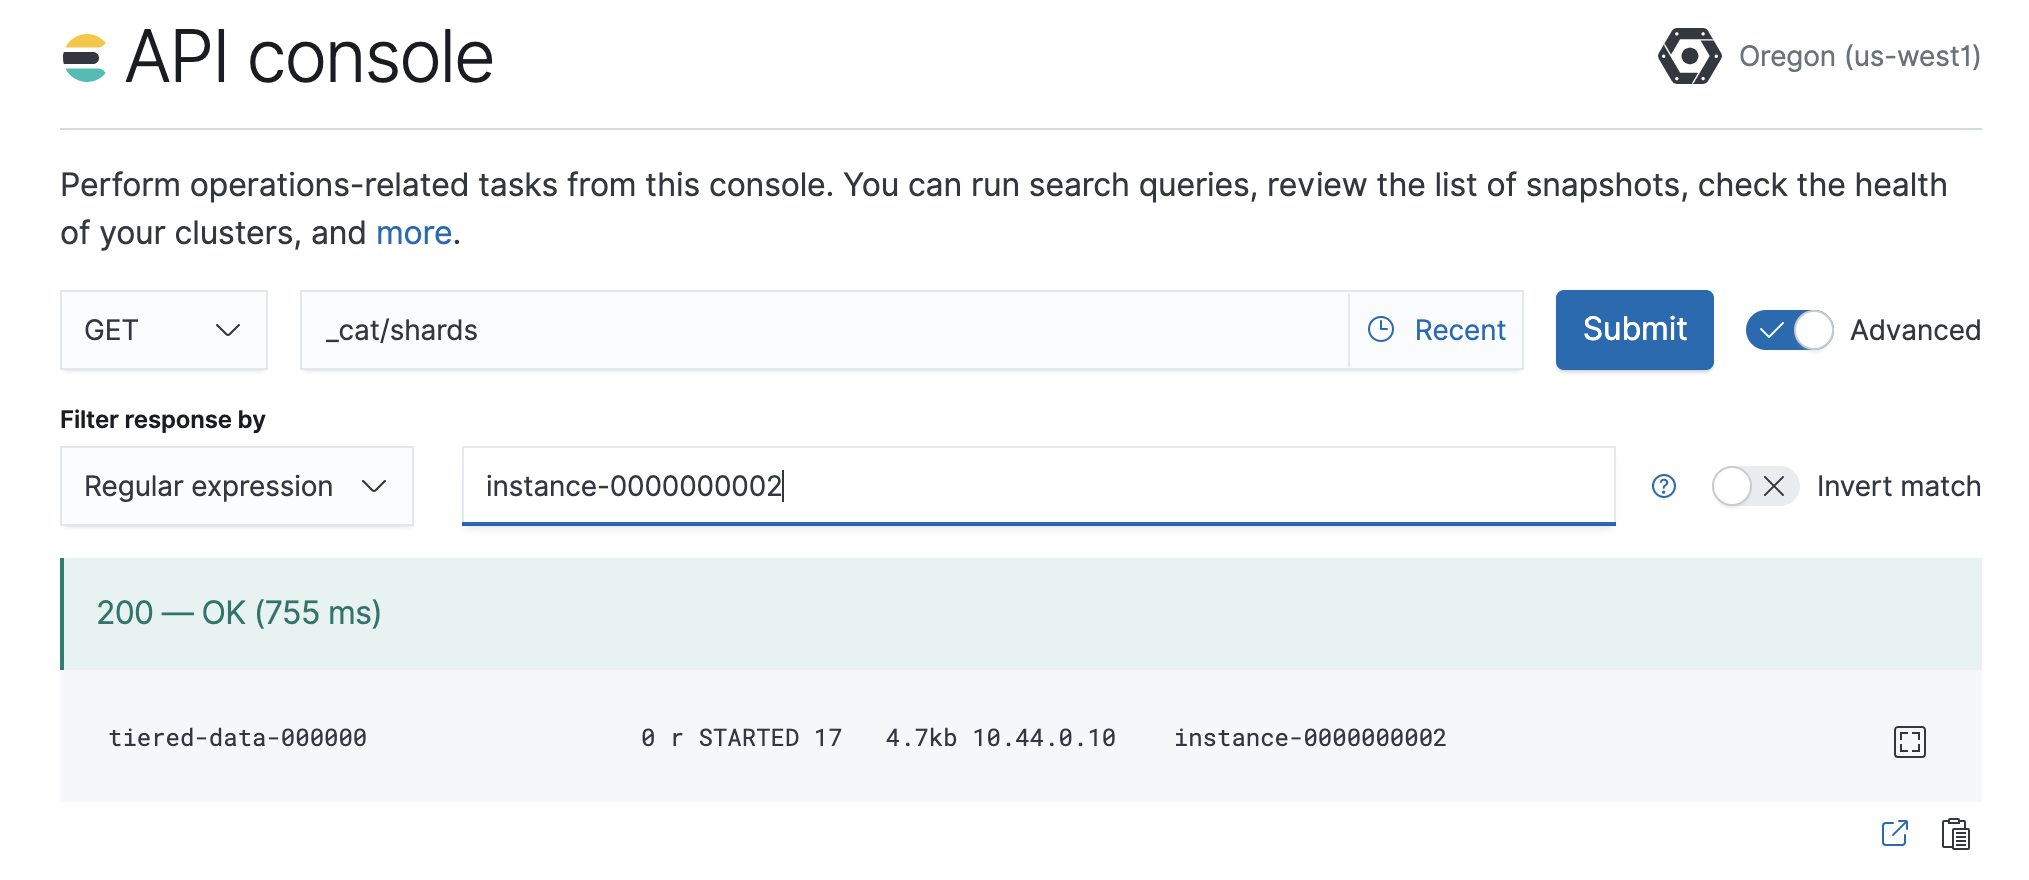
Check and update index allocation rules.
ILM and manual index configurations use different index-level shard allocation filters to control shard placement. For every index that has shards on the nodes you are removing, check its allocation settings and apply the relevant substeps:
GET /my-index/_settingsUpdate
_tier_preference-based rules.Data tier-based ILM policies use
index.routing.allocation.include._tier_preferenceto express shard placement as an ordered list of preferred tiers. Indices using this method have settings similar to the following example:{ ... "routing": { "allocation": { "include": { "_tier_preference": "data_warm,data_hot" } } } ... }- The example represents an index in the
warmtier.
Before disabling the tier, update
_tier_preferenceso that the tier where you want the data to move is the first available tier in the list. This allows Elasticsearch to begin relocating the shards before the deployment plan removes the tier.Update the setting based on where you want to move the data:
- To move the data to an existing fallback tier, remove the tier being disabled from the list. For example, when disabling the warm tier, change
data_warm,data_hottodata_hot. - To move the data to a later lifecycle tier, add that tier before the tier being disabled. For example, when disabling the warm tier, change
data_warm,data_hottodata_cold,data_warm,data_hot.
The following example moves data from warm to cold:
PUT /my-index/_settings { "routing": { "allocation": { "include": { "_tier_preference": "data_cold,data_warm,data_hot" } } } }- You can also use
data_cold,data_hot. Both values move the data to cold, but omittingdata_warmremoves that tier from the fallback sequence.
NoteDo not use the frozen tier as a fallback for regular indices. It is reserved for partially mounted searchable snapshots.
- The example represents an index in the
Update node attribute allocation requirement rules.
Older ILM policies and some custom configurations use
index.routing.allocation.requireto pin shards to nodes with a specific attribute. Indices using this method have settings similar to the following example:{ ... "routing": { "allocation": { "require": { "data": "warm" } } } ... }Unlike
_tier_preference, arequirerule is a hard constraint: if the required nodes are gone, the shard becomes unassigned and Elasticsearch cannot move it automatically. You must remove or redirect these rules before disabling the tier. To remove the attribute requirement:PUT /my-index/_settings { "routing": { "allocation": { "require": { "data": null } } } }Alternatively, redirect the index to a different tier by setting
requireto the desired attribute value. For example, to move an index to nodes withdataattribute ofcold:PUT /my-index/_settings { "routing": { "allocation": { "require": { "data": "cold" } } } }Adjust the
datavalue to match the custom node attributes and index-level shard allocation filters your indices already use. You cannot send regular indices to the frozen tier.If you remove the
requirerule, Elasticsearch does not re-allocate shards immediately. They move when the deployment plan disables the tier. You can instead use the cluster reroute API or redirectrequireto a different attribute value to start re-allocation before applying the plan.Review other custom allocation rules.
If indices on the nodes being removed use other index-level shard allocation filters, such as
include,exclude, orrequireconfigurations not covered earlier, update or remove any rules that would prevent shards from moving to the intended nodes. You can preserve rules unrelated to the tier removal.The following example removes all
_name-based custom allocation filters from an index:PUT /my-index/_settings { "index.routing.allocation.require._name": null, "index.routing.allocation.include._name": null, "index.routing.allocation.exclude._name": null }
ImportantIf your allocation setting changes start relocation, wait until shard allocation and recovery finish. Use
GET /_cat/allocation?v=true&s=nodeto monitor the nodes that the plan will remove. Shards might remain if you only removed arequirerule because that change does not force them to move. The deployment plan relocates them when it disables the tier.If shards that you expect to move remain on the original tier, use the cluster allocation explain API to determine the cause. Common causes include disk watermarks or the
index.routing.allocation.total_shards_per_nodelimit on the destination nodes.Edit the deployment, disabling the data tier.
If autoscaling is enabled, set the maximum size to 0 for the data tier to ensure autoscaling does not re-enable the data tier.
Any remaining shards on the tier being disabled are re-allocated across the remaining cluster nodes while applying the plan to disable the data tier. Monitor shard allocation during the data migration phase to ensure all allocation rules have been correctly updated. If the plan fails to migrate data away from the data tier, then re-examine the allocation rules for the indices remaining on that data tier.
Once the plan change completes, confirm that
GET /_cat/nodes?vshows no nodes associated with the disabled tier and thatGET /_cluster/healthreportsgreen.Review your ILM policies and consider removing references to the disabled tier to keep them consistent with the deployment topology. This is especially important in older deployments where ILM uses node-attribute-based allocation, as those policies cannot run phases that target nodes that no longer exist.
For guidance on updating policies, refer to Configure a lifecycle policy.
Re-enable ILM:
POST /_ilm/startVerify that ILM is running and that no indices report errors related to the disabled tier:
GET /_ilm/status
GET /_all/_ilm/explain?human=true&expand_wildcards=all&only_errors=true
Confirm that
operation_modeisRUNNING. Investigate any reported errors and verify that no policy still attempts to allocate data to the disabled tier.
This section explains how to remove a data tier that contains searchable snapshot indices. Your options for preserving the data depend on how the indices are mounted:
- Partially mounted searchable snapshots on the frozen tier: The only way to keep the data available as indices when removing the frozen tier is to restore all partially mounted indices as regular indices on another tier. Follow the steps in this section to restore the indices and remove the original searchable snapshot indices.
- Fully mounted searchable snapshots on the cold tier: To keep the indices as searchable snapshots, move them to another tier by following Remove a tier with regular indices. This works because fully mounted indices follow the same shard placement rules as regular indices. Alternatively, follow the steps in this section to restore them as regular indices on another tier.
If you do not need to preserve the data, delete the searchable snapshot indices and continue from the shard verification before disabling the tier.
The following procedure captures the snapshot metadata, restores the indices as regular indices, removes the original searchable snapshot indices, optionally deletes the source snapshots, and then disables the tier.
The ILM searchable_snapshot action typically prefixes the resulting index with restored-* for fully mounted indices in the hot or cold phase and partial-* for partially mounted indices in the frozen phase. Manually mounted searchable snapshots might not use these prefixes. In the following steps, adapt the index names and patterns to match the indices on the tier you are removing.
From your deployment page, filter the instance list by the data tier you want to disable and note the instance IDs.
Stop ILM to prevent data from migrating to the phase you intend to remove while you work.
POST /_ilm/stop
GET /_ilm/status
Wait until
operation_modeisSTOPPEDbefore proceeding.Using the searchable snapshot indices identified in Before you remove a data tier, create an inventory of the indices to restore. For standard ILM configurations, you can use
restored-*for the cold tier andpartial-*for the frozen tier. For custom configurations, use individual index names or a pattern that matches the relevant indices. For each index, record the index name, source snapshot name, and snapshot repository.GET /<searchable-snapshot-index-name-or-pattern>/_settings?filter_path=**.index.store.snapshot.snapshot_name,**.index.store.snapshot.repository_name&expand_wildcards=all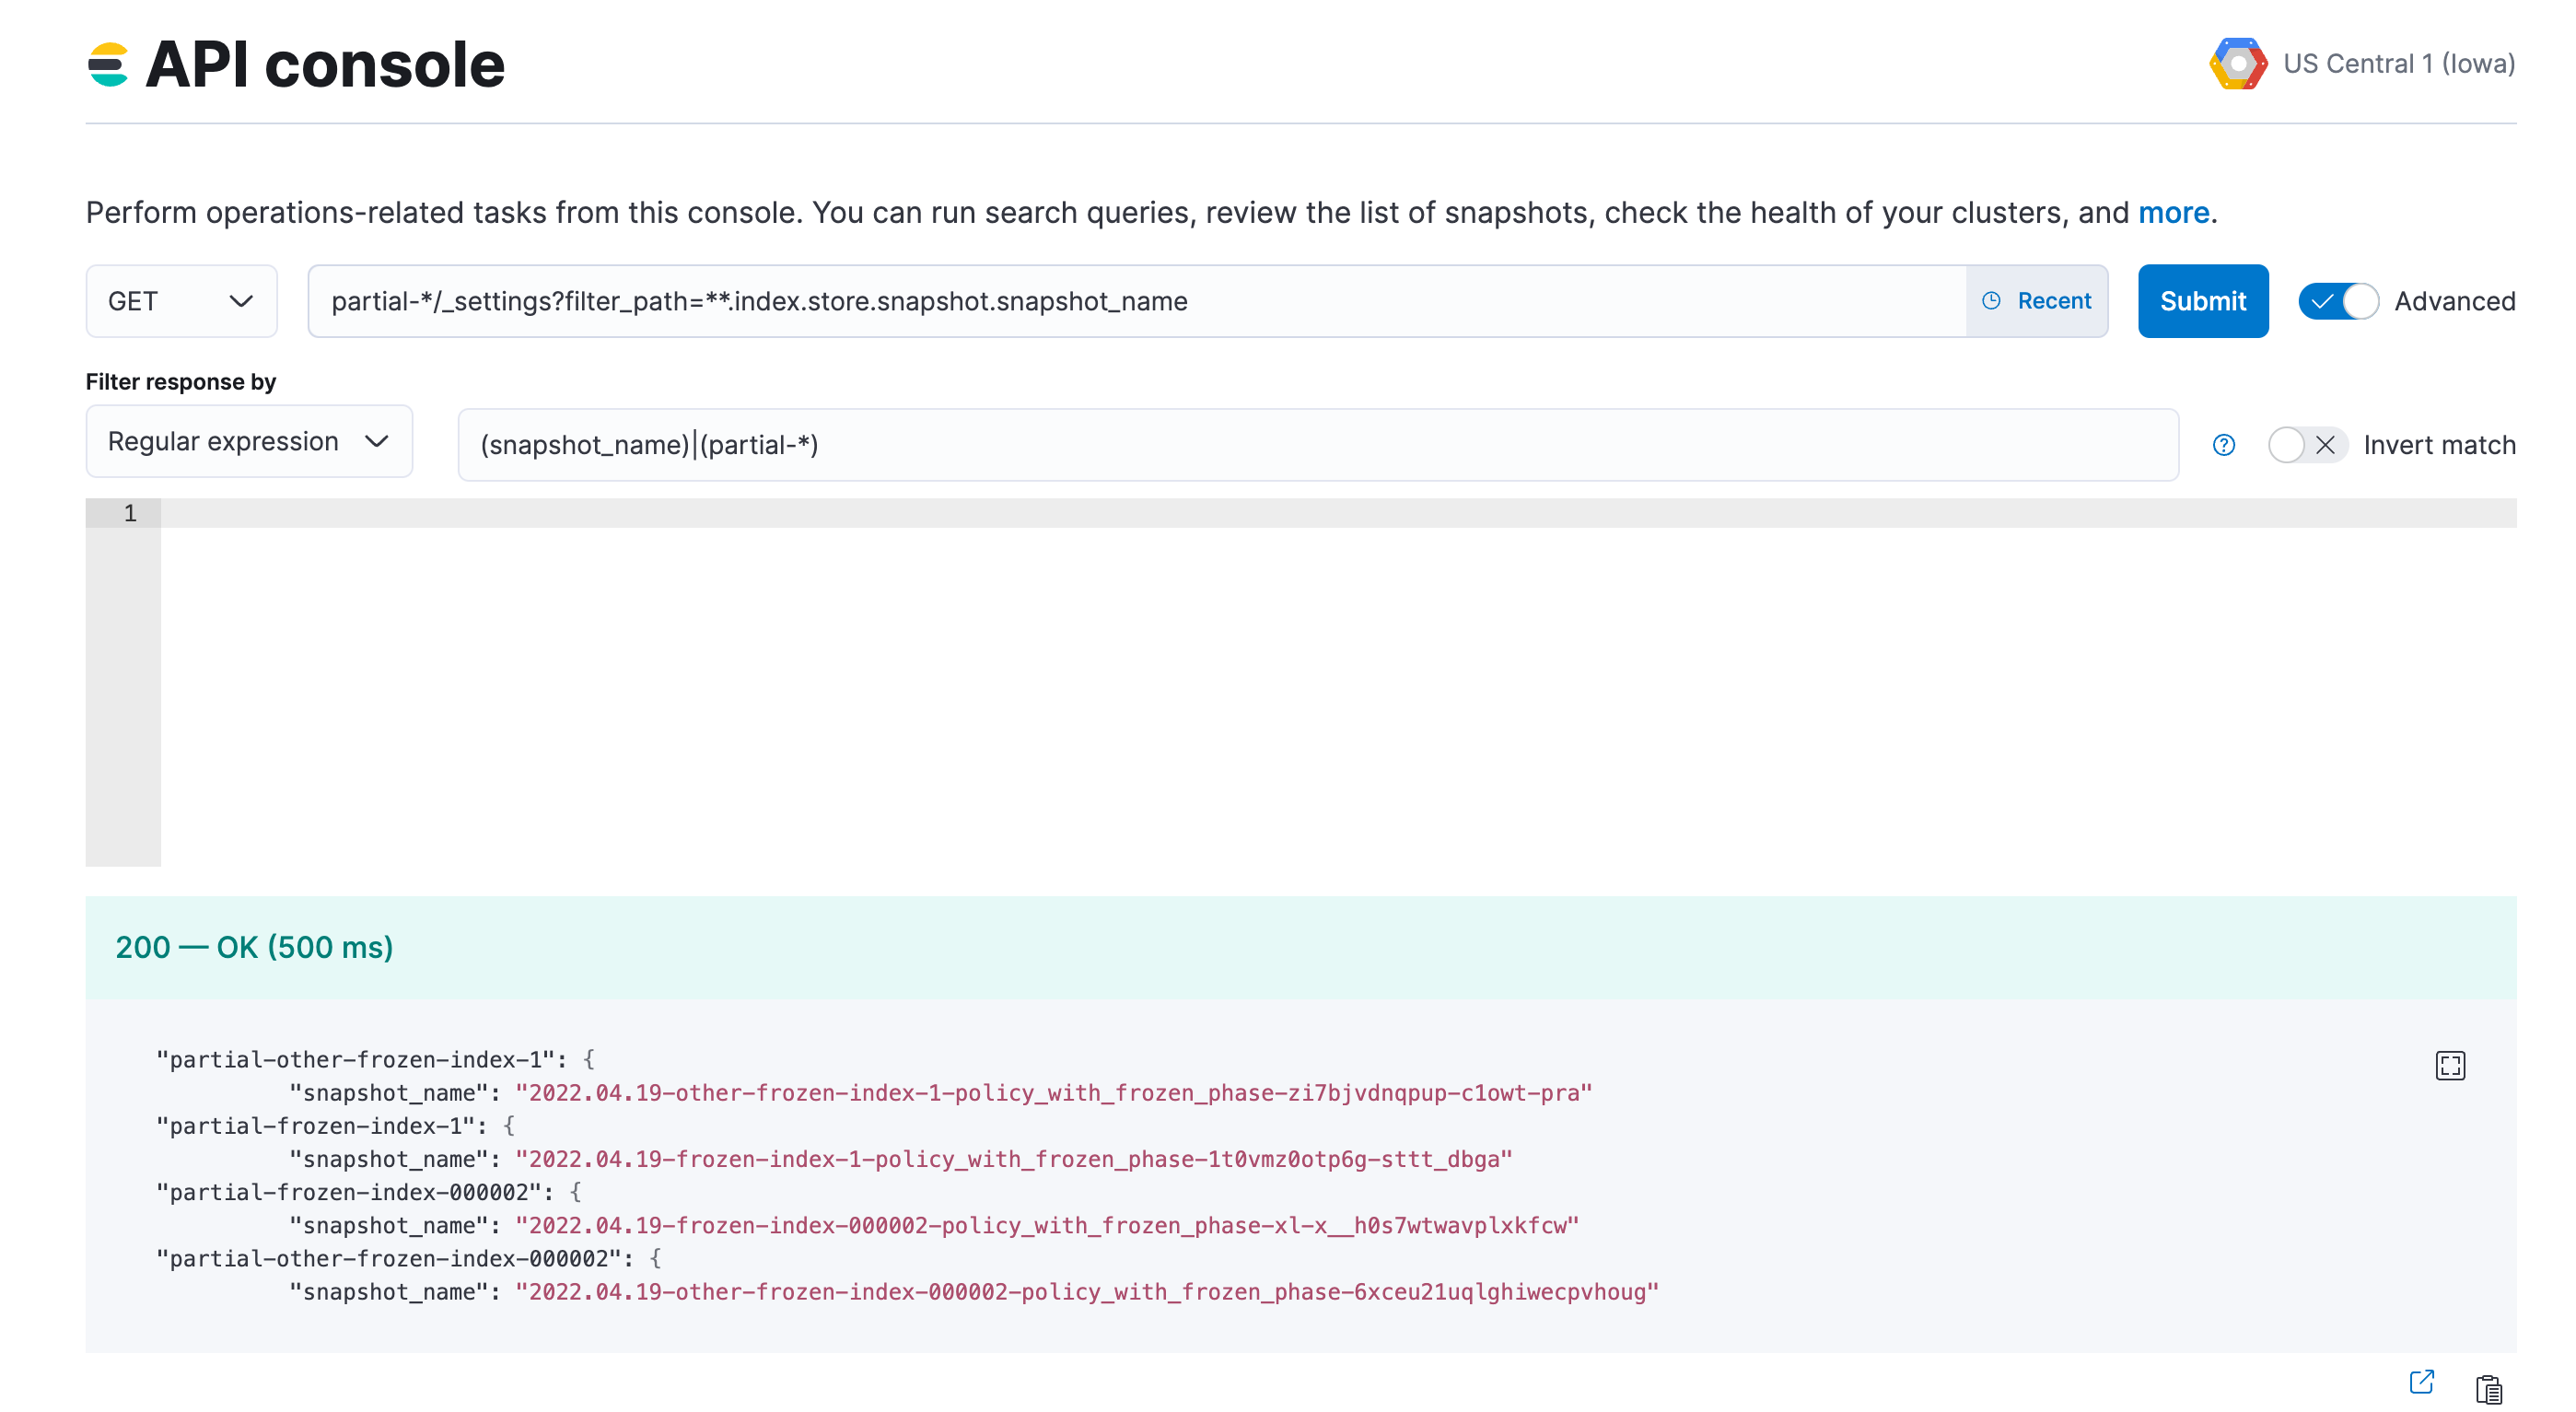
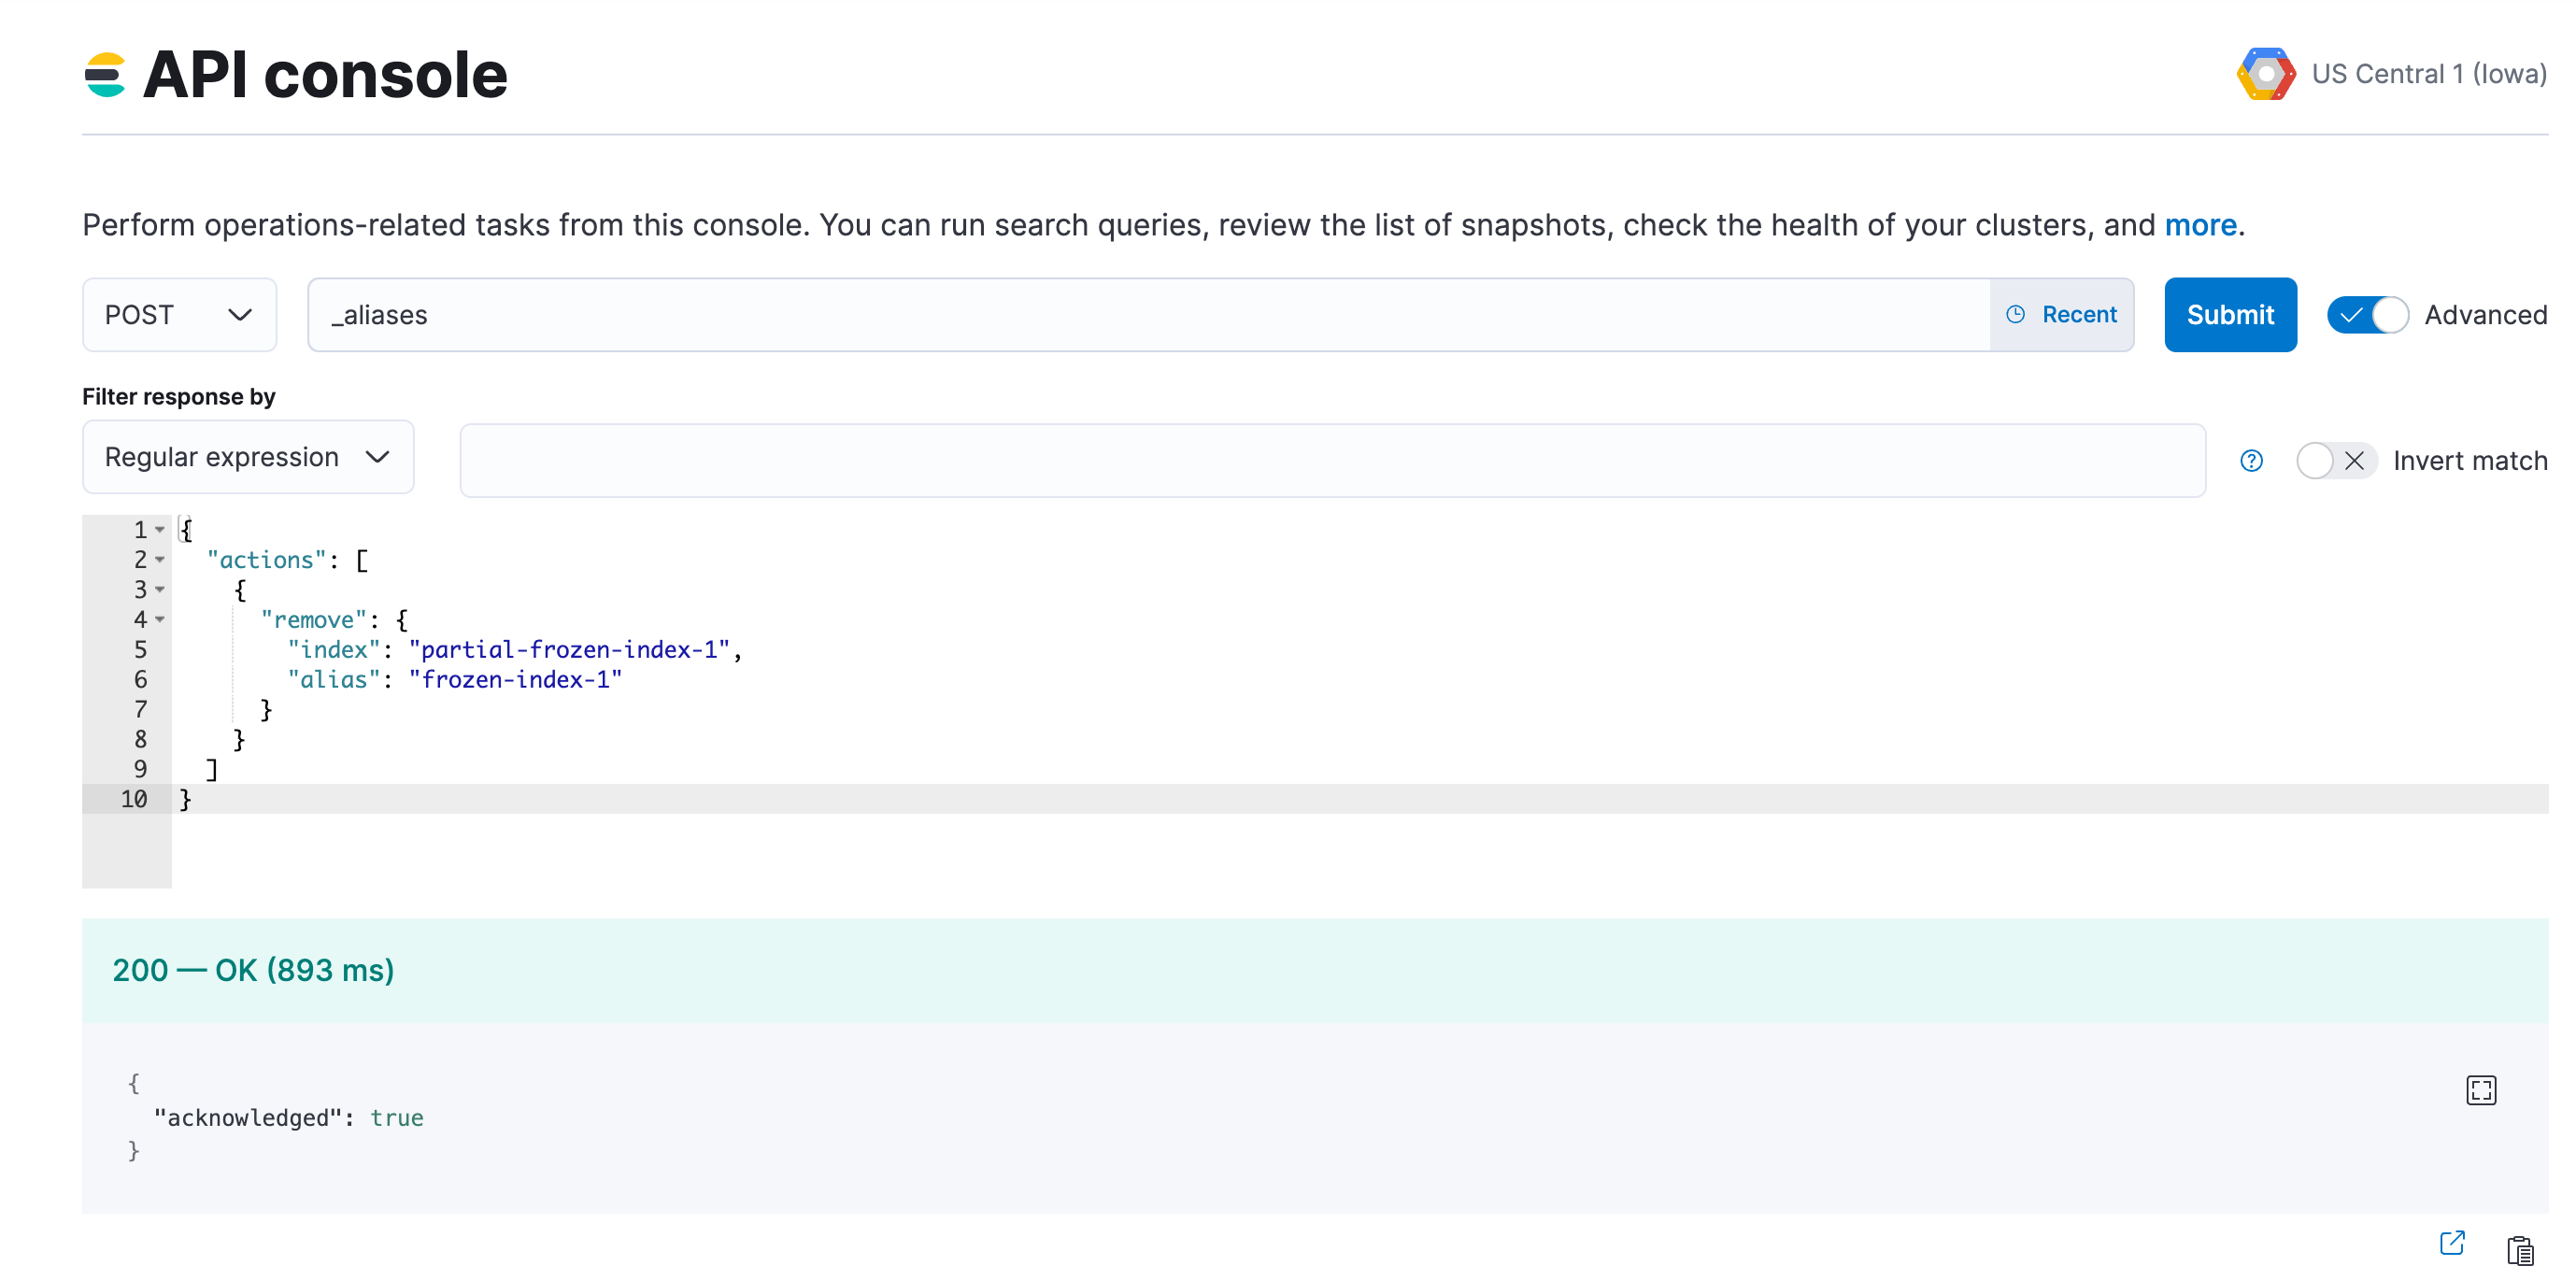
For each index in the inventory, remove any aliases that were applied to the searchable snapshot index.
POST /_aliases { "actions": [ { "remove": { "index": "<searchable-snapshot-index-name>", "alias": "<alias-name>" } } ] }NoteIf you use a data stream, you can skip this step.
Restore each index in the inventory from its source snapshot.
The restore request creates a regular index on the remaining tiers and prevents it from inheriting the previous ILM policy and rollover alias:
POST /_snapshot/<snapshot_repository_name>/<searchable_snapshot_name>/_restore { "indices": "*", "index_settings": { "index.routing.allocation.include._tier_preference": "<data_tiers>", "index.number_of_replicas": 1, "index.lifecycle.name": null, "index.lifecycle.rollover_alias": null } }- Use the corresponding snapshot repository and snapshot name from the inventory.
- The
*value restores every index in the snapshot. Snapshots created by the ILMsearchable_snapshotaction contain only the managed index. For a manually created snapshot that contains multiple indices, replace*with the name of the original index you want to restore. - Specify an ordered list of remaining tiers where the restored index can be allocated. Refer to Update
_tier_preference-based rules. - Adjust
index.number_of_replicasto match your resiliency needs.
To manage the restored index with a different ILM policy, apply the policy after the restore and configure its rollover alias if required. Refer to Switch lifecycle policies.
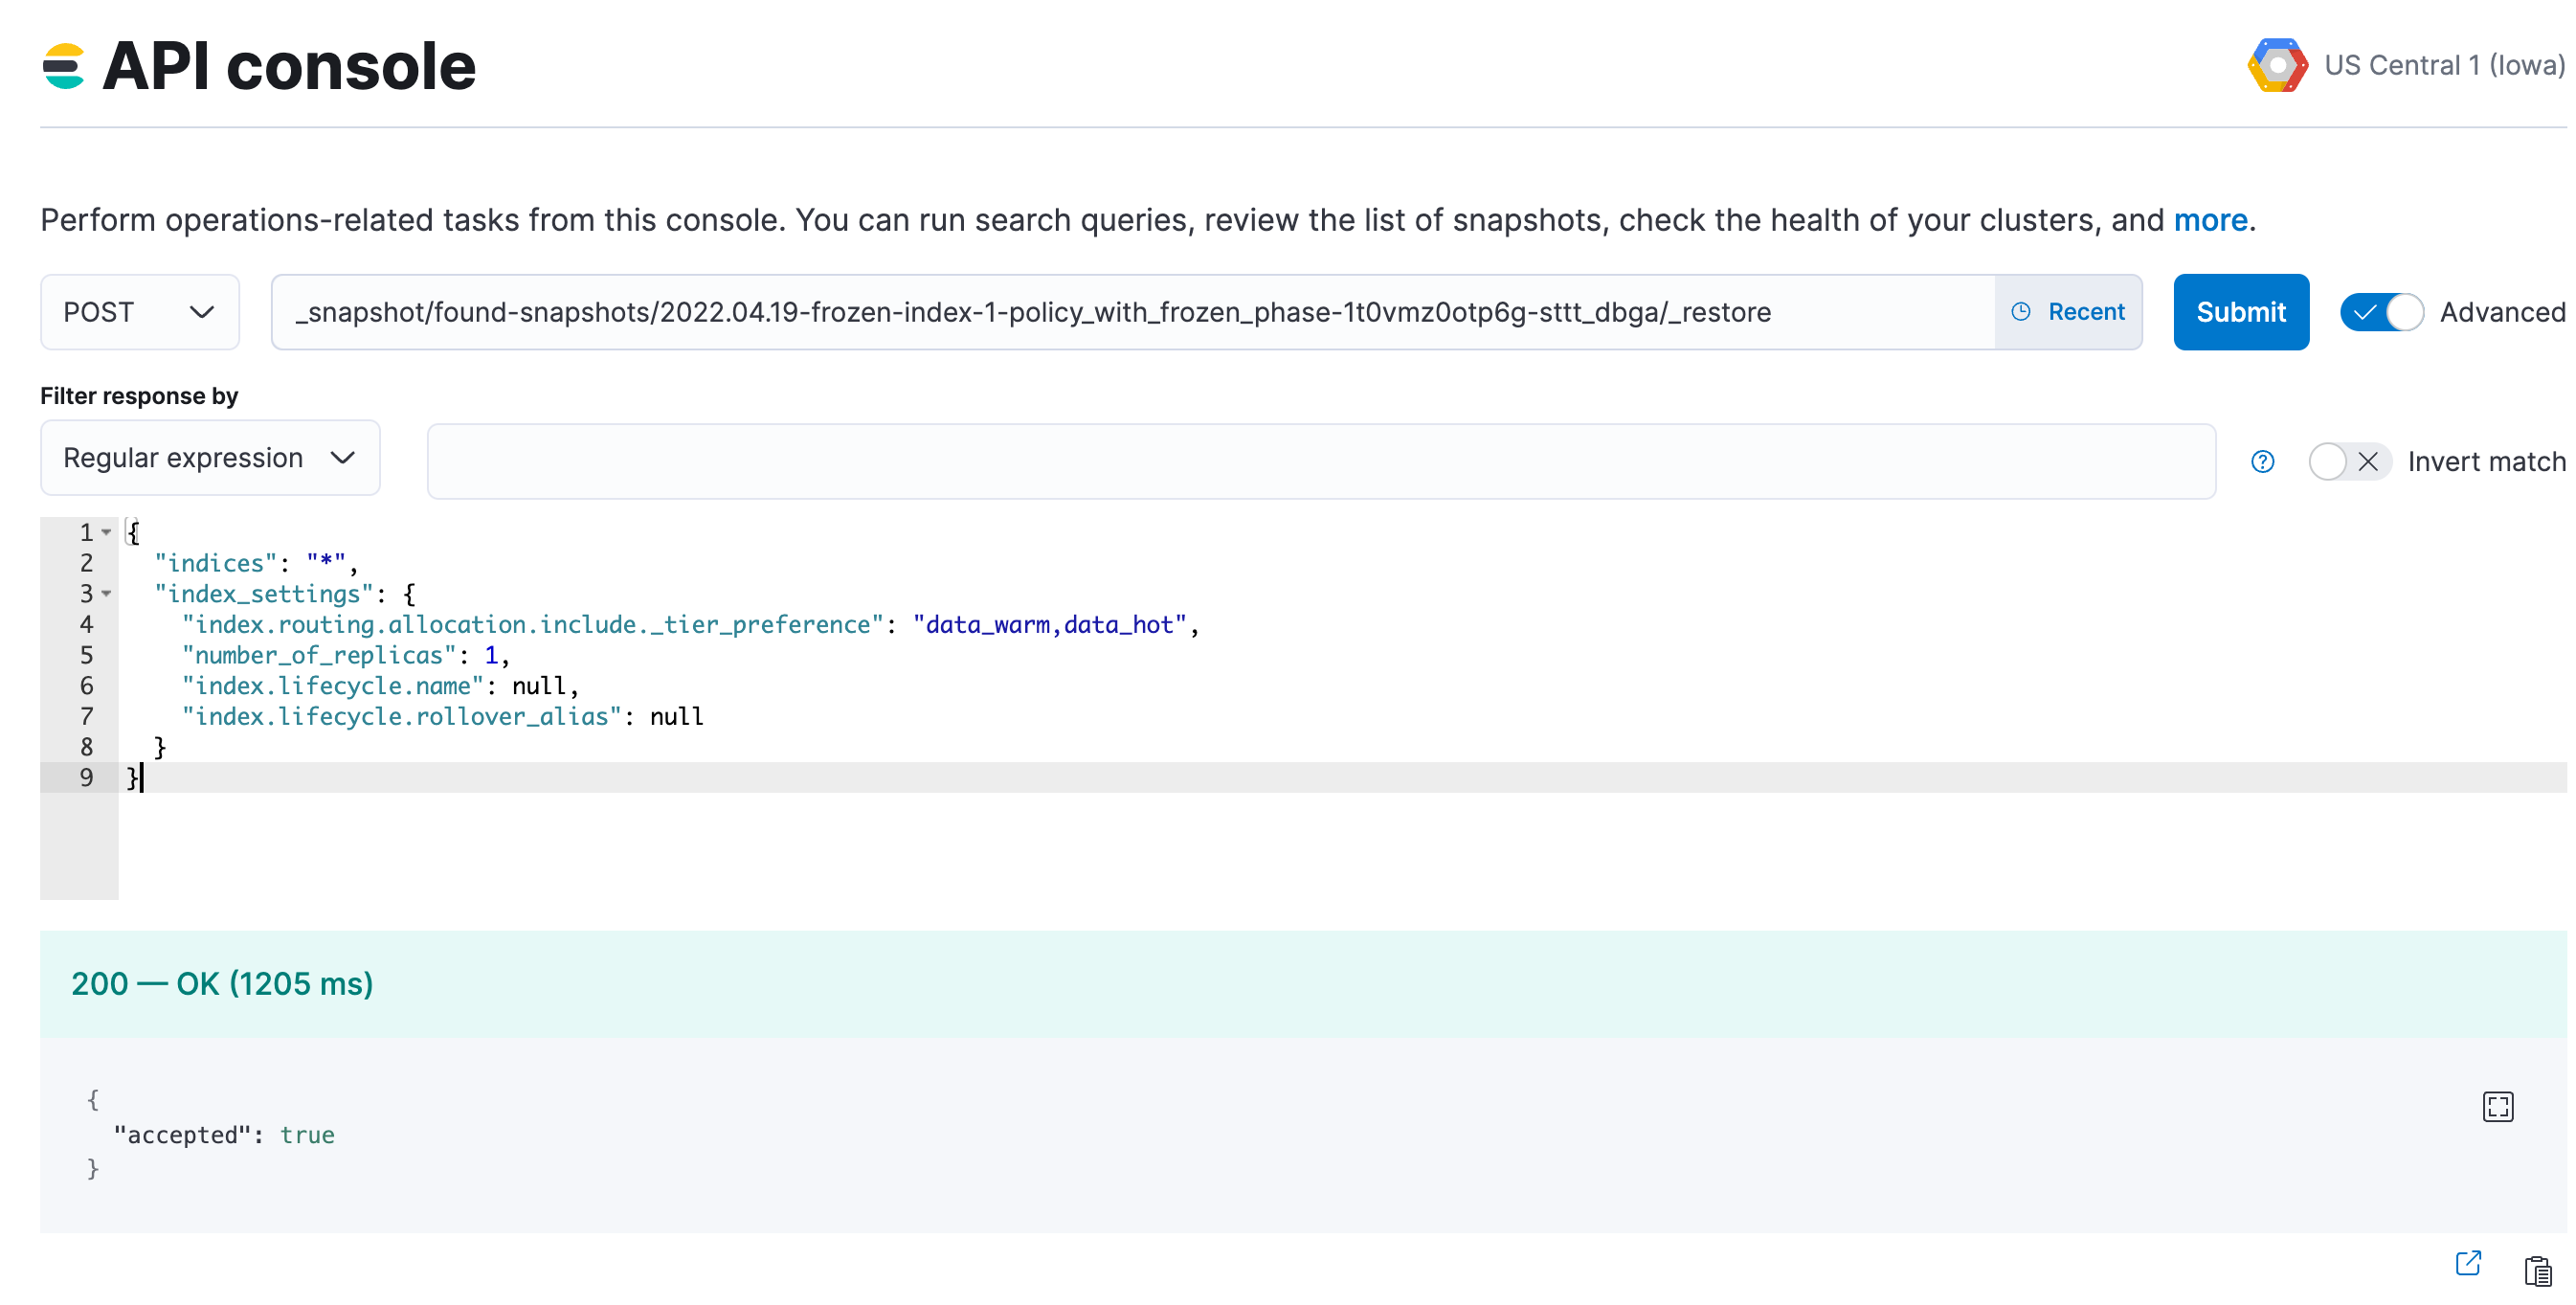
Once all snapshots are restored, use
GET /_cat/indices/<index-pattern>?v=trueto check that the restored indices aregreenand reflect the expecteddocs.countandstore.sizevalues.If you are using a data stream, you might need to use
GET /_data_stream/<data-stream-name>to get the list of the backing indices, and then specify them by usingGET /_cat/indices/<backing-index-name>?v=trueto check. When you restore the backing indices of a data stream, some considerations apply, and you might need to manually add the restored indices into your data stream or re-create your data stream.After verifying each restored index, delete the corresponding original searchable snapshot index from the inventory.
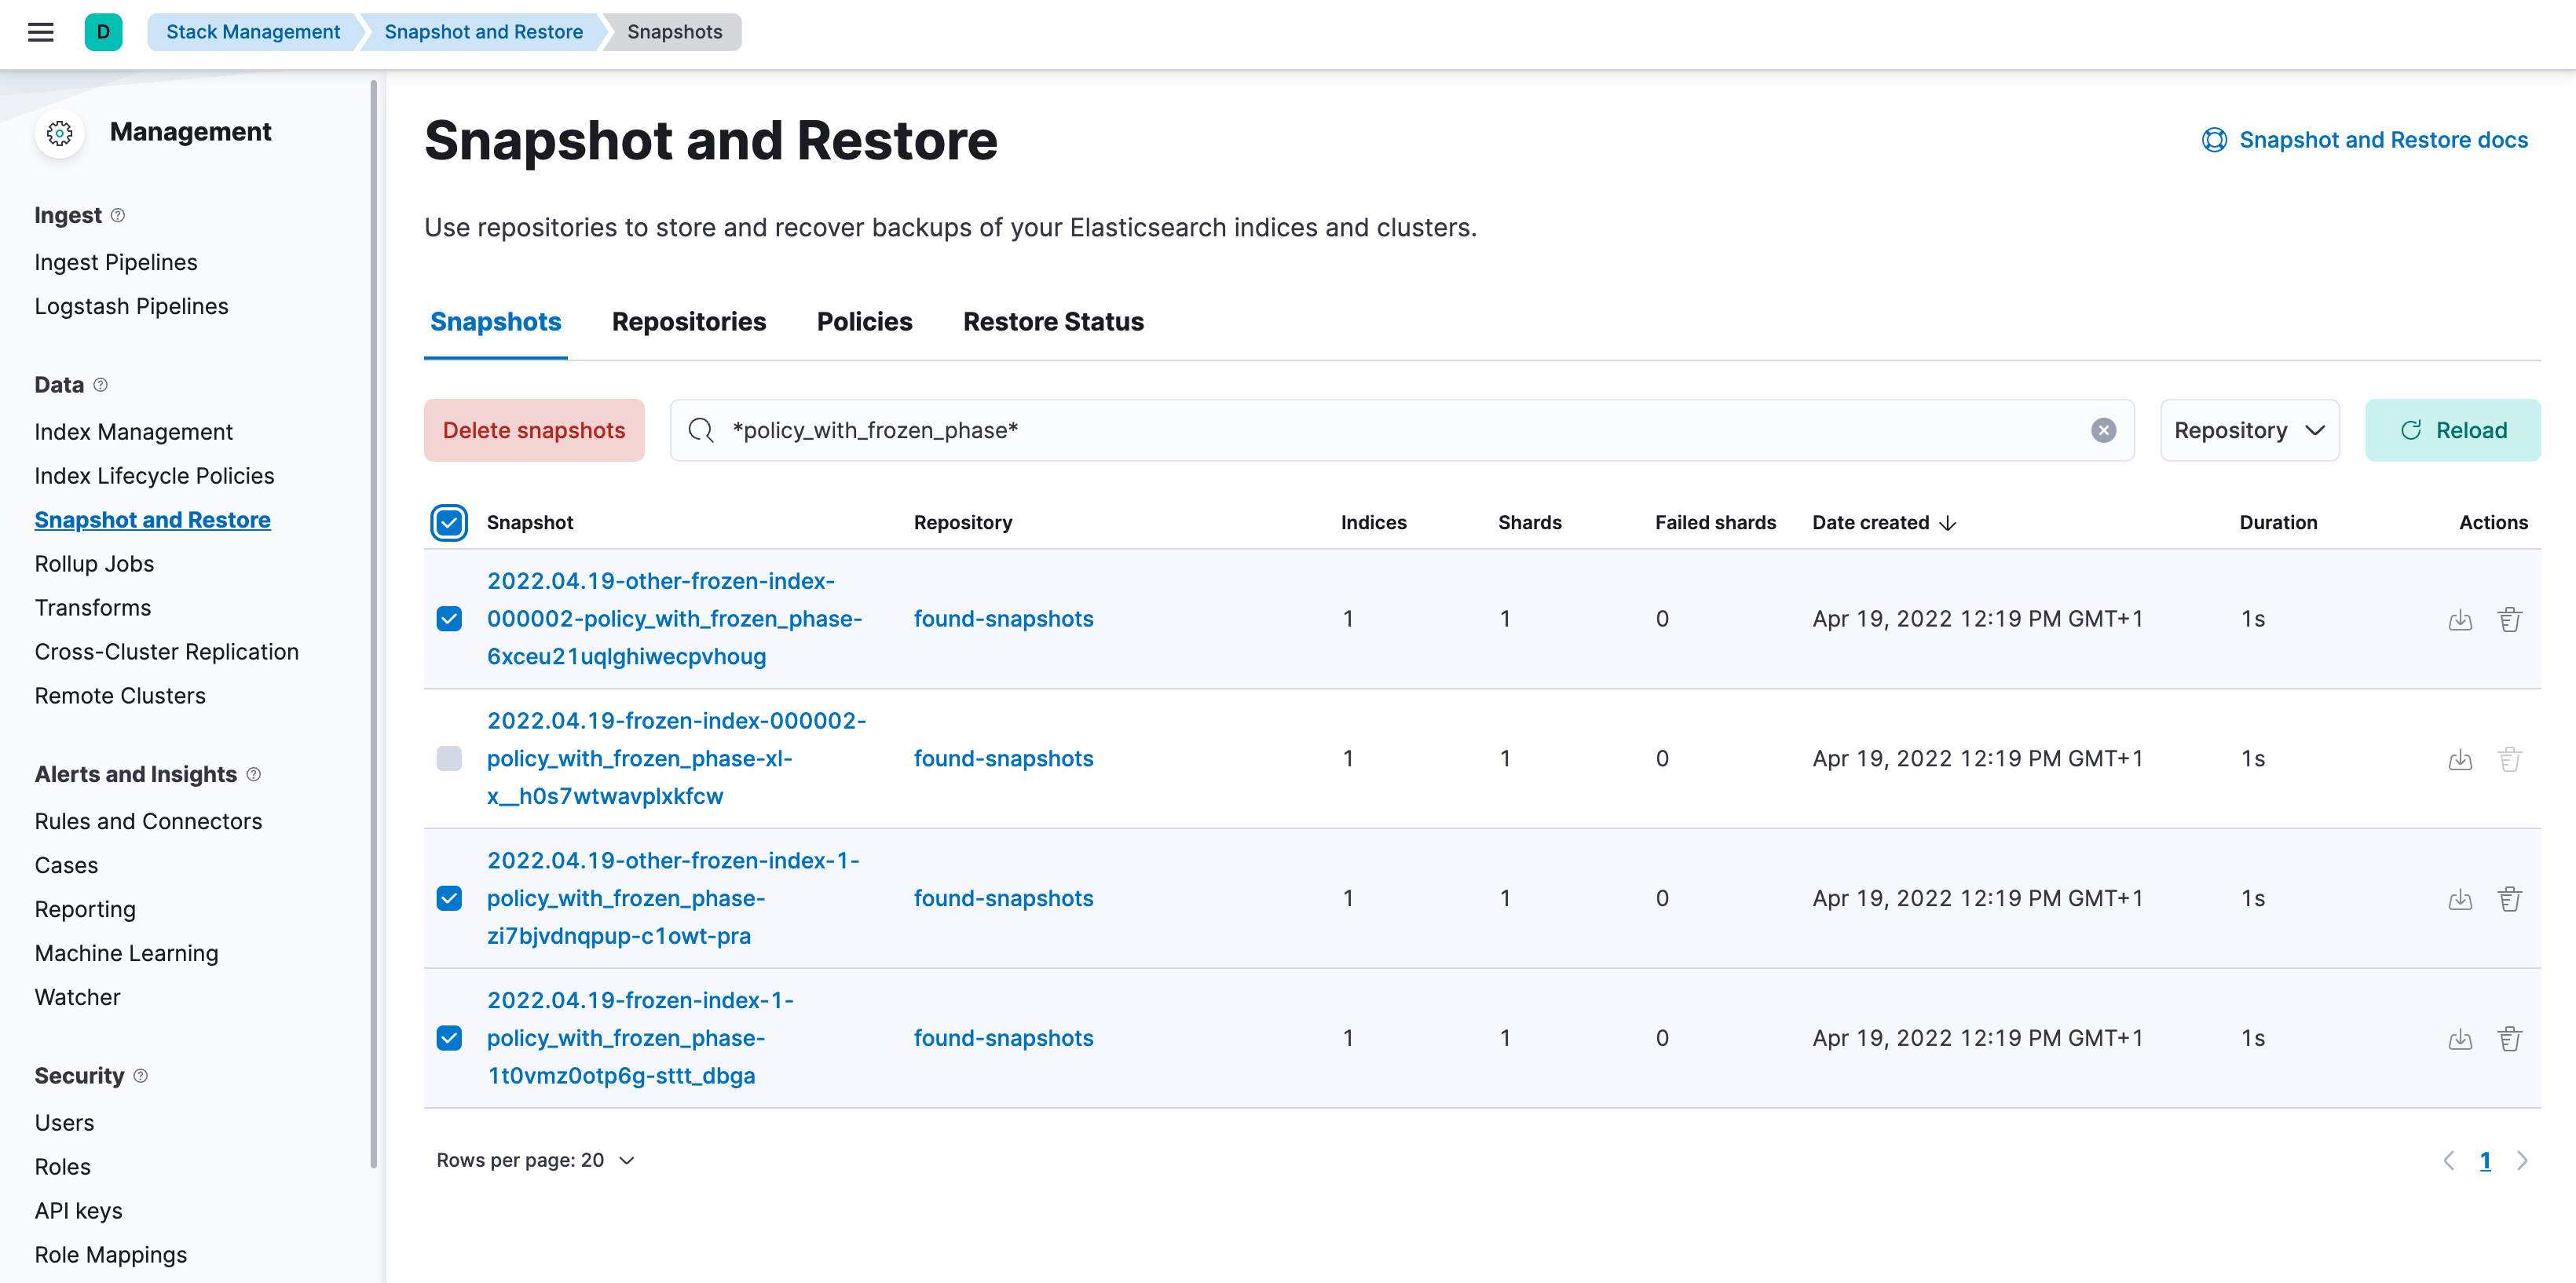
DELETE /<searchable-snapshot-index-name>If you no longer need the source snapshots, delete them from Kibana:
WarningDeleting the source snapshots is not required to disable the tier. Before deleting a snapshot, verify that no mounted index in this or another cluster still depends on it and that it contains no other data you need. The underlying snapshot is the sole full copy of the data for every searchable snapshot index mounted from it.
Find Snapshot and Restore in the navigation menu or use the global search field.
Select the Snapshots tab.
Search for the snapshot names recorded in the inventory. If the snapshots were created by the same ILM policy, you can search for the policy name instead.
Select the snapshots you want to delete, and click Delete.
Confirm that no shards remain on the data nodes you want to remove using
GET /_cat/allocation?v=true&s=node.Edit your deployment from the console to disable the data tier.
If autoscaling is enabled, set the maximum size to
0for the data tier to ensure autoscaling does not re-enable it.Once the plan change completes, confirm that
GET /_cat/nodes?vshows no nodes associated with the disabled tier and thatGET /_cluster/healthreportsgreen.Review your ILM policies and update any phases that target the disabled tier. For example, when disabling the frozen tier, remove the
frozenphase. If you want future indices to continue using searchable snapshots, configure thesearchable_snapshotaction in an appropriate remaining phase. Also update any allocation rules that reference the disabled tier.For guidance on updating policies, refer to Configure a lifecycle policy.
Re-enable ILM:
POST /_ilm/startVerify that ILM is running and that no indices report errors related to the disabled tier:
GET /_ilm/status
GET /_all/_ilm/explain?human=true&expand_wildcards=all&only_errors=true
Confirm that
operation_modeisRUNNING. Investigate any reported errors and verify that no policy still attempts to allocate data to the disabled tier.