Data tiers
Elastic Stack Serverless
A data tier is a collection of nodes within a cluster that share the same data node role, and a hardware profile that’s appropriately sized for the role. Elastic recommends that nodes in the same tier share the same hardware profile to avoid hot spotting.
The data tiers that you use, and the way that you use them, depends on the data’s category. The following data tiers are can be used with each data category:
Content data:
- Content tier nodes handle the indexing and query load for non-timeseries indices, such as a product catalog.
Time series data:
- Hot tier nodes handle the indexing load for time series data, such as logs or metrics. They hold your most recent, most-frequently-accessed data.
- Warm tier nodes hold time series data that is accessed less-frequently and rarely needs to be updated.
- Cold tier nodes hold time series data that is accessed infrequently and not normally updated. To save space, you can keep fully mounted indices of searchable snapshots on the cold tier. These fully mounted indices eliminate the need for replicas, reducing required disk space by approximately 50% compared to the regular indices.
- Frozen tier nodes hold time series data that is accessed rarely and never updated. The frozen tier stores partially mounted indices of searchable snapshots exclusively. This extends the storage capacity even further — by up to 20 times compared to the warm tier.
The performance of an Elasticsearch node is often limited by the performance of the underlying storage and hardware profile. For example hardware profiles, refer to Elastic Cloud’s instance configurations. Review our recommendations for optimizing your storage for indexing and search.
Elasticsearch assumes nodes within a data tier share the same hardware profile (such as CPU, RAM, disk capacity). Data tiers with unequally resourced nodes have a higher risk of hot spotting.
The way data tiers are used often depends on the data’s category:
Content data remains on the content tier for its entire data lifecycle.
Time series data may progress through the descending temperature data tiers (hot, warm, cold, and frozen) according to your performance, resiliency, and data retention requirements.
You can automate these lifecycle transitions using the data stream lifecycle, or custom index lifecycle management.
Learn more about each data tier, including when and how it should be used.
Data stored in the content tier is generally a collection of items such as a product catalog or article archive. Unlike time series data, the value of the content remains relatively constant over time, so it doesn’t make sense to move it to a tier with different performance characteristics as it ages. Content data typically has long data retention requirements, and you want to be able to retrieve items quickly regardless of how old they are.
Content tier nodes are usually optimized for query performance—they prioritize processing power over IO throughput so they can process complex searches and aggregations and return results quickly. While they are also responsible for indexing, content data is generally not ingested at as high a rate as time series data such as logs and metrics. From a resiliency perspective the indices in this tier should be configured to use one or more replicas.
The content tier is required and is often deployed within the same node grouping as the hot tier. System indices and other indices that aren’t part of a data stream are automatically allocated to the content tier.
The hot tier is the Elasticsearch entry point for time series data and holds your most-recent, most-frequently-searched time series data. Nodes in the hot tier need to be fast for both reads and writes, which requires more hardware resources and faster storage (SSDs). For resiliency, indices in the hot tier should be configured to use one or more replicas.
The hot tier is required. New indices that are part of a data stream are automatically allocated to the hot tier.
Time series data can move to the warm tier once it is being queried less frequently than the recently-indexed data in the hot tier. The warm tier typically holds data from recent weeks. Updates are still allowed, but likely infrequent. Nodes in the warm tier generally don’t need to be as fast as those in the hot tier. For resiliency, indices in the warm tier should be configured to use one or more replicas.
When you no longer need to search time series data regularly, it can move from the warm tier to the cold tier. While still searchable, this tier is typically optimized for lower storage costs rather than search speed.
For better storage savings, you can keep fully mounted indices of searchable snapshots on the cold tier. Unlike regular indices, these fully mounted indices don’t require replicas for reliability. In the event of a failure, they can recover data from the underlying snapshot instead. This potentially halves the local storage needed for the data. A snapshot repository is required to use fully mounted indices in the cold tier. Fully mounted indices are read-only.
Alternatively, you can use the cold tier to store regular indices with replicas instead of using searchable snapshots. This lets you store older data on less expensive hardware but doesn’t reduce required disk space compared to the warm tier.
Once data is no longer being queried, or being queried rarely, it may move from the cold tier to the frozen tier where it stays for the rest of its life.
The frozen tier requires a snapshot repository. The frozen tier uses partially mounted indices to store and load data from a snapshot repository. This reduces local storage and operating costs while still letting you search frozen data. Because Elasticsearch must sometimes fetch frozen data from the snapshot repository, searches on the frozen tier are typically slower than on the cold tier.
Follow the instructions for your deployment type to configure data tiers.
The default configuration for an Elastic Cloud deployment includes a shared tier for hot and content data. This tier is required and can’t be removed.
To add a warm, cold, or frozen tier when you create a deployment:
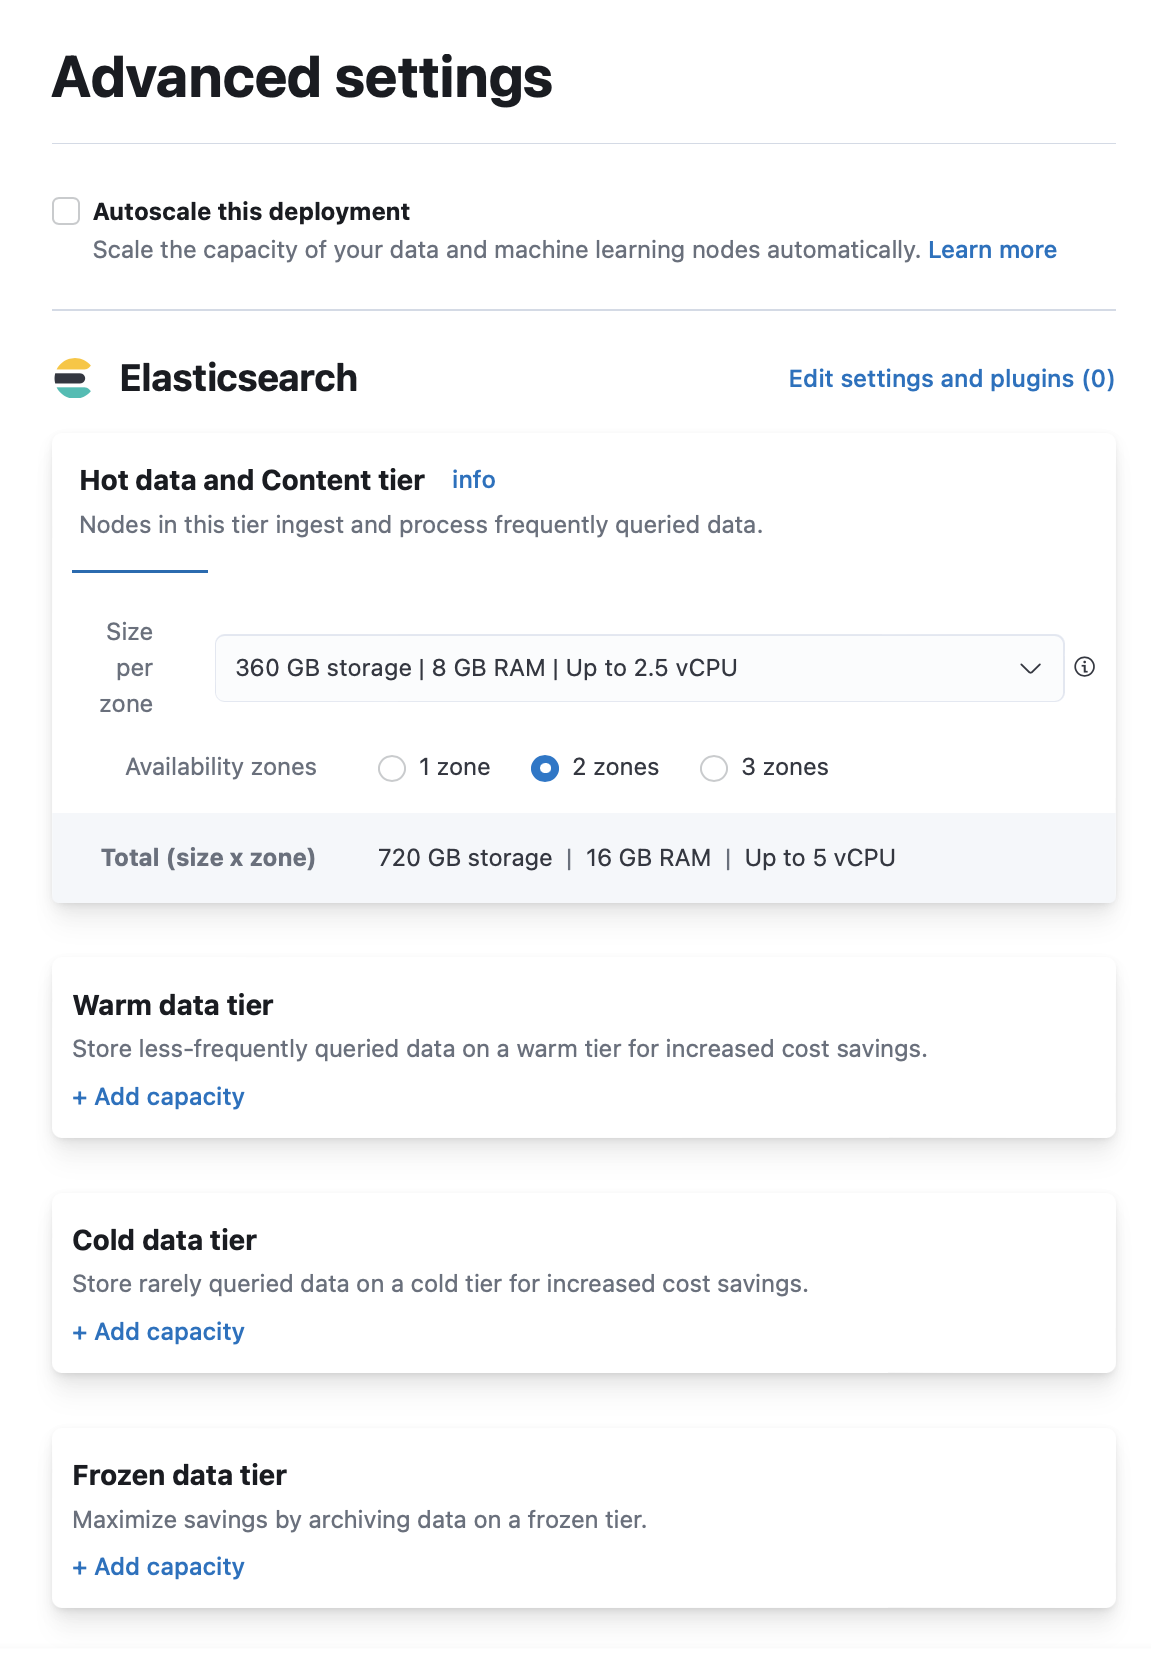
- On the Create deployment page, click Advanced Settings.
- Click + Add capacity for any data tiers to add.
- Click Create deployment at the bottom of the page to save your changes.
To add a data tier to an existing deployment:
- Log in to the Elastic Cloud console or the Elastic Cloud Enterprise admin console.
- On the Deployments page, select your deployment.
- In your deployment menu, select Edit.
- Click + Add capacity for any data tiers to add.
- Click Save at the bottom of the page to save your changes.
The process of disabling a data tier depends on whether we are dealing with searchable snapshots or regular indices.
The hot and warm tiers store regular indices, while the frozen tier stores searchable snapshots. However, the cold tier can store either regular indices or searchable snapshots. To check if a cold tier contains searchable snapshots perform the following request:
GET /_cat/indices/restored-*
Elastic Cloud Hosted and Elastic Cloud Enterprise try to move all data from the nodes that are removed during plan changes. To disable a non-searchable snapshot data tier (e.g., hot, warm, or cold tier), make sure that all data on that tier can be re-allocated by reconfiguring the relevant shard allocation filters. You’ll also need to temporarily stop your index lifecycle management (ILM) policies to prevent new indices from being moved to the data tier you want to disable.
To learn more about ILM, or shard allocation filtering, check the following documentation:
To make sure that all data can be migrated from the data tier you want to disable, follow these steps:
Determine which nodes will be removed from the cluster.
Log in to the Elastic Cloud Console.
From the Deployments page, select your deployment.
On the Deployments page you can narrow your deployments by name, ID, or choose from several other filters. To customize your view, use a combination of filters, or change the format from a grid to a list.
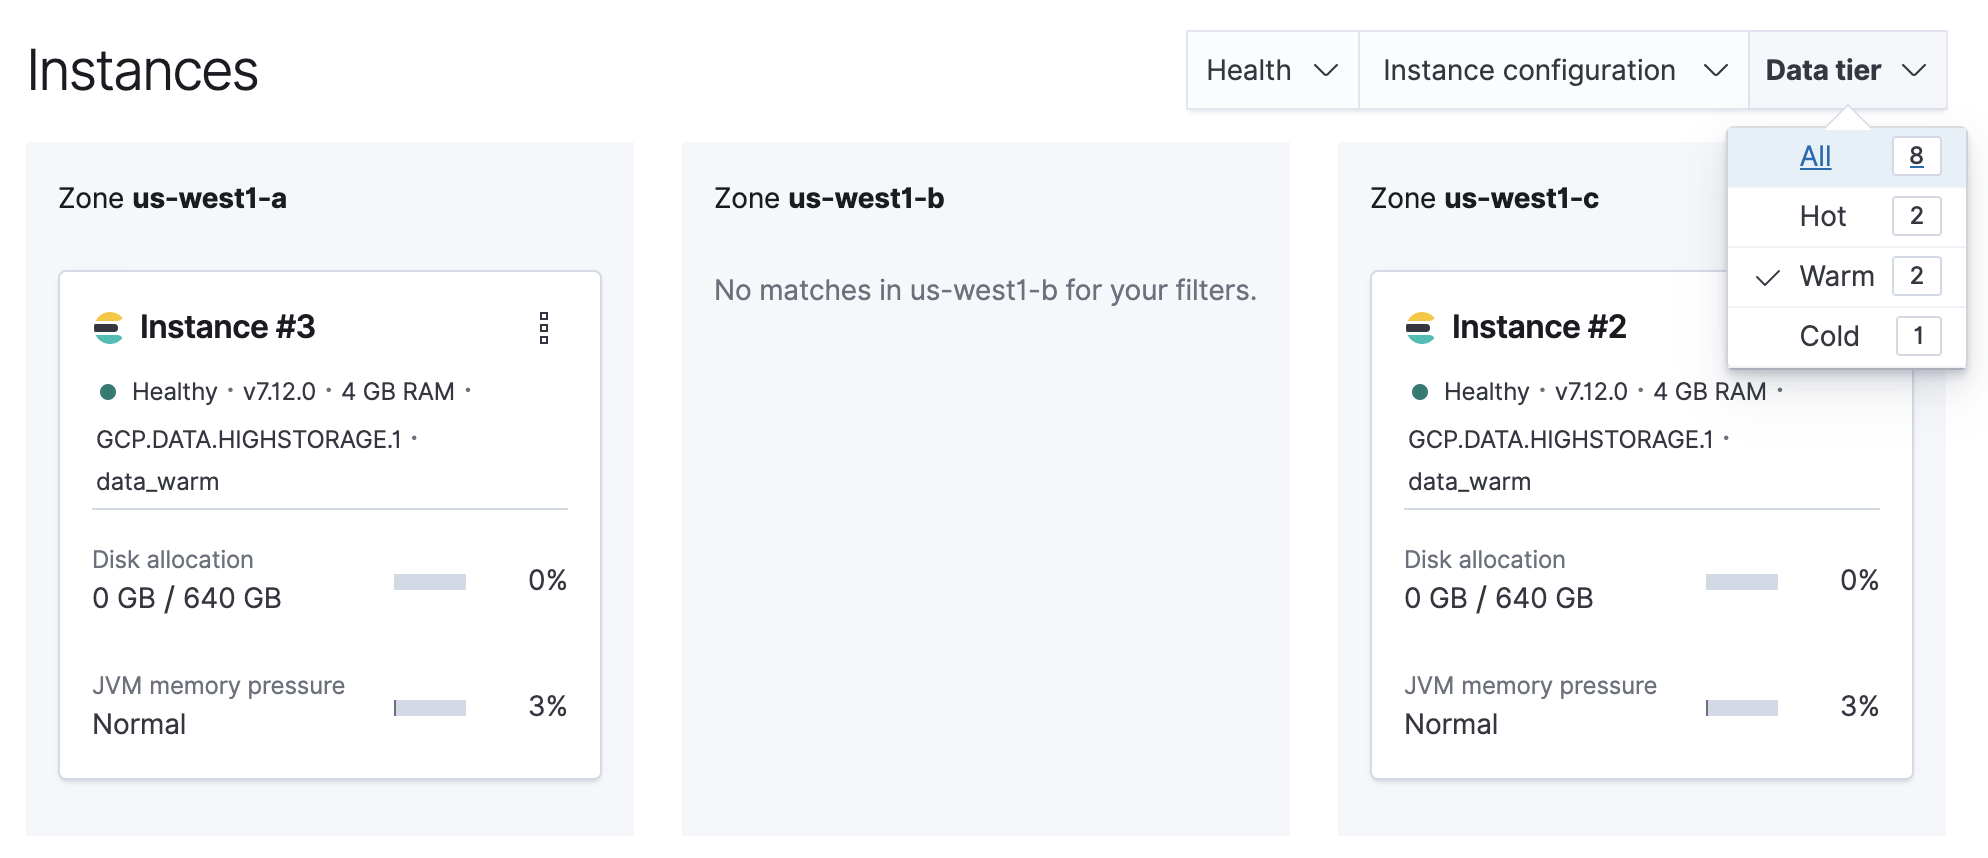
Filter the list of instances by the Data tier you want to disable.

Note the listed instance IDs. In this example, it would be Instance 2 and Instance 3.
From the Deployments page, select your deployment.
Narrow the list by name, ID, or choose from several other filters. To further define the list, use a combination of filters.
Filter the list of instances by the Data tier you want to disable.
Note the listed instance IDs. In this example, it would be Instance 2 and Instance 3.
Stop ILM.
POST /_ilm/stopDetermine which shards need to be moved.
GET /_cat/shardsParse the output, looking for shards allocated to the nodes to be removed from the cluster. Note that
Instance #2is shown asinstance-0000000002in the output.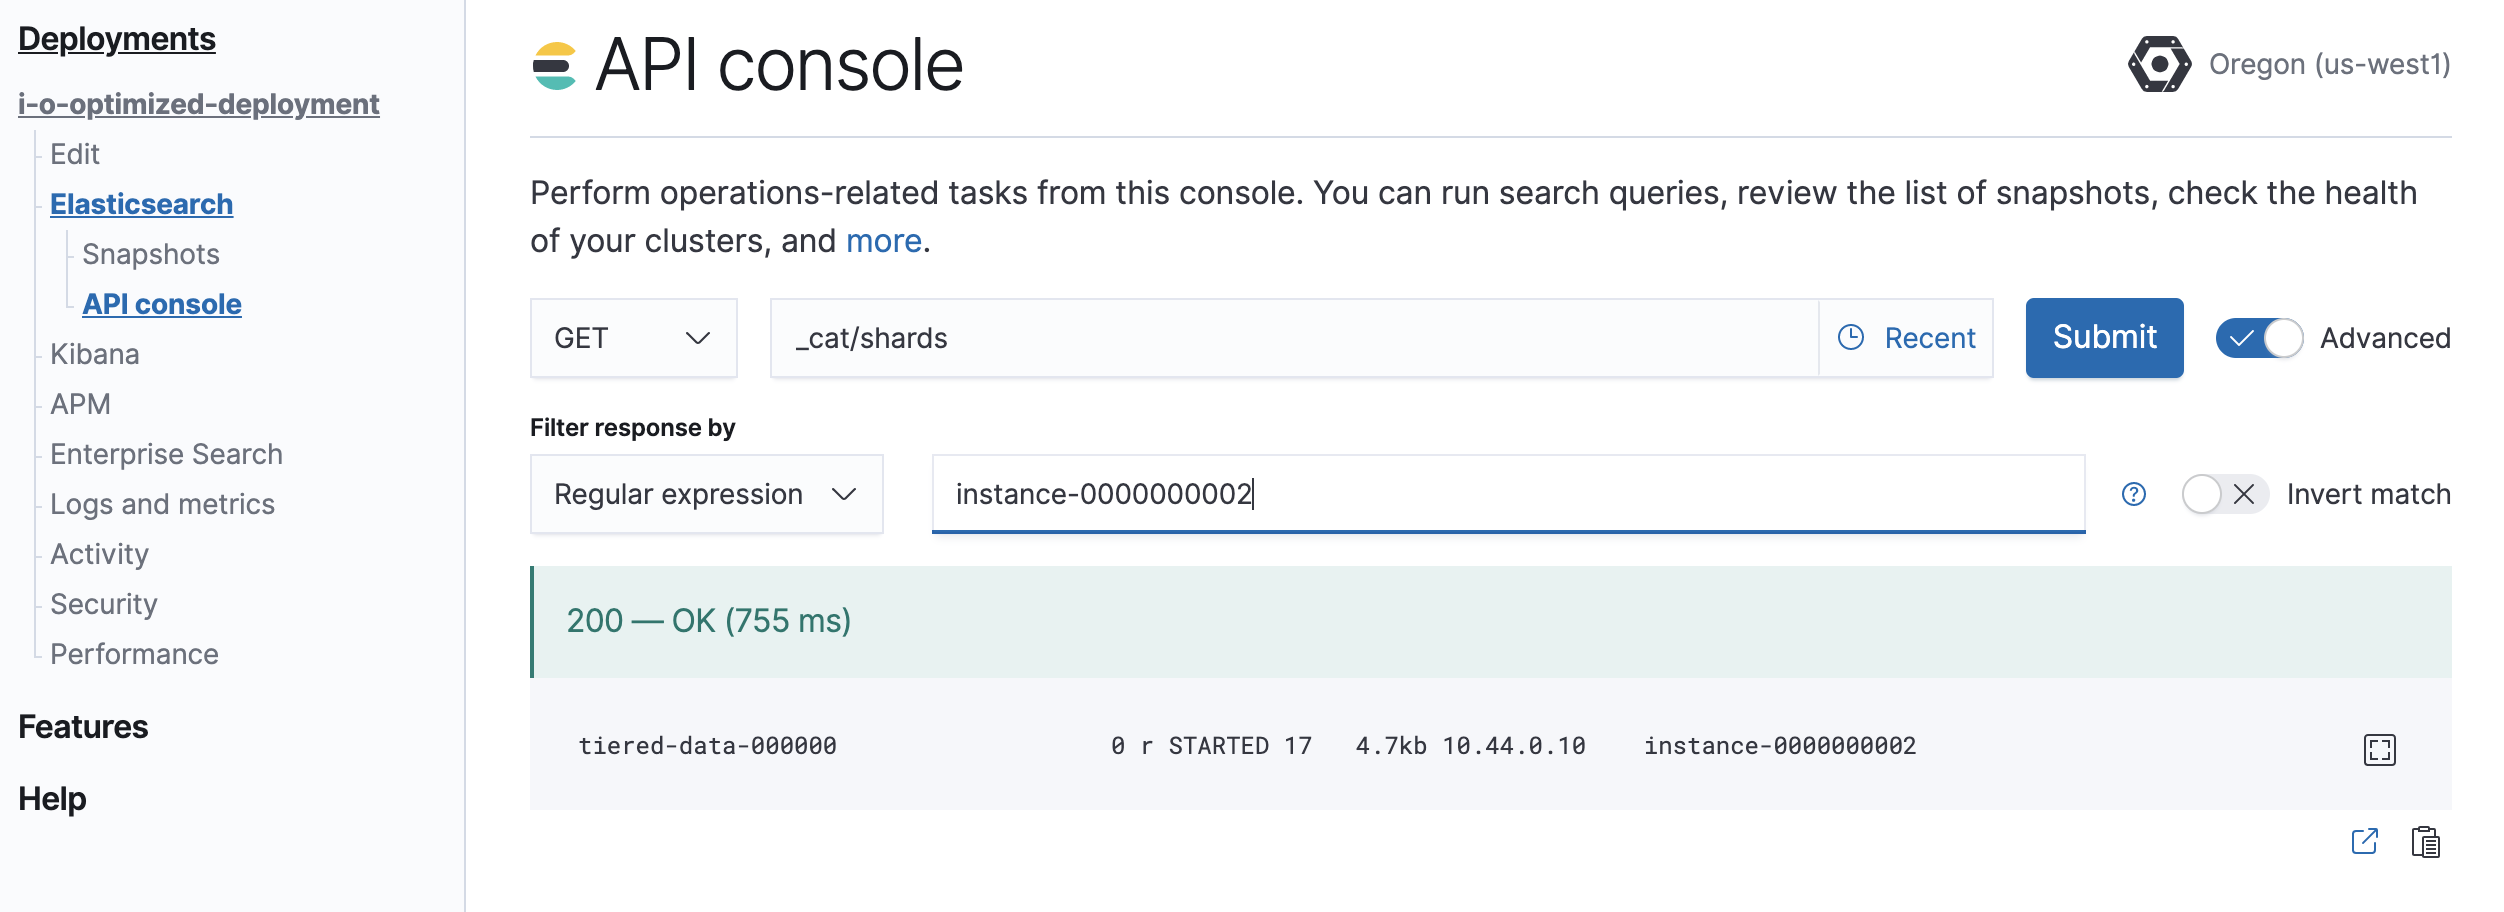
Move shards off the nodes to be removed from the cluster.
You must remove any index-level shard allocation filters from the indices on the nodes to be removed. ILM uses different rules depending on the policy and version of Elasticsearch. Check the index settings to determine which rule to use:
GET /my-index/_settingsUpdating data tier based allocation inclusion rules.
Data tier based ILM policies use
index.routing.allocation.includeto allocate shards to the appropriate tier. The indices that use this method have index routing settings similar to the following example:{ ... "routing": { "allocation": { "include": { "_tier_preference": "data_warm,data_hot" } } } ... }You must remove the relevant tier from the inclusion rules. For example, to disable the warm tier, the
data_warmtier preference should be removed:PUT /my-index/_settings { "routing": { "allocation": { "include": { "_tier_preference": "data_hot" } } } }Updating allocation inclusion rules will trigger a shard re-allocation, moving the shards from the nodes to be removed.
Updating node attribute allocation requirement rules.
Node attribute based ILM policies uses
index.routing.allocation.requireto allocate shards to the appropriate nodes. The indices that use this method have index routing settings that are similar to the following example:{ ... "routing": { "allocation": { "require": { "data": "warm" } } } ... }You must either remove or redefine the routing requirements. To remove the attribute requirements, use the following code:
PUT /my-index/_settings
{
    "routing": {
      "allocation": {
        "require": {
            "data": null
        }
      }
    }
}
Removing required attributes does not trigger a shard reallocation. These shards are moved when applying the plan to disable the data tier. Alternatively, you can use the cluster re-route API to manually re-allocate the shards before removing the nodes, or explicitly re-allocate shards to hot nodes by using the following code:
PUT /my-index/_settings
{
    "routing": {
      "allocation": {
        "require": {
            "data": "hot"
        }
      }
    }
}
Removing custom allocation rules.
If indices on nodes to be removed have shard allocation rules of other forms, they must be removed as shown in the following example:
PUT /my-index/_settings
{
    "routing": {
      "allocation": {
        "require": null,
        "include": null,
        "exclude": null
      }
    }
}
Edit the deployment, disabling the data tier.
If autoscaling is enabled, set the maximum size to 0 for the data tier to ensure autoscaling does not re-enable the data tier.
Any remaining shards on the tier being disabled are re-allocated across the remaining cluster nodes while applying the plan to disable the data tier. Monitor shard allocation during the data migration phase to ensure all allocation rules have been correctly updated. If the plan fails to migrate data away from the data tier, then re-examine the allocation rules for the indices remaining on that data tier.
Once the plan change completes, confirm that there are no remaining nodes associated with the disabled tier and that
GET _cluster/healthreportsgreen. If this is the case, re-enable ILM.POST _ilm/start
When data reaches the cold or frozen phases, it is automatically converted to a searchable snapshot by ILM. If you do not intend to delete this data, you should manually restore each of the searchable snapshot indices to a regular index before disabling the data tier, by following these steps:
Stop ILM and check ILM status is
STOPPEDto prevent data from migrating to the phase you intend to disable while you are working through the next steps.# stop ILM POST _ilm/stop # check status GET _ilm/statusCapture a comprehensive list of index and searchable snapshot names.
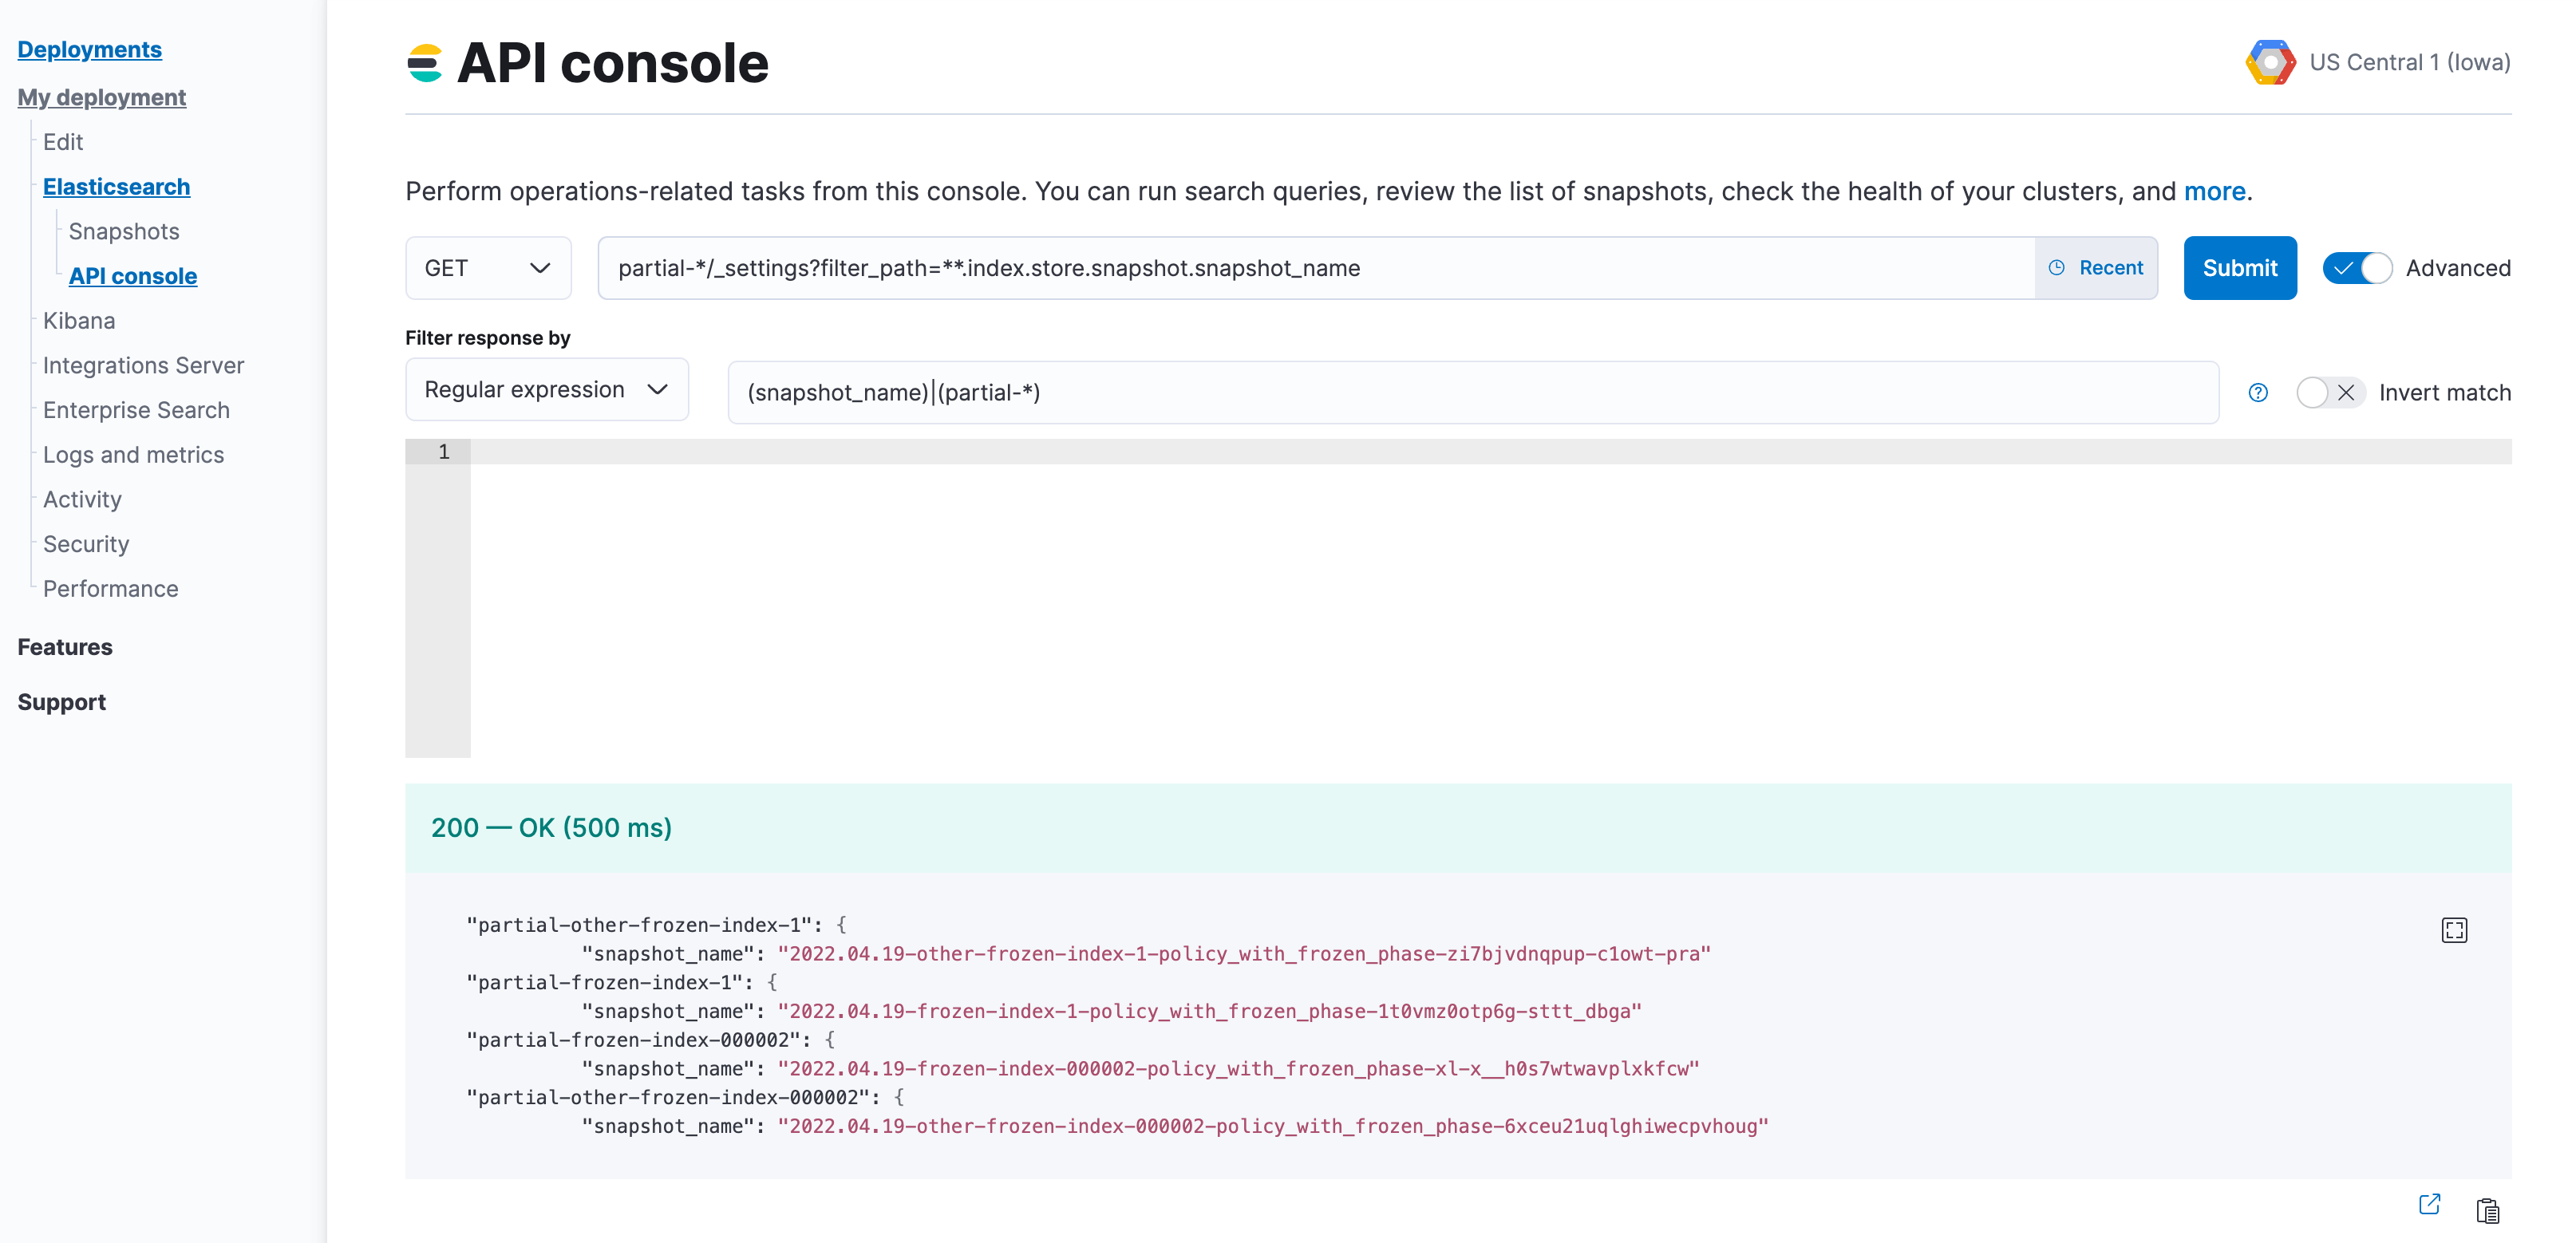
The index name of the searchable snapshots may differ based on the data tier. If you intend to disable the cold tier, then perform the following request with the
restored-*prefix. If the frozen tier is the one to be disabled, use thepartial-*prefix.GET <searchable-snapshot-index-prefix>/_settings?filter_path=**.index.store.snapshot.snapshot_name&expand_wildcards=allIn the example we have a list of 4 indices, which need to be moved away from the frozen tier.
(Optional) Save the list of index and snapshot names in a text file, so you can access it throughout the rest of the process.
Remove the aliases that were applied to searchable snapshots indices. Use the index prefix from step 2.
POST _aliases { "actions": [ { "remove": { "index": "<searchable-snapshot-index-prefix>-<index_name>", "alias": "<index_name>" } } ] }NoteIf you use data stream, you can skip this step.
In the example we are removing the alias for the
frozen-index-1index.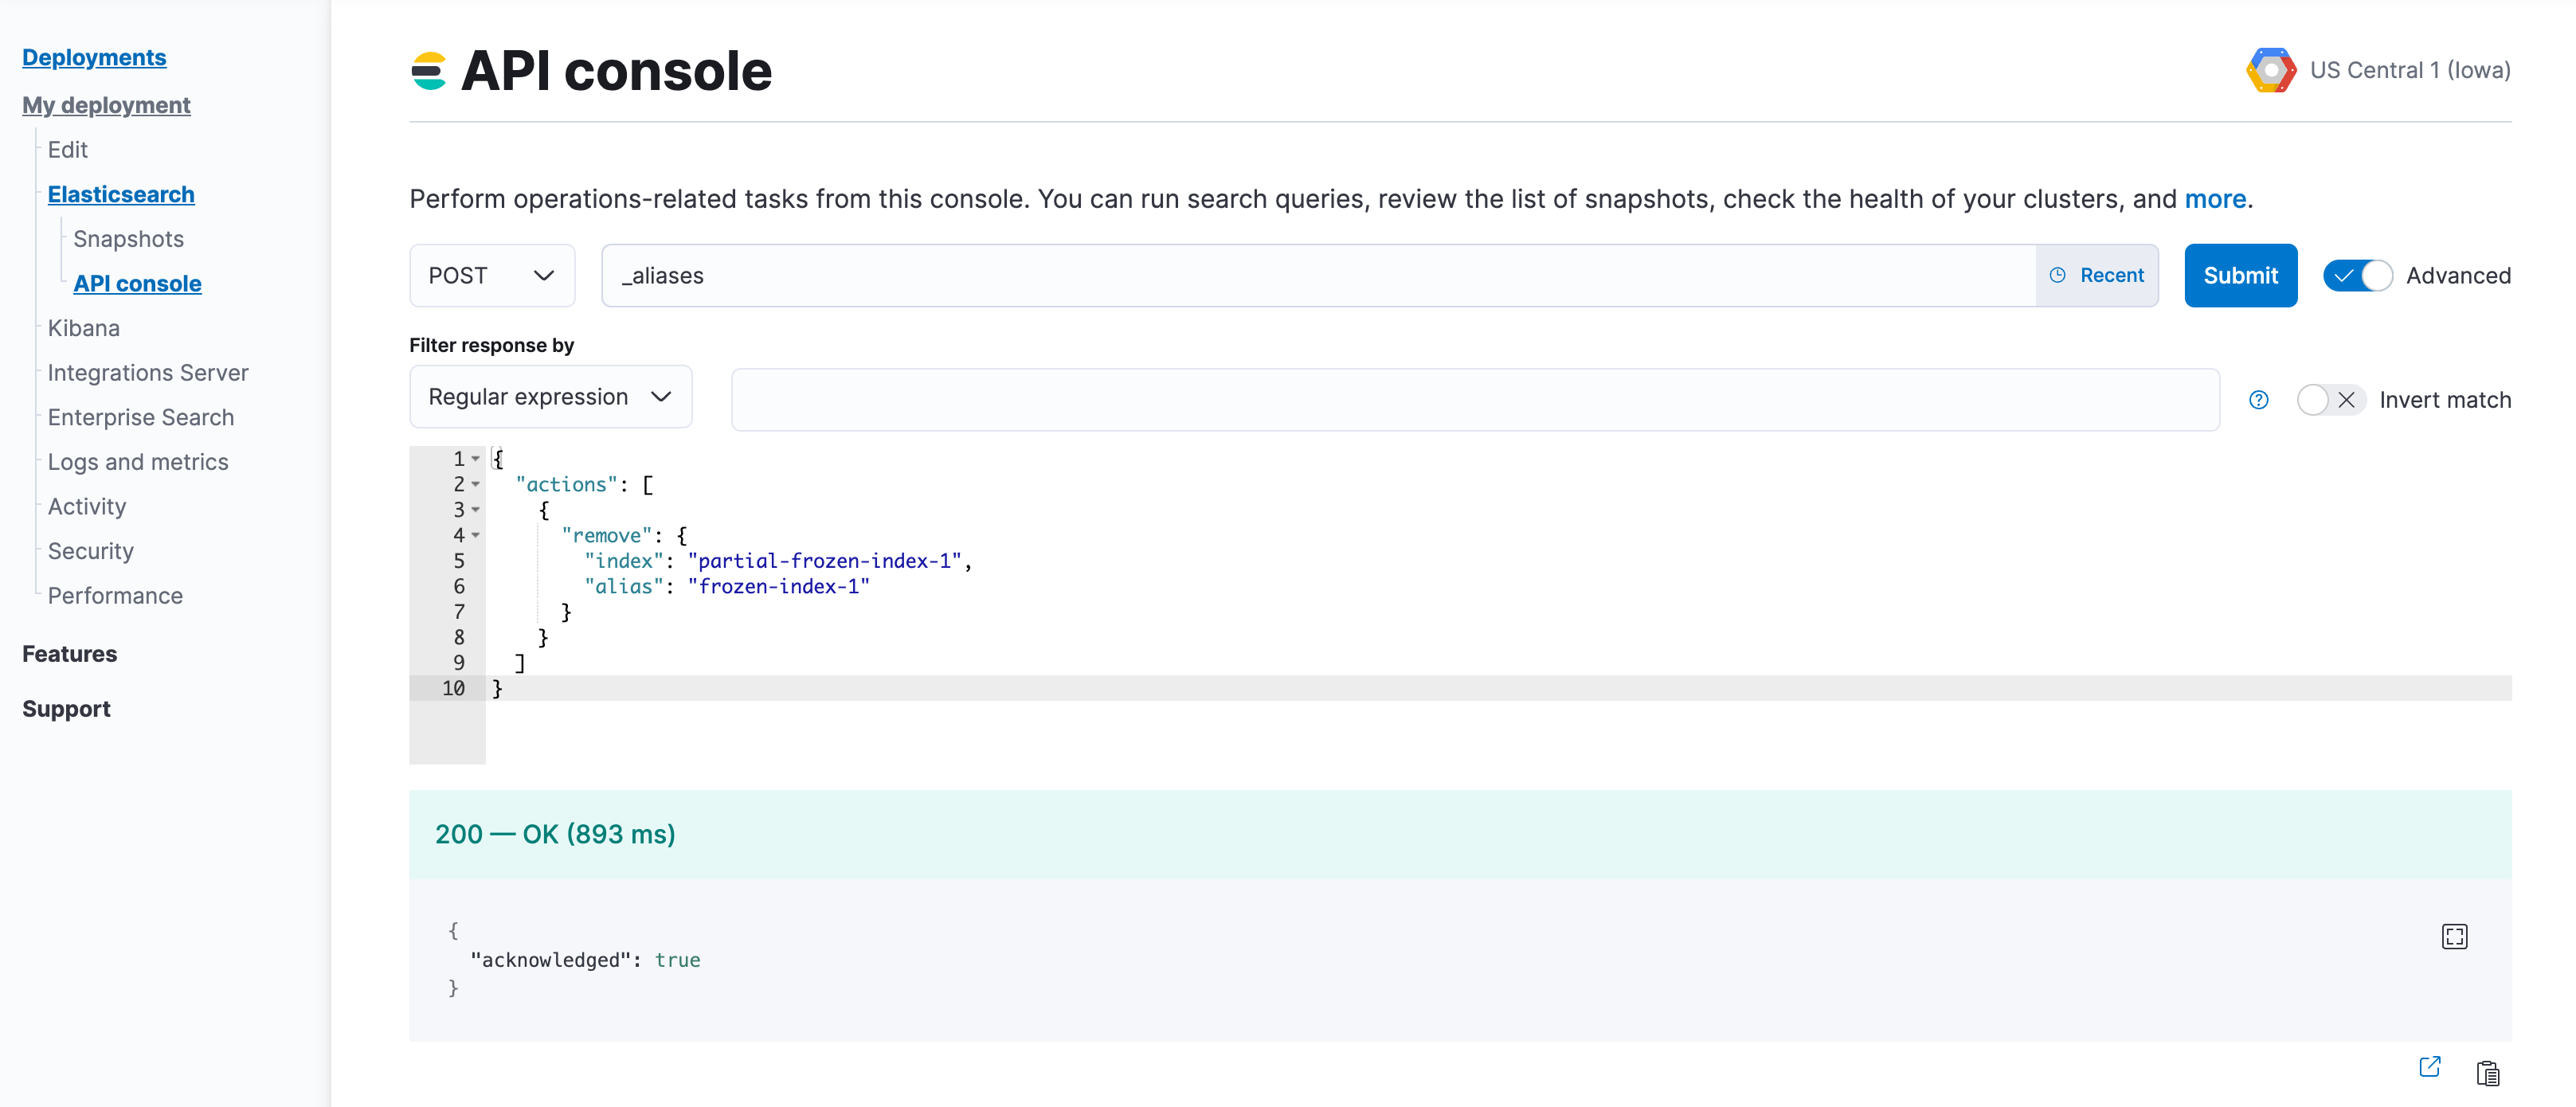
Restore indices from the searchable snapshots.
Follow the steps to specify the data tier based allocation inclusion rules.
Remove the associated ILM policy (set it to
null). If you want to apply a different ILM policy, follow the steps to Switch lifecycle policies.If needed, specify the alias for rollover, otherwise set it to
null.Optionally, specify the desired number of replica shards.
POST _snapshot/found-snapshots/<searchable_snapshot_name>/_restore
{
  "indices": "*",
  "index_settings": {
    "index.routing.allocation.include._tier_preference": "<data_tiers>",
    "number_of_replicas": X,
    "index.lifecycle.name": "<new-policy-name>",
    "index.lifecycle.rollover_alias": "<alias-for-rollover>"
  }
}
The
<searchable_snapshot_name>refers to the above-mentioned step: "Capture a comprehensive list of index and searchable snapshot names".In the example we are restoring
frozen-index-1from the snapshot infound-snapshots(default snapshot repository) and placing it in the warm tier.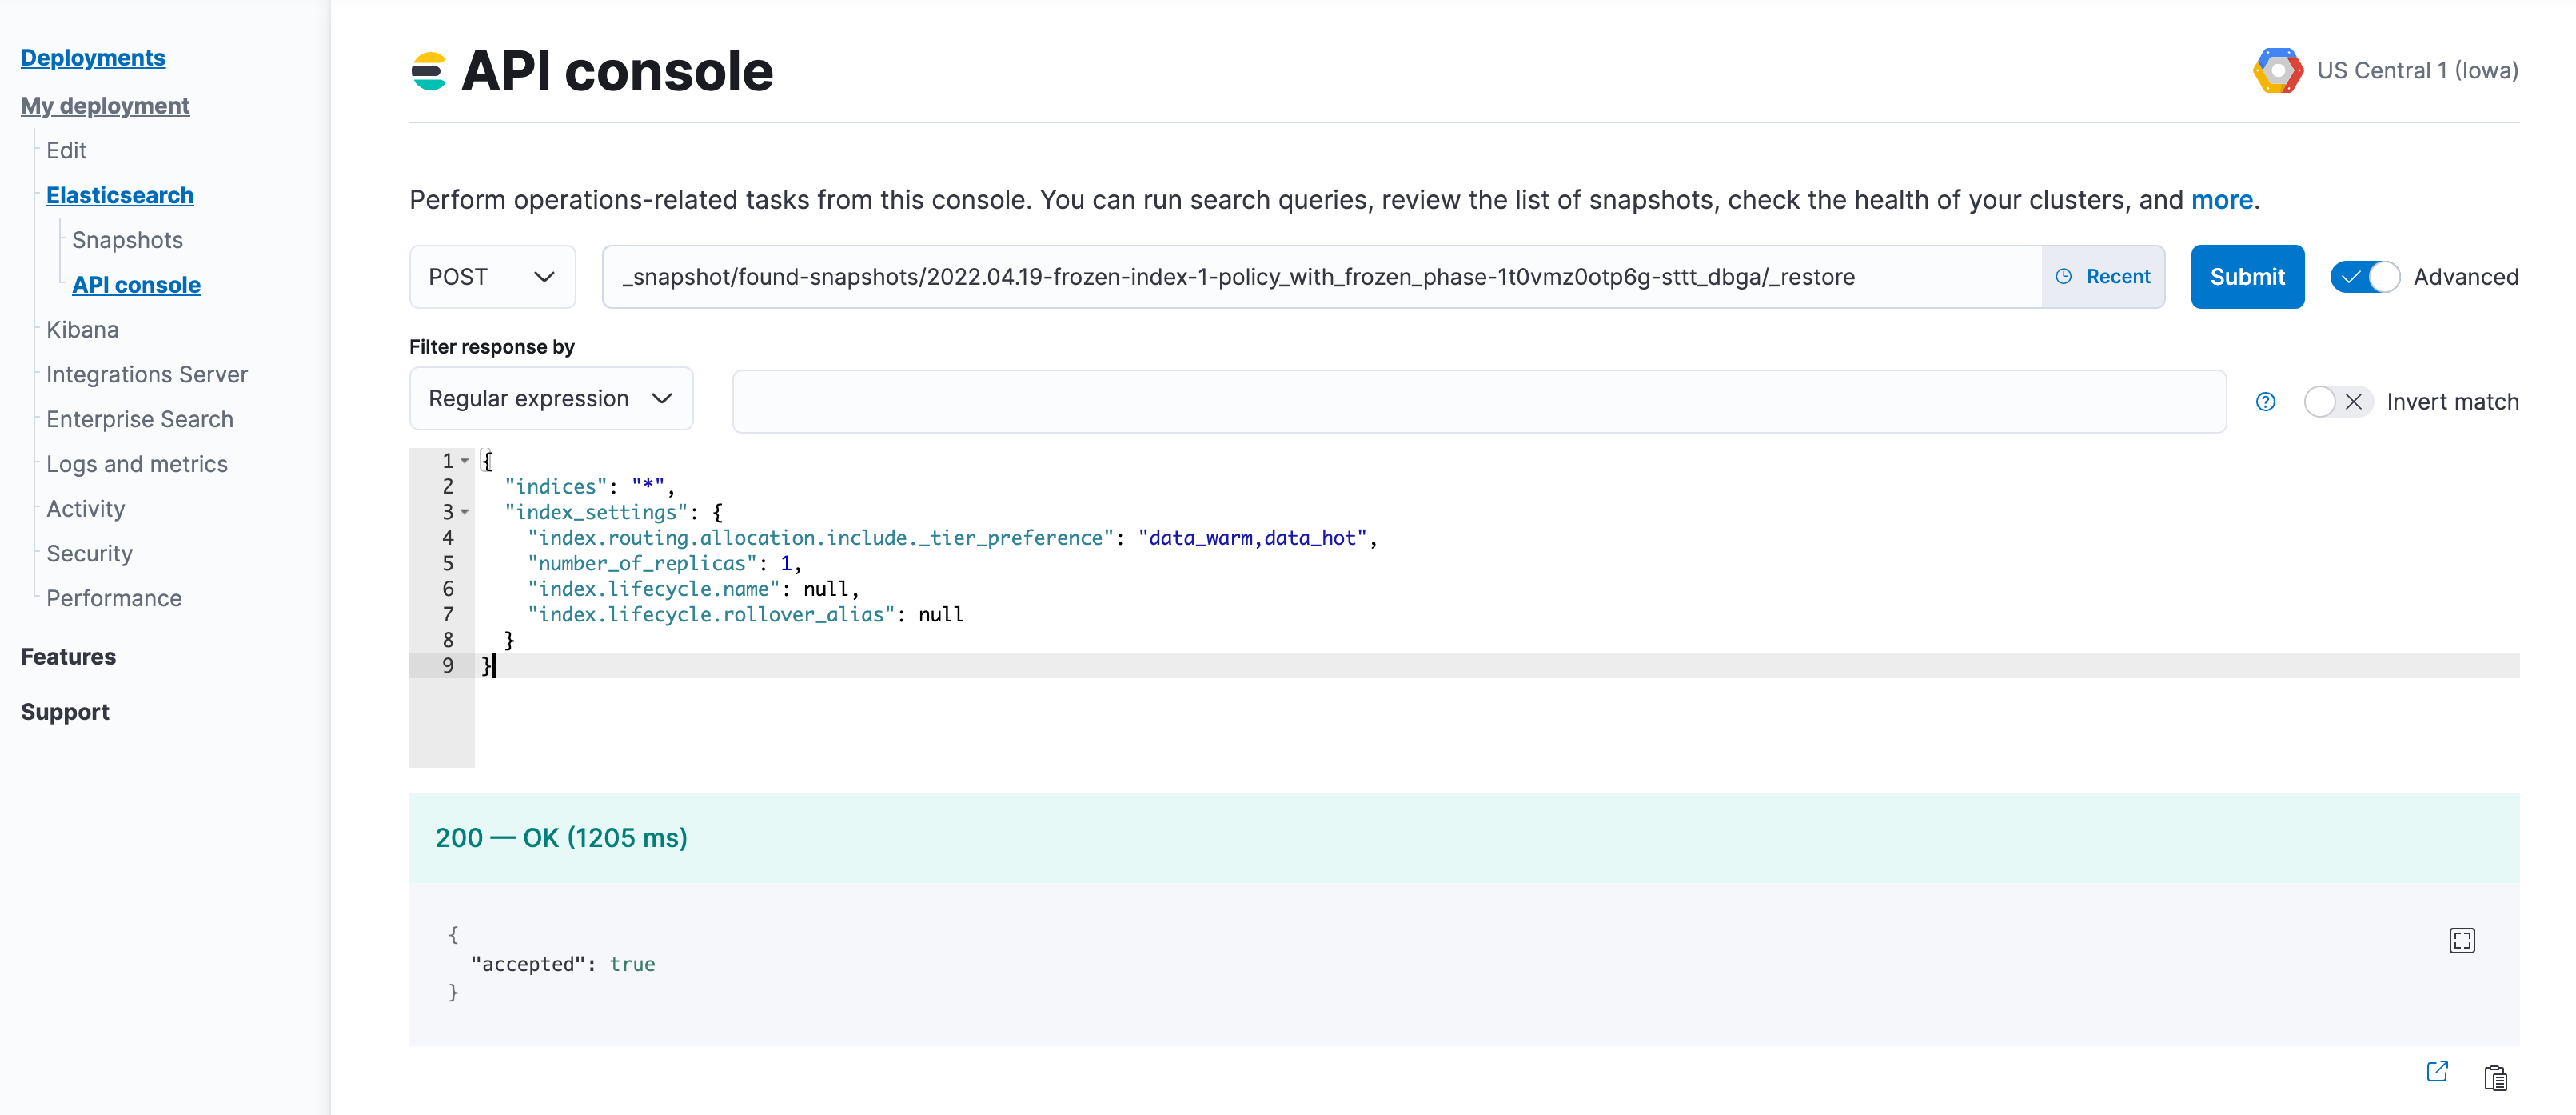
Repeat steps 4 and 5 until all snapshots are restored to regular indices.
Once all snapshots are restored, use
GET _cat/indices/<index-pattern>?v=trueto check that the restored indices aregreenand are correctly reflecting the expecteddocandstore.sizecounts.If you are using data stream, you may need to use
GET _data_stream/<data-stream-name>to get the list of the backing indices, and then specify them by usingGET _cat/indices/<backing-index-name>?v=trueto check.Once your data has completed restoration from searchable snapshots to the target data tier,
DELETEsearchable snapshot indices using the prefix from step 2.DELETE <searchable-snapshot-index-prefix>-<index_name>Delete the searchable snapshots by following these steps:
Open Kibana and navigate to Management > Data > Snapshot and Restore > Snapshots (or go to
<kibana-endpoint>/app/management/data/snapshot_restore/snapshots)Search for
*<ilm-policy-name>*Bulk select the snapshots and delete them
In the example we are deleting the snapshots associated with the
policy_with_frozen_phase.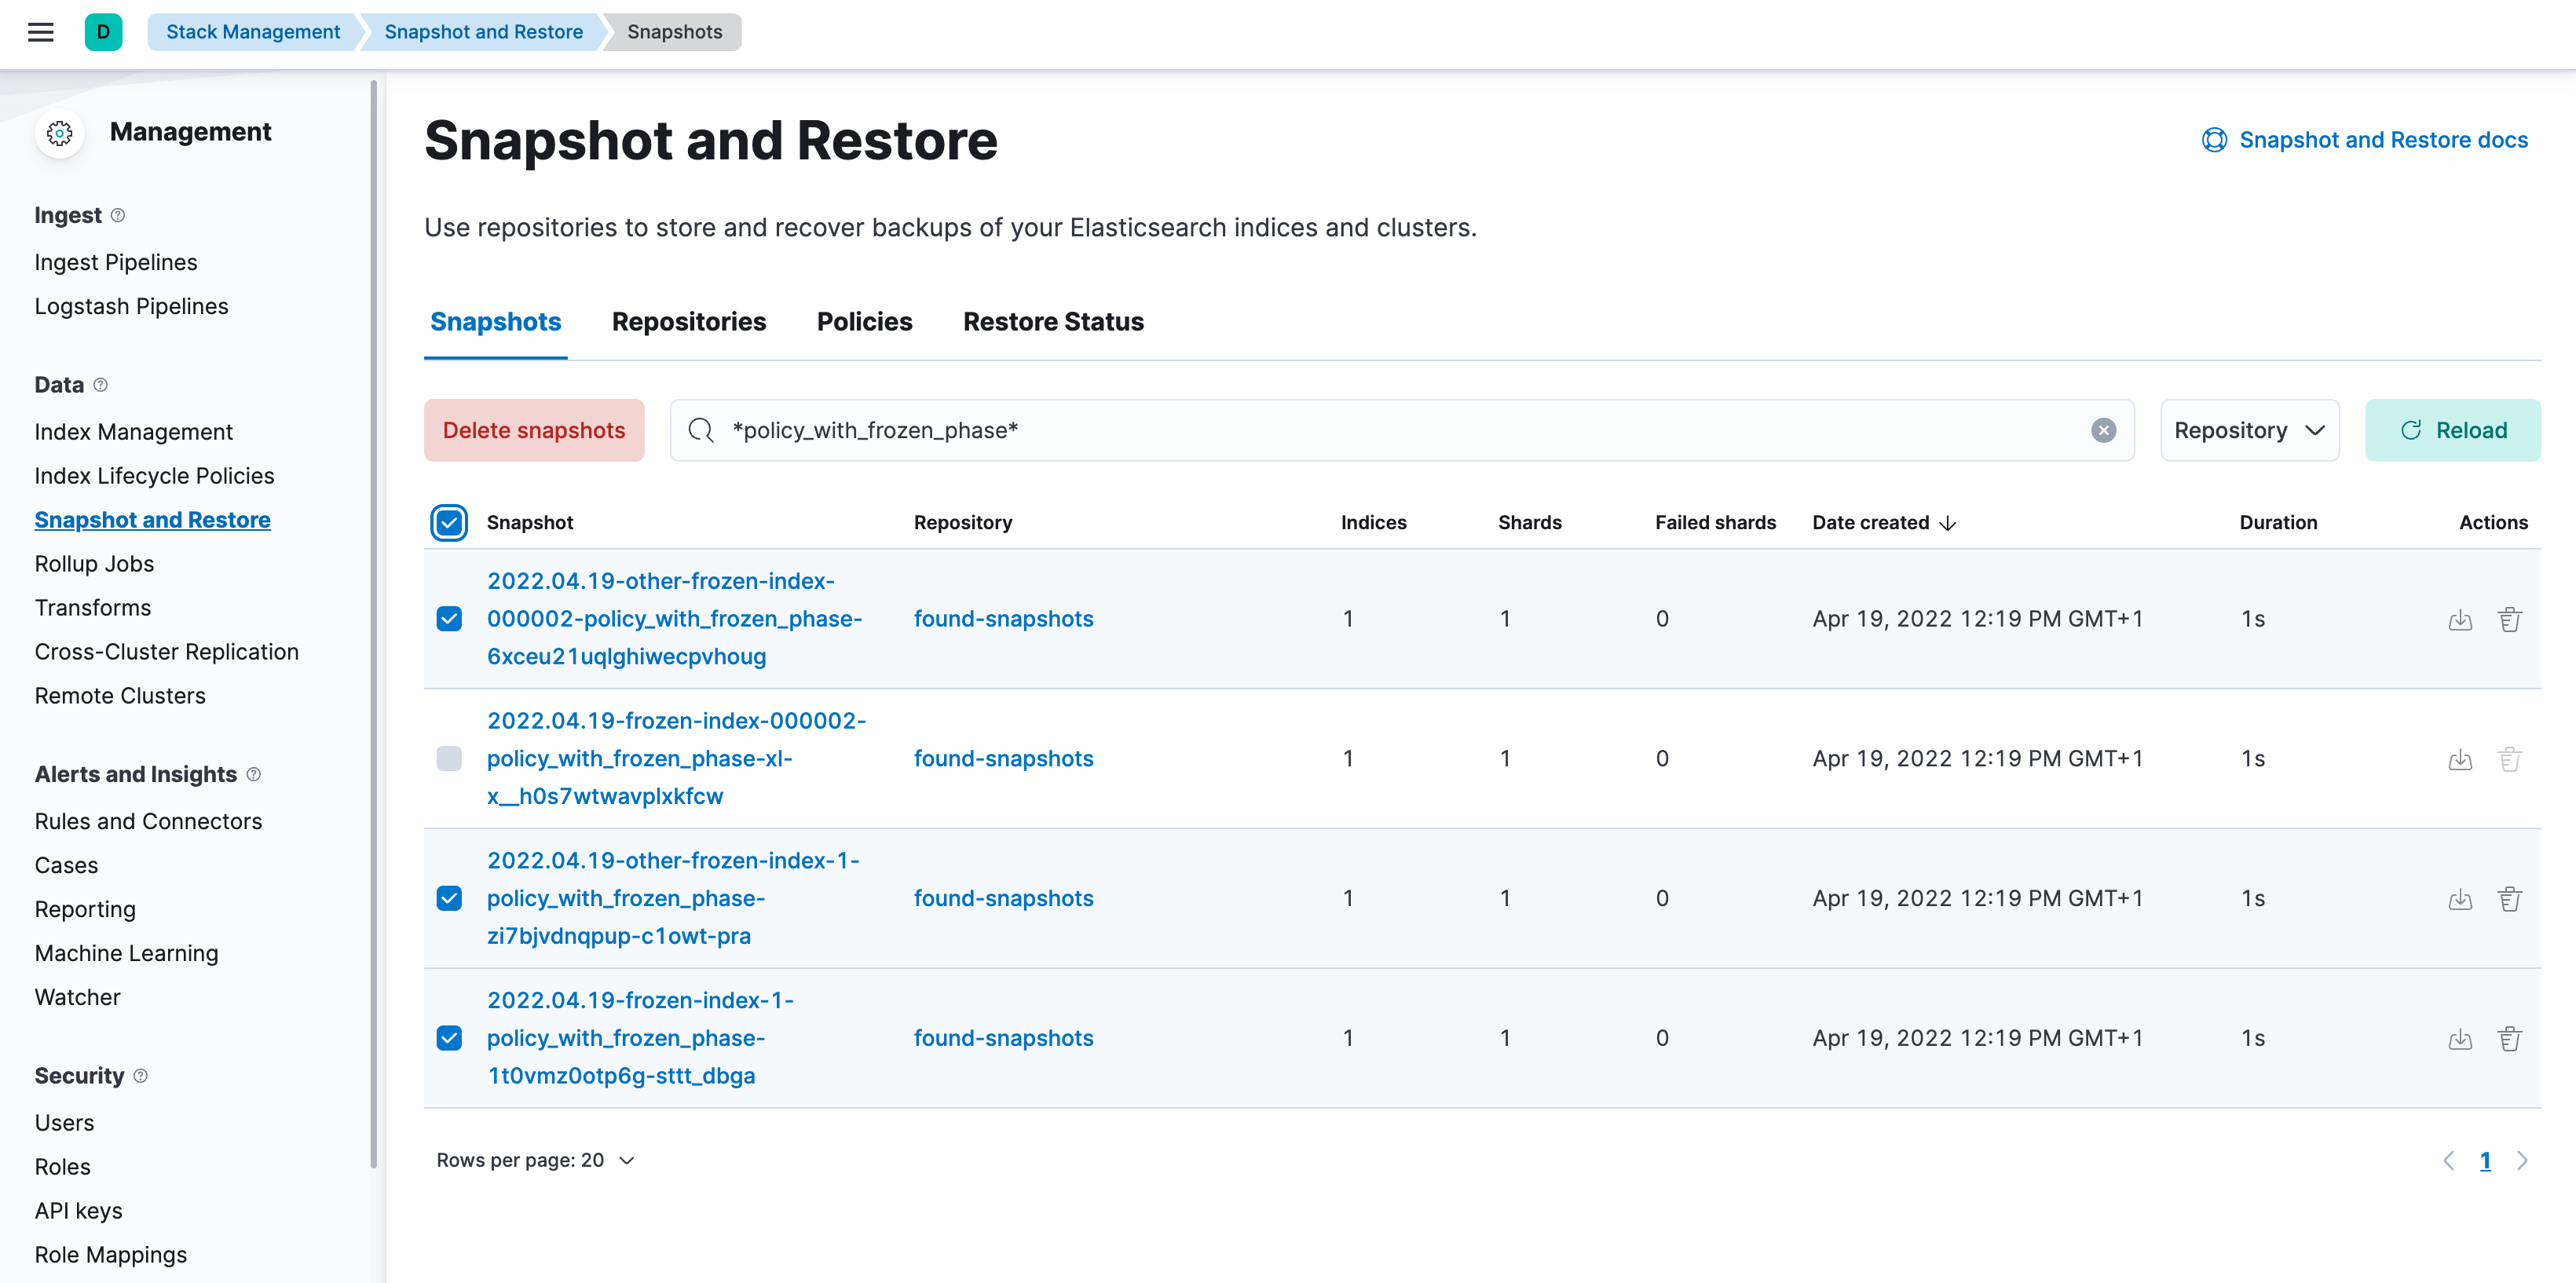
Confirm that no shards remain on the data nodes you wish to remove using
GET _cat/allocation?v=true&s=node.Edit your cluster from the console to disable the data tier.
Once the plan change completes, confirm that there are no remaining nodes associated with the disabled tier and that
GET _cluster/healthreportsgreen. If this is the case, re-enable ILM.POST _ilm/start
For self-managed deployments, each node’s data role is configured in elasticsearch.yml. For example, the highest-performance nodes in a cluster might be assigned to both the hot and content tiers:
node.roles: ["data_hot", "data_content"]
We recommend you use dedicated nodes in the frozen tier.
The index.routing.allocation.include._tier_preference setting determines which tier the index should be allocated to.
When you create an index, by default Elasticsearch sets the _tier_preference to data_content to automatically allocate the index shards to the content tier.
When Elasticsearch creates an index as part of a data stream, by default Elasticsearch sets the _tier_preference to data_hot to automatically allocate the index shards to the hot tier.
At the time of index creation, you can override the default setting by explicitly setting the preferred value in one of two ways:
- Using an index template. Refer to Automate rollover with ILM for details.
- Within the create index request body.
You can override this setting after index creation by updating the index setting to the preferred value.
This setting also accepts multiple tiers in order of preference. This prevents indices from remaining unallocated if no nodes are available in the preferred tier. For example, when index lifecycle management migrates an index to the cold phase, it sets the index _tier_preference to data_cold,data_warm,data_hot.
To remove the data tier preference setting, set the _tier_preference value to null. This allows the index to allocate to any data node within the cluster. Setting the _tier_preference to null does not restore the default value. Note that, in the case of managed indices, a migrate action might apply a new value in its place.
You can check an existing index’s data tier preference by polling its settings for index.routing.allocation.include._tier_preference:
GET /my-index-000001/_settings?filter_path=*.settings.index.routing.allocation.include._tier_preference
The _tier_preference setting might conflict with other allocation settings. This conflict might prevent the shard from allocating. A conflict might occur when a cluster has not yet been completely migrated to data tiers.
This setting will not unallocate a currently allocated shard, but might prevent it from migrating from its current location to its designated data tier. To troubleshoot, call the cluster allocation explain API and specify the suspected problematic shard.
ILM automatically transitions managed indices through the available data tiers using the migrate action. By default, this action is automatically injected in every phase. You can explicitly specify the migrate action with "enabled": false to disable automatic migration, for example, if you’re using the allocate action to manually specify allocation rules.