Get started with KSPM
This page explains how to configure the Kubernetes Security Posture Management (KSPM) integration.
The KSPM integration is available to all Elastic Cloud users. For on-prem deployments, it requires an Enterprise subscription.
The KSPM integration only works in the
DefaultKibana space. Installing the KSPM integration on a different Kibana space will not work.KSPM is not supported on EKS clusters in AWS GovCloud. Click here to request support.
To view posture data, ensure you have the
readprivilege for the following Elasticsearch indices:logs-cloud_security_posture.findings_latest-*logs-cloud_security_posture.scores-*logs-cloud_security_posture.findings
The instructions differ depending on whether you’re installing on EKS or on unmanaged clusters.
Install on EKS-managed clusters:
Install on unmanaged clusters:
- Find Cloud Security Posture in the navigation menu or use the global search field.
- Click Add a KSPM integration.
- Read the integration’s description to understand how it works. Then, click Add Kubernetes Security Posture Management.
- Name your integration. Use a name that matches the purpose or team of the cluster(s) you want to monitor, for example,
IT-dev-k8s-clusters. - Select EKS from the Kubernetes Deployment menu. A new section for AWS credentials will appear.
There are several options for how to provide AWS credentials:
- Use Kubernetes Service Account to assume IAM role
- Use default instance role
- Use access keys directly
- Use temporary security credentials
- Use a shared credentials file
- Use an IAM role ARN
Regardless of which option you use, you’ll need to grant the following permissions:
 ecr:GetRegistryPolicy, eks:ListTagsForResource
elasticloadbalancing:DescribeTags
ecr-public:DescribeRegistries
ecr:DescribeRegistry
elasticloadbalancing:DescribeLoadBalancerPolicyTypes
ecr:ListImages
ecr-public:GetRepositoryPolicy
elasticloadbalancing:DescribeLoadBalancerAttributes
elasticloadbalancing:DescribeLoadBalancers
ecr-public:DescribeRepositories
eks:DescribeNodegroup
ecr:DescribeImages
elasticloadbalancing:DescribeLoadBalancerPolicies
ecr:DescribeRepositories
eks:DescribeCluster
eks:ListClusters
elasticloadbalancing:DescribeInstanceHealth
ecr:GetRepositoryPolicy
If you are using the AWS visual editor to create and modify your IAM Policies, you can copy and paste this IAM policy JSON object:
Click to view JSON object
{
    "Version": "2012-10-17",
    "Statement": [
        {
            "Sid": "VisualEditor0",
            "Effect": "Allow",
            "Action": [
                "ecr:GetRegistryPolicy",
                "eks:ListTagsForResource",
                "elasticloadbalancing:DescribeTags",
                "ecr-public:DescribeRegistries",
                "ecr:DescribeRegistry",
                "elasticloadbalancing:DescribeLoadBalancerPolicyTypes",
                "ecr:ListImages",
                "ecr-public:GetRepositoryPolicy",
                "elasticloadbalancing:DescribeLoadBalancerAttributes",
                "elasticloadbalancing:DescribeLoadBalancers",
                "ecr-public:DescribeRepositories",
                "eks:DescribeNodegroup",
                "ecr:DescribeImages",
                "elasticloadbalancing:DescribeLoadBalancerPolicies",
                "ecr:DescribeRepositories",
                "eks:DescribeCluster",
                "eks:ListClusters",
                "elasticloadbalancing:DescribeInstanceHealth",
                "ecr:GetRepositoryPolicy"
            ],
            "Resource": "*"
        }
    ]
}
Follow AWS’s EKS Best Practices documentation to use the IAM Role to Kubernetes Service-Account (IRSA) feature to get temporary credentials and scoped permissions.
During setup, do not fill in any option in the "Setup Access" section. Click Save and continue.
Follow AWS’s IAM roles for Amazon EC2 documentation to create an IAM role using the IAM console, which automatically generates an instance profile.
During setup, do not fill in any option in the "Setup Access" section. Click Save and continue.
Access keys are long-term credentials for an IAM user or AWS account root user. To use access keys as credentials, you must provide the Access key ID and the Secret Access Key.
For more details, refer to AWS' Access Keys and Secret Access Keys documentation.
You must select "Programmatic access" when creating the IAM user.
You can configure temporary security credentials in AWS to last for a specified duration. They consist of an access key ID, a secret access key, and a security token, which is typically found using GetSessionToken.
Because temporary security credentials are short term, once they expire, you will need to generate new ones and manually update the integration’s configuration to continue collecting cloud posture data. Update the credentials before they expire to avoid data loss.
IAM users with multi-factor authentication (MFA) enabled need to submit an MFA code when calling GetSessionToken. For more details, refer to AWS' Temporary Security Credentials documentation.
You can use the AWS CLI to generate temporary credentials. For example, you could use the following command if you have MFA enabled:
`sts get-session-token --serial-number arn:aws:iam::1234:mfa/your-email@example.com --duration-seconds 129600 --token-code 123456`
The output from this command includes the following fields, which you should provide when configuring the KSPM integration:
Access key ID: The first part of the access key.Secret Access Key: The second part of the access key.Session Token: A token required when using temporary security credentials.
If you use different AWS credentials for different tools or applications, you can use profiles to define multiple access keys in the same configuration file. For more details, refer to AWS' Shared Credentials Files documentation.
Instead of providing the Access key ID and Secret Access Key to the integration, provide the information required to locate the access keys within the shared credentials file:
Credential Profile Name: The profile name in the shared credentials file.Shared Credential File: The directory of the shared credentials file.
If you don’t provide values for all configuration fields, the integration will use these defaults:
- If
Access key ID,Secret Access Key, andARN Roleare not provided, then the integration will check forCredential Profile Name. - If there is no
Credential Profile Name, the default profile will be used. - If
Shared Credential Fileis empty, the default directory will be used. - For Linux or Unix, the shared credentials file is located at
~/.aws/credentials.
An IAM role Amazon Resource Name (ARN) is an IAM identity that you can create in your AWS account. You define the role’s permissions. Roles do not have standard long-term credentials such as passwords or access keys. Instead, when you assume a role, it provides temporary security credentials for your session. An IAM role’s ARN can be used to specify which AWS IAM role to use to generate temporary credentials.
For more details, refer to AWS' AssumeRole API documentation. Follow AWS' instructions to create an IAM user, and define the IAM role’s permissions using the JSON permissions policy above.
To use an IAM role’s ARN, you need to provide either a credential profile or access keys along with the ARN role. The ARN Role value specifies which AWS IAM role to use for generating temporary credentials.
If ARN Role is present, the integration will check if Access key ID and Secret Access Key are present. If not, the package will check for a Credential Profile Name. If a Credential Profile Name is not present, the default credential profile will be used.
Once you’ve provided AWS credentials, finish configuring the KSPM integration:
- If you want to monitor Kubernetes clusters that aren’t yet enrolled in Fleet, select New Hosts under “where to add this integration”.
- Name the Elastic Agent policy. Use a name that matches the purpose or team of the cluster(s) you want to monitor. For example,
IT-dev-k8s-clusters. - Click Save and continue, then Add agent to your hosts. The Add agent wizard appears and provides a DaemonSet manifest
.yamlfile with pre-populated configuration information, such as theFleet IDandFleet URL.
The Add agent wizard helps you deploy the KSPM integration on the Kubernetes clusters you wish to monitor. For each cluster:
- Download the manifest and make any necessary revisions to its configuration to suit the needs of your environment.
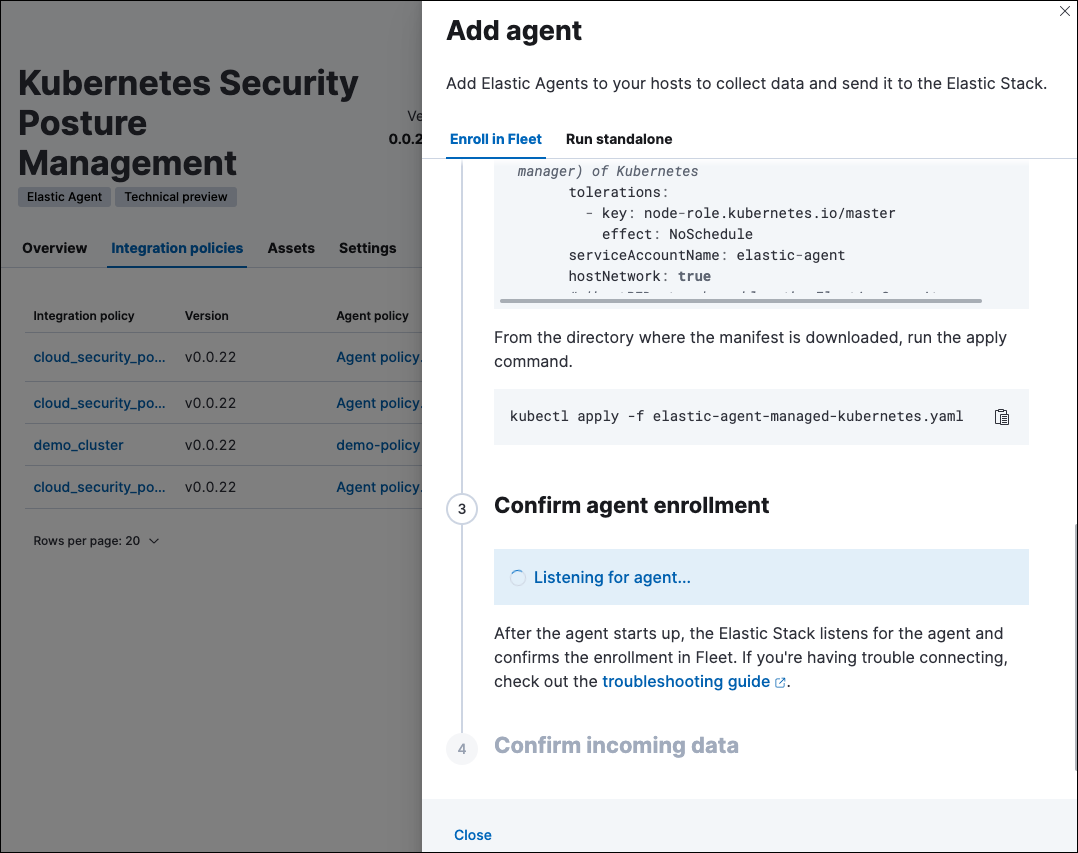
- Apply the manifest using the
kubectl apply -fcommand. For example:kubectl apply -f elastic-agent-managed-kubernetes.yaml
After a few minutes, a message confirming the Elastic Agent enrollment appears, followed by a message confirming that data is incoming. You can then click View assets to see where the newly-collected configuration information appears throughout Kibana, including the Findings page and the Cloud Security Posture dashboard.
Follow these steps to deploy the KSPM integration to unmanaged clusters. Keep in mind credentials are NOT required for unmanaged deployments.
To install the integration on unmanaged clusters:
- Find Cloud Security Posture in the navigation menu or use the global search field.
- Click Add a KSPM integration.
- Read the integration’s description to understand how it works. Then, click Add Kubernetes Security Posture Management.
- Name your integration. Use a name that matches the purpose or team of the cluster(s) you want to monitor, for example,
IT-dev-k8s-clusters. - Select Unmanaged Kubernetes from the Kubernetes Deployment menu.
- If you want to monitor Kubernetes clusters that aren’t yet enrolled in Fleet, select New Hosts when choosing the Elastic Agent policy.
- Select the Elastic Agent policy where you want to add the integration.
- Click Save and continue, then Add agent to your hosts. The Add agent wizard appears and provides a DaemonSet manifest
.yamlfile with pre-populated configuration information, such as theFleet IDandFleet URL.
The Add agent wizard helps you deploy the KSPM integration on the Kubernetes clusters you wish to monitor. To do this, for each cluster:
- Download the manifest and make any necessary revisions to its configuration to suit the needs of your environment.
- Apply the manifest using the
kubectl apply -fcommand. For example:kubectl apply -f elastic-agent-managed-kubernetes.yaml
After a few minutes, a message confirming the Elastic Agent enrollment appears, followed by a message confirming that data is incoming. You can then click View assets to see where the newly-collected configuration information appears throughout Kibana, including the Findings page and the Cloud Security Posture dashboard.
To run KSPM on an ECK deployment, you must edit the Elastic Agent CRD and Elastic Agent Cluster-Role .yaml files.
Patch Elastic Agent
Add volumes and volumeMounts to podTemplate:
podTemplate:
  spec:
    containers:
    - name: agent
      volumeMounts:
      - name: proc
        mountPath: /hostfs/proc
        readOnly: true
      - name: cgroup
        mountPath: /hostfs/sys/fs/cgroup
        readOnly: true
      - name: varlibdockercontainers
        mountPath: /var/lib/docker/containers
        readOnly: true
      - name: varlog
        mountPath: /var/log
        readOnly: true
      - name: etc-full
        mountPath: /hostfs/etc
        readOnly: true
      - name: var-lib
        mountPath: /hostfs/var/lib
        readOnly: true
      - name: etc-mid
        mountPath: /etc/machine-id
        readOnly: true
    volumes:
    - name: proc
      hostPath:
        path: /proc
    - name: cgroup
      hostPath:
        path: /sys/fs/cgroup
    - name: varlibdockercontainers
      hostPath:
        path: /var/lib/docker/containers
    - name: varlog
      hostPath:
        path: /var/log
    - name: etc-full
      hostPath:
        path: /etc
    - name: var-lib
      hostPath:
        path: /var/lib
    # Mount /etc/machine-id from the host to determine host ID
    # Needed for Elastic Security integration
    - name: etc-mid
      hostPath:
        path: /etc/machine-id
        type: File
Patch RBAC
Make sure that the elastic-agent service-account has the following Role and ClusterRole:
apiVersion: rbac.authorization.k8s.io/v1
kind: RoleBinding
metadata:
  namespace: default
  name: elastic-agent
subjects:
- kind: ServiceAccount
  name: elastic-agent
  namespace: default
roleRef:
  kind: Role
  name: elastic-agent
  apiGroup: rbac.authorization.k8s.io
---
apiVersion: rbac.authorization.k8s.io/v1
kind: ClusterRole
metadata:
  name: elastic-agent
  labels:
    k8s-app: elastic-agent
rules:
- apiGroups: [""]
  resources:
  - nodes
  - namespaces
  - events
  - pods
  - services
  - configmaps
  - serviceaccounts
  - persistentvolumes
  - persistentvolumeclaims
  verbs: ["get", "list", "watch"]
- apiGroups: ["extensions"]
  resources:
  - replicasets
  verbs: ["get", "list", "watch"]
- apiGroups: ["apps"]
  resources:
  - statefulsets
  - deployments
  - replicasets
  - daemonsets
  verbs: ["get", "list", "watch"]
- apiGroups:
  - ""
  resources:
  - nodes/stats
  verbs:
  - get
- apiGroups: [ "batch" ]
  resources:
  - jobs
  - cronjobs
  verbs: [ "get", "list", "watch" ]
- nonResourceURLs:
  - "/metrics"
  verbs:
  - get
- apiGroups: ["rbac.authorization.k8s.io"]
  resources:
  - clusterrolebindings
  - clusterroles
  - rolebindings
  - roles
  verbs: ["get", "list", "watch"]
- apiGroups: ["policy"]
  resources:
  - podsecuritypolicies
  verbs: ["get", "list", "watch"]
---
apiVersion: rbac.authorization.k8s.io/v1
kind: Role
metadata:
  name: elastic-agent
  namespace: default
  labels:
    k8s-app: elastic-agent
rules:
  - apiGroups:
    - coordination.k8s.io
    resources:
    - leases
    verbs: ["get", "create", "update"]