Data views
Elastic Stack Serverless
By default, analytics features such as Discover require a data view to access the Elasticsearch data that you want to explore. A data view can point to one or more indices, data streams, or index aliases. For example, a data view can point to your log data from yesterday, or all indices that contain your data.
In certain apps, you can also query your Elasticsearch data using ES|QL. With ES|QL, data views aren't required.
- Creating and managing data views requires a role with the following permissions:
Data View ManagementKibana privilege.view_index_metadataElasticsearch privilege.
- If a read-only indicator appears, you have insufficient privileges to create or save data views. In addition, the buttons to create data views or save existing data views are not visible.
If you collected data using one of the Kibana ingest options, uploaded a file, or added sample data, you get a data view created automatically, and can start exploring your data. If you loaded your own data, follow these steps to create a data view.
Open Lens or Discover, and then open the data view menu.
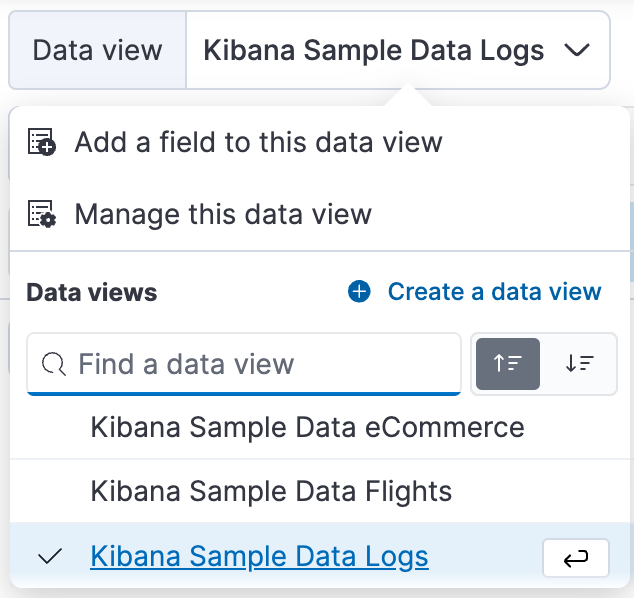
Click Create a data view.
Give your data view a name.
Start typing in the Index pattern field, and Kibana looks for the names of indices, data streams, and aliases that match your input. You can view all available sources or only the sources that the data view targets.
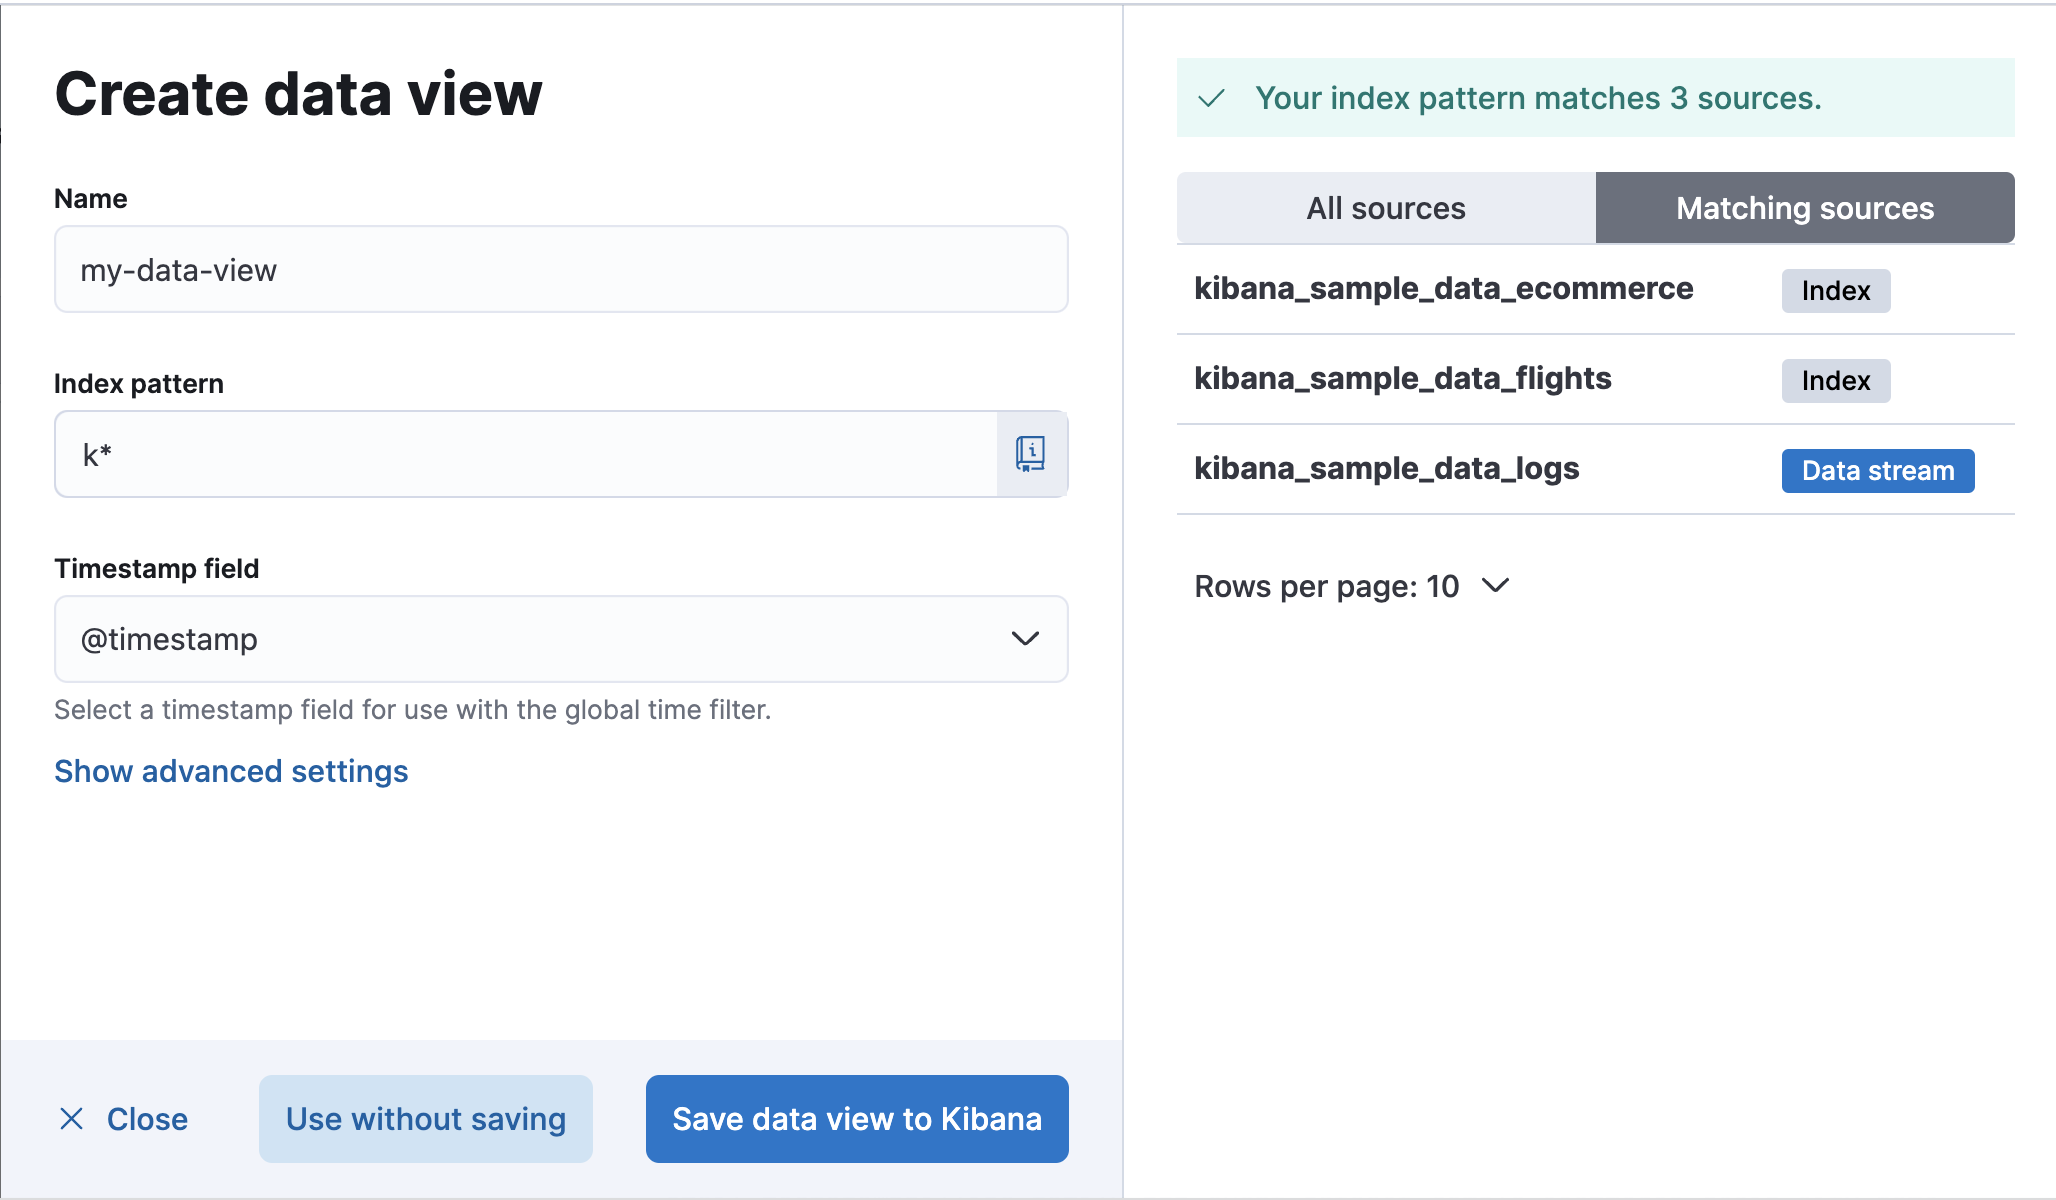
- To match multiple sources, use a wildcard (*).
filebeat-*matchesfilebeat-apache-a,filebeat-apache-b, and so on. - To match multiple single sources, enter their names, separated by a comma. Do not include a space after the comma.
filebeat-a,filebeat-bmatches two indices. - To exclude a source, use a minus sign (-), for example,
-test3.
- To match multiple sources, use a wildcard (*).
Open the Timestamp field dropdown, and then select the default field for filtering your data by time.
- If you don’t set a default time field, you can’t use global time filters on your dashboards. This is useful if you have multiple time fields and want to create dashboards that combine visualizations based on different timestamps.
- If your index doesn’t have time-based data, choose I don’t want to use the time filter.
Click Show advanced settings to:
- Display hidden and system indices.
- Specify your own data view name. For example, enter your Elasticsearch index alias name.
Click Save data view to Kibana.
You can manage your data views from the Management menu.
Want to explore your data or create a visualization without saving it as a data view? Select Use without saving in the Create data view form in Discover or Lens. With a temporary data view, you can add fields and create an Elasticsearch query alert, just like you would a regular data view. Your work won’t be visible to others in your space.
A temporary data view remains in your space until you change apps, or until you save it.
Temporary data views are not available in the Management menu.
Rollups are deprecated. Use downsampling instead.
A data view can match one rollup index. For a combination rollup data view with both raw and rolled up data, use the standard notation:
rollup_logstash,kibana_sample_data_logs
For an example, refer to Create and visualize rolled up data.
If your Elasticsearch clusters are configured for cross-cluster search, you can create a data view to search across the clusters of your choosing. Specify data streams, indices, and aliases in a remote cluster using the following syntax:
<remote_cluster_name>:<target>
To query Logstash indices across two Elasticsearch clusters that you set up for cross-cluster search, named cluster_one and cluster_two:
cluster_one:logstash-*,cluster_two:logstash-*
Use wildcards in your cluster names to match any number of clusters. To search Logstash indices across clusters named cluster_foo, cluster_bar, and so on:
cluster_*:logstash-*
To query across all Elasticsearch clusters that have been configured for cross-cluster search, use a standalone wildcard for your cluster name:
*:logstash-*
To match indices starting with logstash-, but exclude those starting with logstash-old, from all clusters having a name starting with cluster_:
cluster_*:logstash-*,cluster_*:-logstash-old*
Excluding a cluster avoids sending any network calls to that cluster. To exclude a cluster with the name cluster_one:
cluster_*:logstash-*,-cluster_one:*
Once you configure a data view to use the cross-cluster search syntax, all searches and aggregations using that data view in Kibana take advantage of cross-cluster search.
For more information, refer to Excluding clusters or indicies from cross-cluster search.
When you delete a data view, you cannot recover the associated field formatters, runtime fields, source filters, and field popularity data. Deleting a data view does not remove any indices or data documents from Elasticsearch.
Deleting a data view breaks all visualizations, saved Discover sessions, and other saved objects that reference the data view.
- Go to the Data Views management page using the navigation menu or the global search field.
- Find the data view that you want to delete, and then click
 in the Actions column.
The browser caches data view field lists for increased performance. This is particularly impactful for data views with a high field count that span a large number of indices and clusters. The field list is updated every couple of minutes in typical Kibana usage. Alternatively, use the refresh button on the data view management detail page to get an updated field list. A force reload of Kibana has the same effect.
The field list may be impacted by changes in indices and user permissions.
To customize the data fields in your data view, you can add runtime fields to the existing documents, add scripted fields to compute data on the fly, and change how Kibana displays the data fields.
Runtime fields are fields that you add to documents after you’ve ingested your data, and are evaluated at query time. With runtime fields, you allow for a smaller index and faster ingest time so that you can use less resources and reduce your operating costs. You can use runtime fields anywhere data views are used, for example, you can explore runtime fields in Discover and create visualizations with runtime fields for your dashboard.
With runtime fields, you can:
- Define fields for a specific use case without modifying the underlying schema.
- Override the returned values from index fields.
- Start working on your data without understanding the structure.
- Add fields to existing documents without reindexing your data.
Runtime fields can impact Kibana performance. When you run a query, Elasticsearch uses the fields you index first to shorten the response time. Index the fields that you commonly search for and filter on, such as timestamp, then use runtime fields to limit the number of fields Elasticsearch uses to calculate values.
For detailed information on how to use runtime fields with Elasticsearch, refer to Runtime fields.
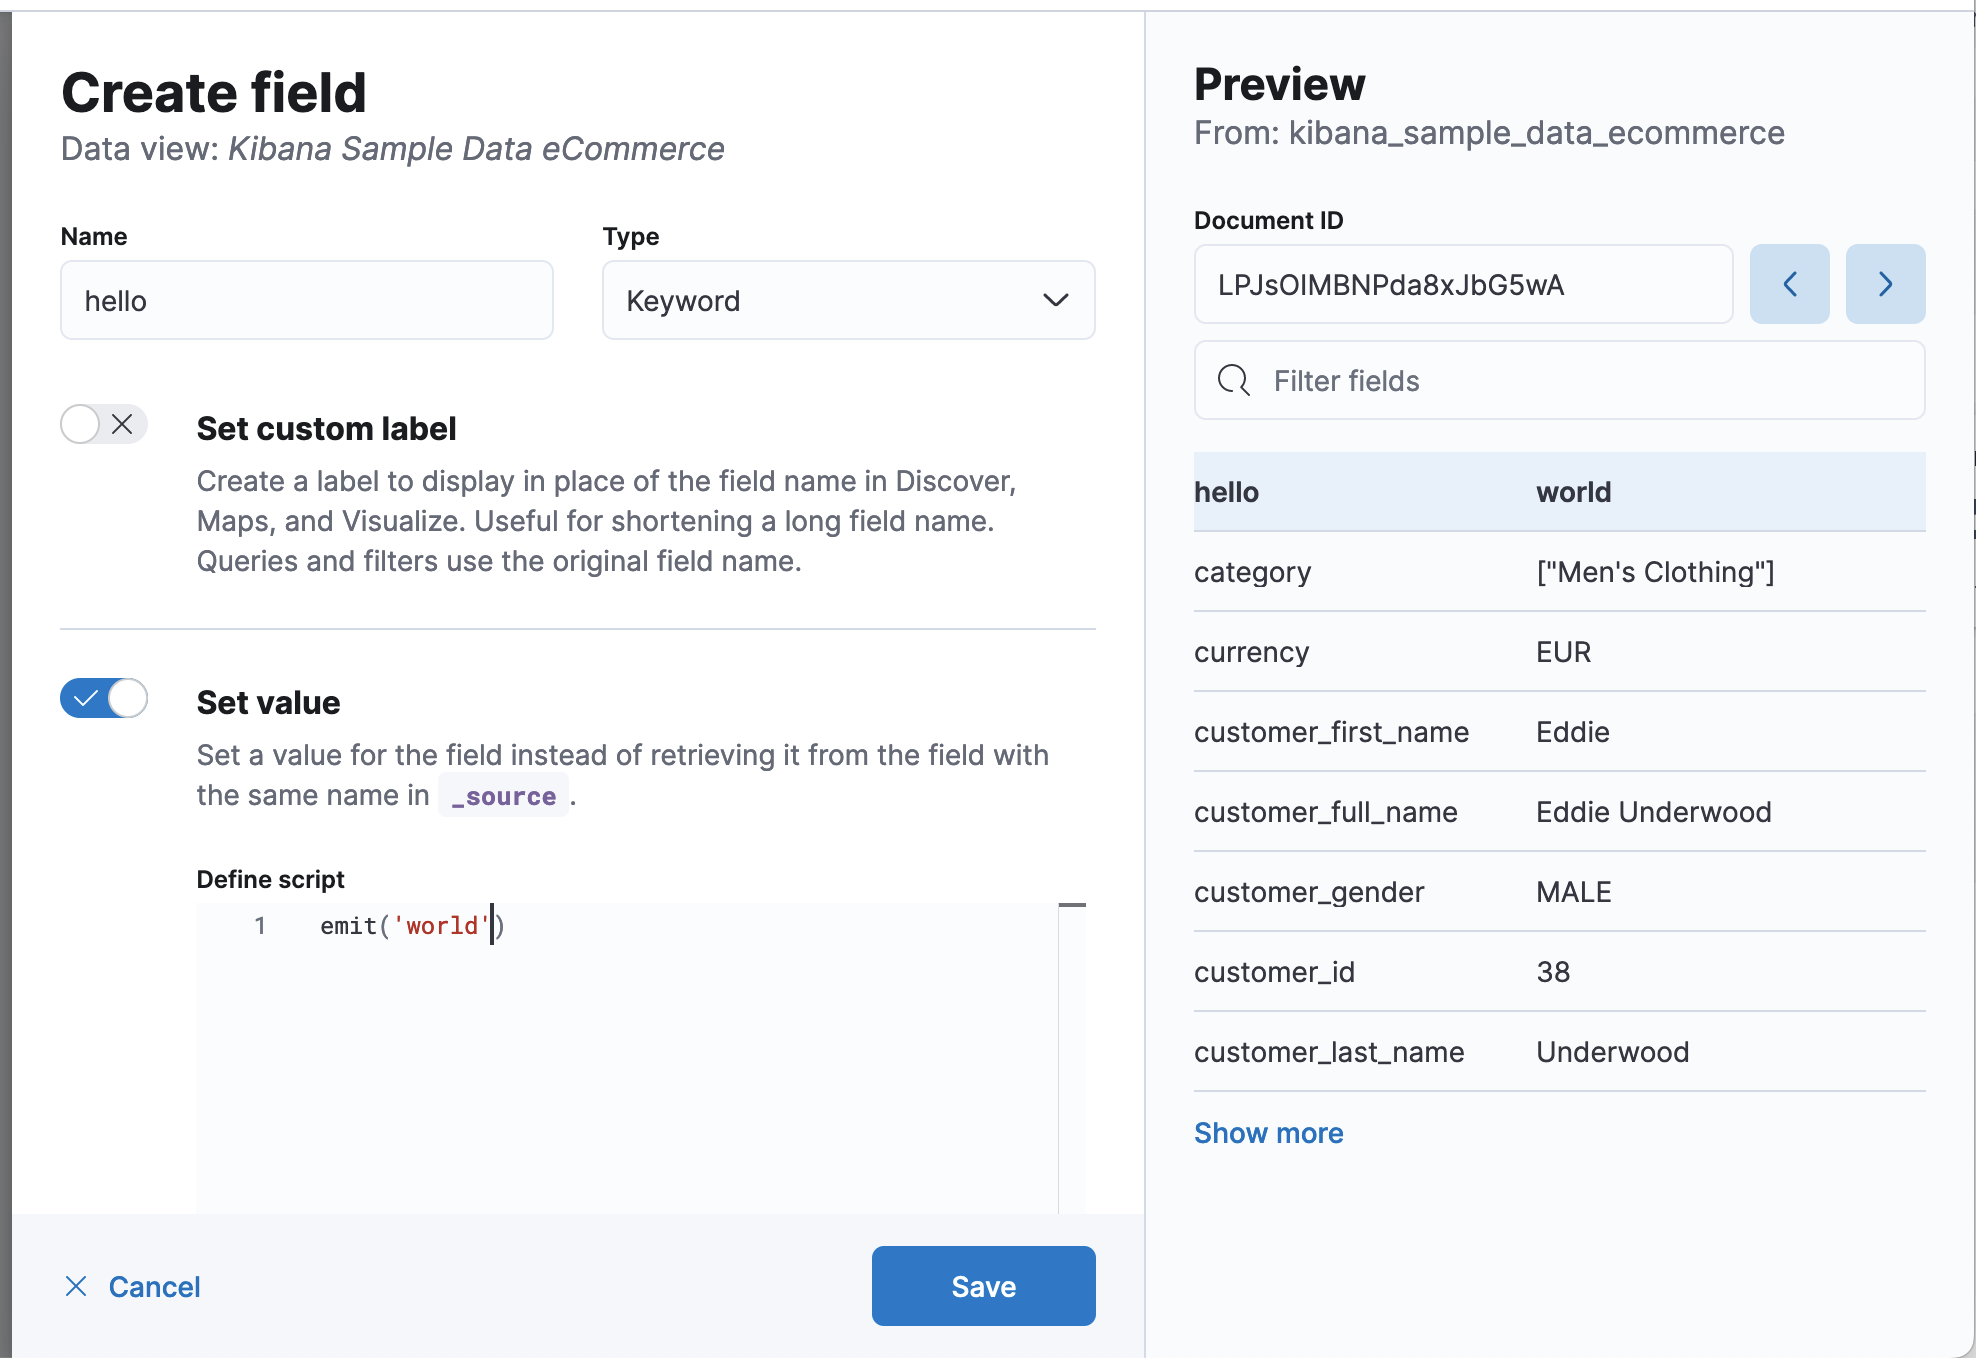
To add runtime fields to your data views, open the data view you want to change, then define the field values by emitting a single value using the Painless scripting language. You can also add runtime fields in Discover and Lens.
Go to the Data Views management page using the navigation menu or the global search field.
Select the data view that you want to add the runtime field to, then click Add field.
Enter the field Name, then select the Type.
Select Set custom label, then enter the label you want to display where the data view is used, such as Discover.
Select Set value, then define the script. The script must match the Type, or the data view fails anywhere it is used.
To help you define the script, use the Preview:
- To view the other available fields, use the Document ID arrows.
- To filter the fields list, enter the keyword in Filter fields.
- To pin frequently used fields to the top of the list, hover over the field, then click
 .
.
Click Create field.
Try the runtime field examples on your own using the Sample web logs data.
Return Hello World!:
emit("Hello World!");
Calculate kilobytes from bytes:
emit(doc['bytes'].value / 1024)
Return the string that appears after the last slash in the URL:
def path = doc["url.keyword"].value;
if (path != null) {
    int lastSlashIndex = path.lastIndexOf('/');
    if (lastSlashIndex > 0) {
        emit(path.substring(lastSlashIndex+1));
    return;
    }
}
emit("");
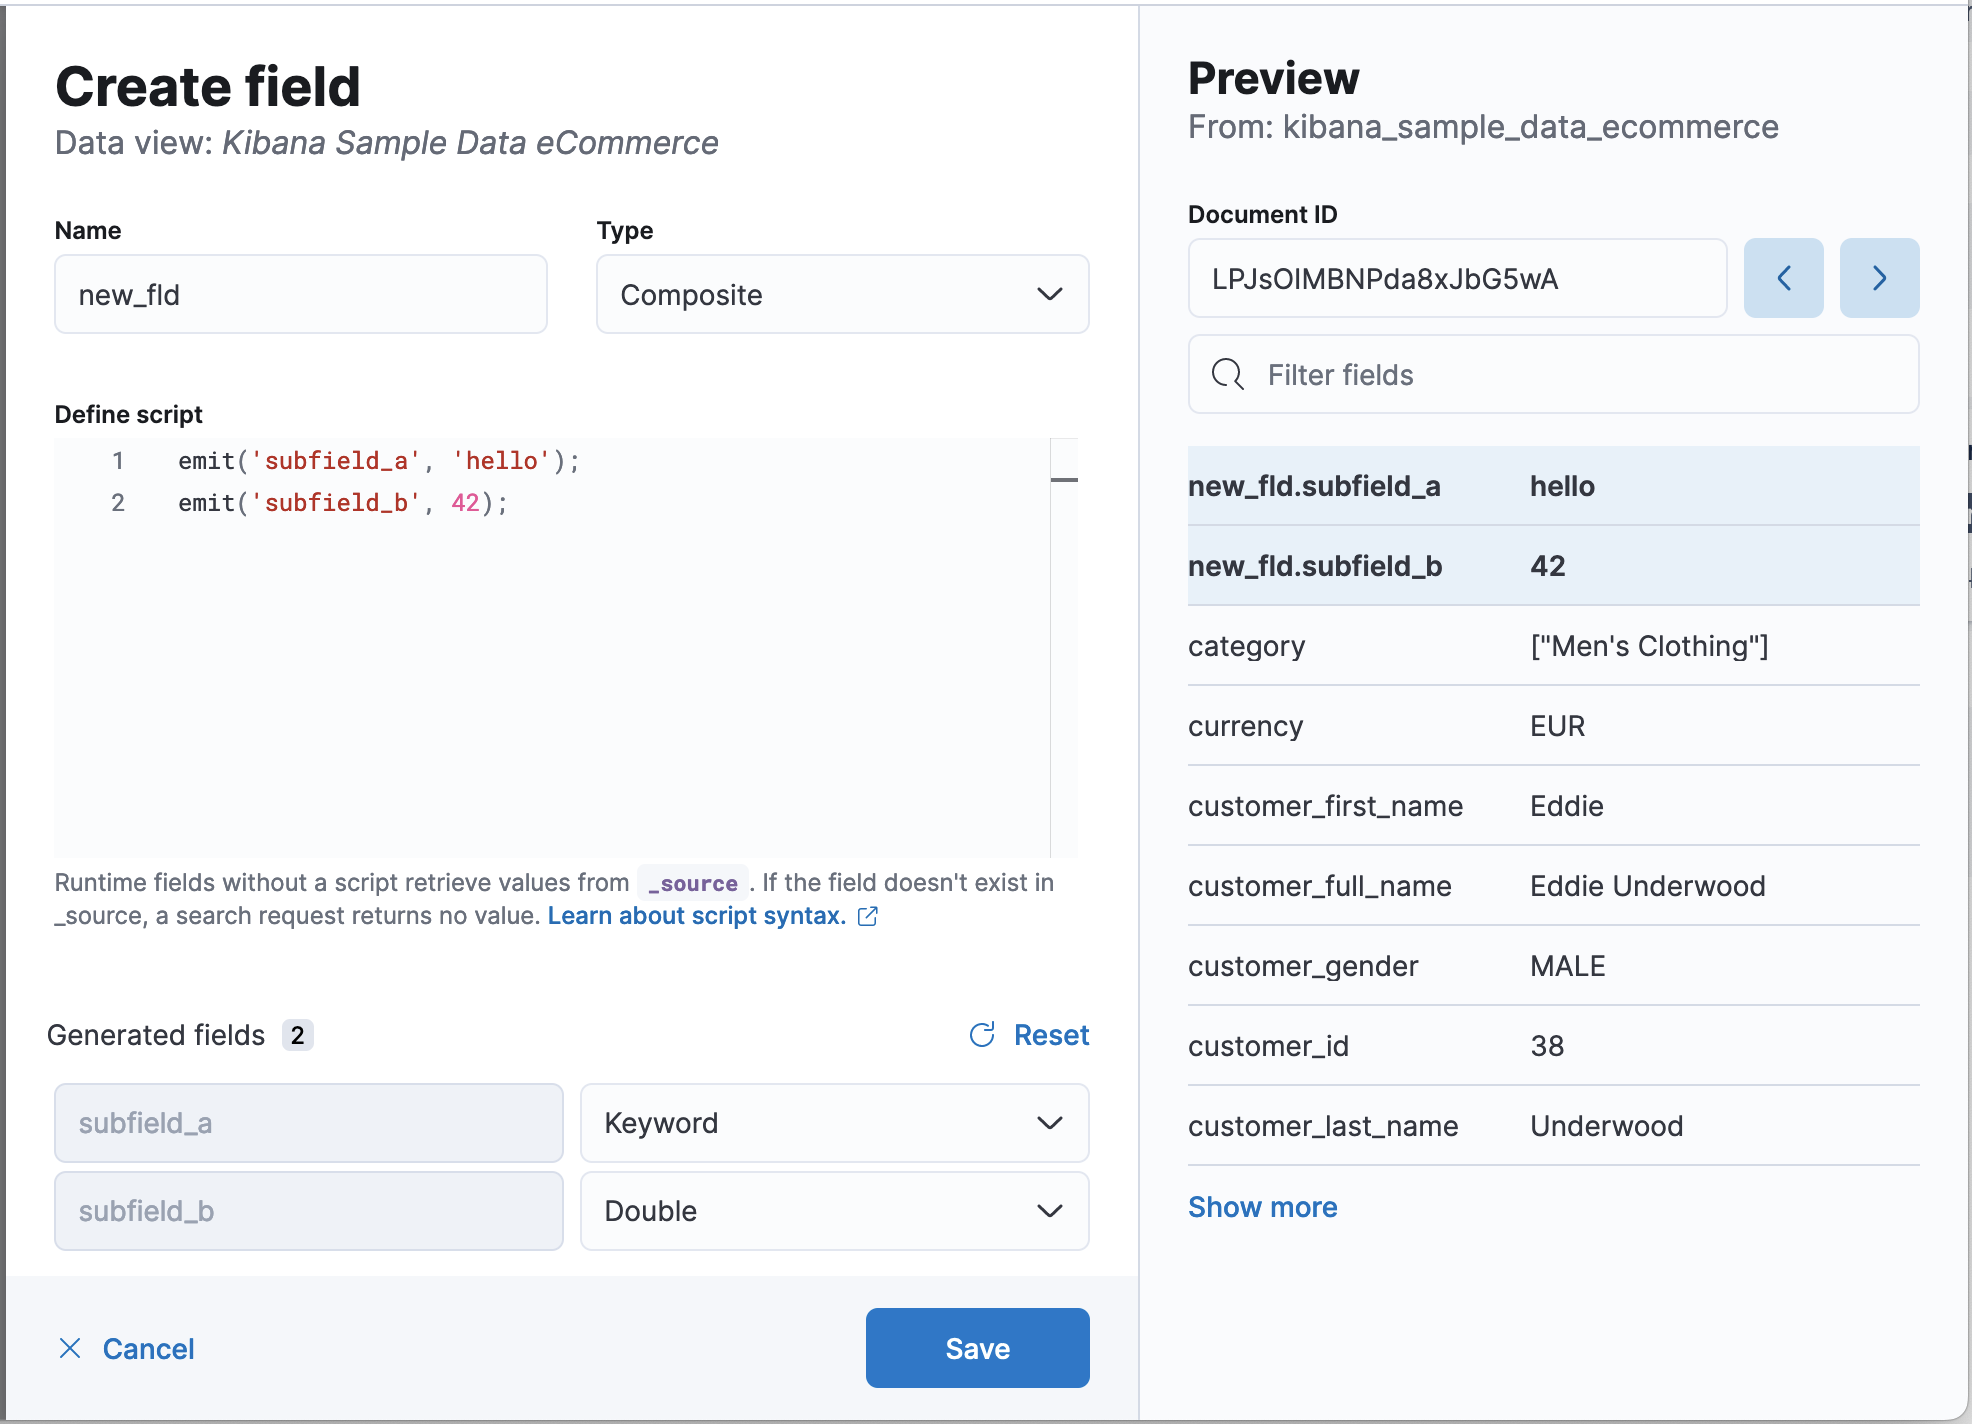
A single runtime field can also produce multiple subfields when the type Composite is selected. The script editor provides default types that can be customized for each subfields.
Return keyword and double type subfields. Note that the first argument for emit is the name of the subfield.
emit('subfield_a', 'Hello');
emit('subfield_b', 42);
Replace null values with None:
def source = doc['referer'].value;
if (source != null) {
  emit(source);
  return;
}
else {
  emit("None");
}
Specify the operating system condition:
def source = doc['machine.os.keyword'].value;
if (source != "") {
  emit(source);
}
else {
  emit("None");
}
Edit the settings for runtime fields, or remove runtime fields from data views.
- Go to the Data Views management page using the navigation menu or the global search field.
- Select the data view that contains the runtime field you want to manage, then open the runtime field edit options or delete the runtime field.
Use runtime fields instead of scripted fields. Runtime fields support Painless scripting and provide greater flexibility. You can also use the Elasticsearch Query Language (ES|QL) to compute values directly at query time.
Scripted fields compute data on the fly from the data in your Elasticsearch indices. The data is shown on the Discover tab as part of the document data, and you can use scripted fields in your visualizations. You query scripted fields with the Kibana query language, and can filter them using the filter bar. The scripted field values are computed at query time, so they aren’t indexed and cannot be searched using the Kibana default query language.
Computing data on the fly with scripted fields can be very resource intensive and can have a direct impact on Kibana performance. Keep in mind that there’s no built-in validation of a scripted field. If your scripts are buggy, you’ll get exceptions whenever you try to view the dynamically generated data.
When you define a scripted field in Kibana, you have a choice of the Lucene expressions or the Painless scripting language.
You can reference any single value numeric field in your expressions, for example:
doc['field_name'].value
For more information on scripted fields and additional examples, refer to Using Painless in Kibana scripted fields
The following code snippets demonstrate how an example scripted field called computed_values on the Kibana Sample Data Logs data view could be migrated to either a runtime field or an ES|QL query, highlighting the differences between each approach.
In the scripted field example, variables are created to track all values the script will need to access or return. Since scripted fields can only return a single value, the created variables must be returned together as an array at the end of the script.
def hour_of_day = $('@timestamp', ZonedDateTime.parse('1970-01-01T00:00:00Z')).getHour();
def time_of_day = '';

if (hour_of_day >= 22 || hour_of_day < 5)
  time_of_day = 'Night';
else if (hour_of_day < 12)
  time_of_day = 'Morning';
else if (hour_of_day < 18)
  time_of_day = 'Afternoon';
else
  time_of_day = 'Evening';

def response_int = Integer.parseInt($('response.keyword', '200'));
def response_category = '';

if (response_int < 200)
  response_category = 'Informational';
else if (response_int < 300)
  response_category = 'Successful';
else if (response_int < 400)
  response_category = 'Redirection';
else if (response_int < 500)
  response_category = 'Client Error';
else
  response_category = 'Server Error';

return [time_of_day, response_category];
Unlike scripted fields, runtime fields do not need to return a single value and can emit values at any point in the script, which will be combined and returned as a multi-value field. This allows for more flexibility in the script logic and removes the need to manually manage an array of values.
def hour_of_day = $('@timestamp', ZonedDateTime.parse('1970-01-01T00:00:00Z')).getHour();

if (hour_of_day >= 22 || hour_of_day < 5)
  emit('Night');
else if (hour_of_day < 12)
  emit('Morning');
else if (hour_of_day < 18)
  emit('Afternoon');
else
  emit('Evening');

def response_int = Integer.parseInt($('response.keyword', '200'));

if (response_int < 200)
  emit('Informational');
else if (response_int < 300)
  emit('Successful');
else if (response_int < 400)
  emit('Redirection');
else if (response_int < 500)
  emit('Client Error');
else
  emit('Server Error');
Alternatively, ES|QL can be used to skip the need for data view management entirely and simply compute the values you need at query time. ES|QL supports computing multiple field values in a single query, using computed values with its rich set of commands and functions, and even aggregations against computed values. This makes it an excellent solution for one-off queries and realtime data analysis.
FROM kibana_sample_data_logs
  | EVAL hour_of_day = DATE_EXTRACT("HOUR_OF_DAY", @timestamp)
  | EVAL time_of_day = CASE(
      hour_of_day >= 22 OR hour_of_day < 5, "Night",
      hour_of_day < 12, "Morning",
      hour_of_day < 18, "Afternoon",
      "Evening"
    )
  | EVAL response_int = TO_INTEGER(response)
  | EVAL response_category = CASE(
      response_int < 200, "Informational",
      response_int < 300, "Successful",
      response_int < 400, "Redirection",
      response_int < 500, "Client Error",
      "Server Error"
    )
  | EVAL computed_values = MV_APPEND(time_of_day, response_category)
  | DROP hour_of_day, time_of_day, response_int, response_category
The ability to create new scripted fields has been removed from the Data Views management page in 9.0. Existing scripted fields can still be edited or deleted, and the creation UI can be accessed by navigating directly to /app/management/kibana/dataViews/dataView/{{dataViewId}}/create-field, but we recommend migrating to runtime fields or ES|QL queries instead to prepare for removal.
- Go to the Data Views management page using the navigation menu or the global search field.
- Select the data view that contains the scripted field you want to manage.
- Select the Scripted fields tab, then open the scripted field edit options or delete the scripted field.
For more information about scripted fields in Elasticsearch, refer to Scripting.
Built-in validation is unsupported for scripted fields. When your scripts contain errors, you receive exceptions when you view the dynamically generated data.
Kibana uses the same field types as Elasticsearch, however, some Elasticsearch field types are unsupported in Kibana. To customize how Kibana displays data fields, use the formatting options.
- Go to the Data Views management page using the navigation menu or the global search field.
- Click the data view that contains the field you want to change.
- Find the field, then open the edit options (
 ).
). - Select Set custom label, then enter a Custom label for the field.
- Select Set format, then enter the Format for the field.
For numeric fields the default field formatters are based on the meta.unit field. The unit is associated with a time unit, percent, or byte. The convention for percents is to use value 1 to mean 100%.
String fields support String and Url formatters.
The String field formatter enables you to apply transforms to the field.
Supported transformations include:
- Convert to lowercase
- Convert to uppercase
- Convert to title case
- Apply the short dots transformation, which replaces the content before the
.character with the first character of the content. For example:
- Original
- Becomes
com.organizations.project.ClassName-
c.o.p.ClassName- Base64 decode
- URL param decode
You can specify the following types to the Url field formatter:
- Link — Converts the contents of the field into an URL. You can specify the width and height of the image, while keeping the aspect ratio. When the image is smaller than the specified parameters, the image is unable to upscale.
- Image — Specifies the image directory.
- Audio — Specify the audio directory.
To customize URL field formats, use templates. An URL template enables you to add values to a partial URL. To add the contents of the field to a fixed URL, use the {{value}} string.
For example, when:
- A field contains a user ID
- A field uses the
Urlfield formatter - The URI template is
http://company.net/profiles?user_id={{{value}}}
The resulting URL replaces {{value}} with the user ID from the field.
The {{value}} template string URL-encodes the contents of the field. When a field encoded into a URL contains non-ASCII characters, the characters are replaced with a % character and the appropriate hexadecimal code. For example, field contents users/admin result in the URL template adding users%2Fadmin.
When the formatter type is Image, the {{value}} template string specifies the name of an image at the specified URI.
When the formatter type is Audio, the {{value}} template string specifies the name of an audio file at the specified URI.
To pass unescaped values directly to the URL, use the {{rawValue}} string.
A Label template enables you to specify a text string that appears instead of the raw URL. You can use the {{value}} template string normally in label templates. You can also use the {{url}} template string to display the formatted URL.
Date fields support Date, String, and Url formatters.
The Date formatter enables you to choose the display format of date stamps using the moment.js standard format definitions.
The String field formatter enables you to apply transforms to the field.
Supported transformations include:
- Convert to lowercase
- Convert to uppercase
- Convert to title case
- Apply the short dots transformation, which replaces the content before the
.character with the first character of the content. For example:
- Original
- Becomes
com.organizations.project.ClassName-
c.o.p.ClassName- Base64 decode
- URL param decode
You can specify the following types to the Url field formatter:
- Link — Converts the contents of the field into an URL. You can specify the width and height of the image, while keeping the aspect ratio. When the image is smaller than the specified parameters, the image is unable to upscale.
- Image — Specifies the image directory.
- Audio — Specify the audio directory.
To customize URL field formats, use templates. An URL template enables you to add values to a partial URL. To add the contents of the field to a fixed URL, use the {{value}} string.
For example, when:
- A field contains a user ID
- A field uses the
Urlfield formatter - The URI template is
http://company.net/profiles?user_id={{{value}}}
The resulting URL replaces {{value}} with the user ID from the field.
The {{value}} template string URL-encodes the contents of the field. When a field encoded into a URL contains non-ASCII characters, the characters are replaced with a % character and the appropriate hexadecimal code. For example, field contents users/admin result in the URL template adding users%2Fadmin.
When the formatter type is Image, the {{value}} template string specifies the name of an image at the specified URI.
When the formatter type is Audio, the {{value}} template string specifies the name of an audio file at the specified URI.
To pass unescaped values directly to the URL, use the {{rawValue}} string.
A Label template enables you to specify a text string that appears instead of the raw URL. You can use the {{value}} template string normally in label templates. You can also use the {{url}} template string to display the formatted URL.
Geographic point fields support the String formatter.
The String field formatter enables you to apply transforms to the field.
Supported transformations include:
- Convert to lowercase
- Convert to uppercase
- Convert to title case
- Apply the short dots transformation, which replaces the content before the
.character with the first character of the content. For example:
- Original
- Becomes
com.organizations.project.ClassName-
c.o.p.ClassName- Base64 decode
- URL param decode
Numeric fields support Bytes, Color, Duration, Histogram, Number, Percentage, String, and Url formatters.
The Bytes, Number, and Percentage formatters enable you to choose the display formats of numbers in the field using the Elastic numeral pattern syntax that Kibana maintains.
The Histogram formatter is used only for the histogram field type. When you use the Histogram formatter, you can apply the Bytes, Number, or Percentage format to aggregated data.
You can specify the following types to the Url field formatter:
- Link — Converts the contents of the field into an URL. You can specify the width and height of the image, while keeping the aspect ratio. When the image is smaller than the specified parameters, the image is unable to upscale.
- Image — Specifies the image directory.
- Audio — Specify the audio directory.
To customize URL field formats, use templates. An URL template enables you to add values to a partial URL. To add the contents of the field to a fixed URL, use the {{value}} string.
For example, when:
- A field contains a user ID
- A field uses the
Urlfield formatter - The URI template is
http://company.net/profiles?user_id={{{value}}}
The resulting URL replaces {{value}} with the user ID from the field.
The {{value}} template string URL-encodes the contents of the field. When a field encoded into a URL contains non-ASCII characters, the characters are replaced with a % character and the appropriate hexadecimal code. For example, field contents users/admin result in the URL template adding users%2Fadmin.
When the formatter type is Image, the {{value}} template string specifies the name of an image at the specified URI.
When the formatter type is Audio, the {{value}} template string specifies the name of an audio file at the specified URI.
To pass unescaped values directly to the URL, use the {{rawValue}} string.
A Label template enables you to specify a text string that appears instead of the raw URL. You can use the {{value}} template string normally in label templates. You can also use the {{url}} template string to display the formatted URL.
The String field formatter enables you to apply transforms to the field.
Supported transformations include:
- Convert to lowercase
- Convert to uppercase
- Convert to title case
- Apply the short dots transformation, which replaces the content before the
.character with the first character of the content. For example:
- Original
- Becomes
com.organizations.project.ClassName-
c.o.p.ClassName- Base64 decode
- URL param decode
The Duration field formatter displays the numeric value of a field in the following increments:
- Picoseconds
- Nanoseconds
- Microseconds
- Milliseconds
- Seconds
- Minutes
- Hours
- Days
- Weeks
- Months
- Years
You can specify these increments with up to 20 decimal places for input and output formats.
The Color field formatter enables you to specify colors with ranges of values for a number field.
When you select the Color formatter, click Add Color, then specify the Range, Text color, and Background color.